C
Qt Quick Ultralite 层示例
演示了如何在 Qt Quick Ultralite 中使用层。
概述
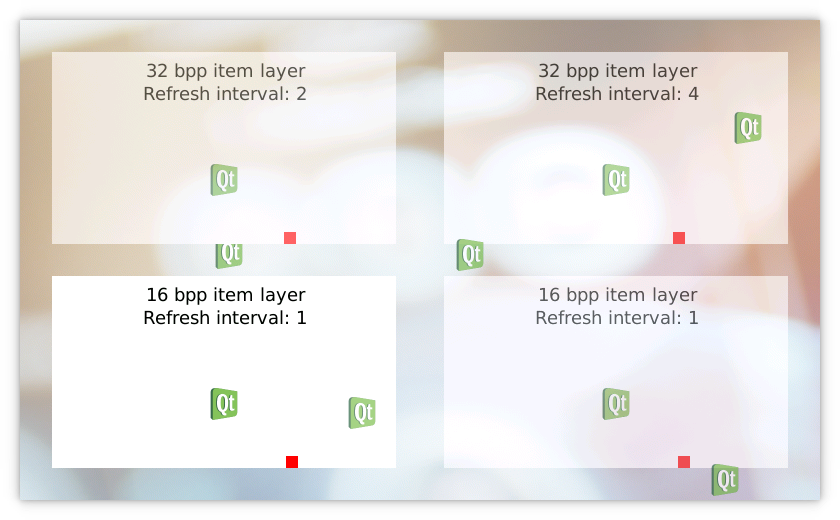
该示例展示了如何使用 SpriteLayer、ItemLayer 和 ImageLayer 创建一个应用程序。它包含三个页面
- Layers 定义了主要的用户界面,请参见 layers.qml。
- 动画项层定义了单个白色矩形的内容,其中包含文本、Qt 标志以及用于演示动画的移动矩形,请参见 AnimatingItemLayer.qml。
- 移动项层定义了移动 Qt 标志的动画,请参见 MovingImageLayer.qml。

目标平台
项目结构
层示例由六个文件组成,CMakeLists.txt、layers.qml、MovingImageLayer.qml、AnimatingItemLayer.qml、background-big.png 和 qt-logo.png。
CMake 项目文件包含一个基本的构建脚本。
layers.qml 展示了如何使用 SpriteLayer。 MovingImageLayer.qml 用于演示 ImageLayer 的使用,而 AnimatingItemLayer.qml 演示了项层的使用。
项目包含两个图像 background-big.png 和 qt-logo.png。
CMake 项目文件
CMake 项目文件使用一个 QmlProject 配置,将 background-big.png 的颜色深度设置为 16 bpp,用于演示如何在 32 bpp 屏幕上混合 16 bpp 的图像。
...
        ImageFiles {
                files: [
                        "background-big.png"
                ]
                MCU.resourceImagePixelFormat: "RGB565"
        }
...
层
layers.qml 文件描述了主要用户界面。
创建了三个带有文本和图像的白色矩形,用于分隔层。每个矩形都有一个不同的 Z 值用于定义堆叠顺序,以及一个不同的刷新间隔用于定义层内容更新的频率。
- SpriteLayer(ID 为 spriteLayer32bpp)创建六个移动的 Qt 标志,展示了如何使用 Z 值定义每个层的堆叠顺序。SpriteLayer 可包含多个图像和项层,这些被称为精灵或子层。
- ItemLayer(ID为bpp32layer)演示了带有不同刷新间隔的项目渲染。在这种情况下,红色框在每四次刷新间隔中移动。渲染提示是一种让后端选择适当的层实现的方法,当启用某些提示时,可能使用不同的渲染方法。在这个例子中,我们向平台提供提示以优化大小而不是优化速度。
- SpriteLayer(ID为spriteLayer16bpp)演示了在32位屏幕上混合16位背景图像和ItemLayer及其项目。
import QtQuick 2.15
import QtQuickUltralite.Layers 2.0

ApplicationScreens {
    Screen {
        id: screen
        ...
        AnimatingItemLayer {
            id: bpp32layer
            z: 2
            ...
            renderingHints: ItemLayer.OptimizeForSize
            refreshInterval: 4
            colorDepth: 32
            opacity: 0.6
        }

        SpriteLayer {
            id: spriteLayer32bpp
            z: 4
            ...
            AnimatingItemLayer {
                z: 2
                ...
            }

            Repeater {
                model: 6
                MovingImageLayer {
                    z: 1
                    container: spriteLayer32bpp
                    source: "qt-logo.png"
                }
            }
        }

        SpriteLayer {
            id: spriteLayer16bpp
            z: 0
            ...
            ImageLayer {
                id: background
                z: 0
                anchors.centerIn: parent
                source: "background-big.png"
            }

            AnimatingItemLayer {
                z: 1
                ...
                colorDepth: 16
                depth: ItemLayer.Bpp16
            }
        }

        AnimatingItemLayer {
            depth: ItemLayer.Bpp16Alpha
            z: 1
            width: screen.boxWidth
            height: screen.boxHeight

            anchors.right: spriteLayer16bpp.right
            anchors.bottom: spriteLayer16bpp.bottom
            anchors.margins: screen.marginWidth

            colorDepth: 16
            opacity: 0.6
        }
    }
AnimatingItemLayer
AnimatingItemLayer.qml创建一个单ItemLayer,其中包含白色矩形、文本、Qt标志和移动的红色框。ItemLayer是一个可以包含动态Qt Quick Ultralite项目的层。AnimatingItemLayer使用此示例中的colorDepth属性设置ItemLayer的颜色深度。
import QtQuick 2.15
import QtQuickUltralite.Layers 2.0

ItemLayer {
    id: itemLayer

    property int colorDepth: 32
    property real t: 0

    depth: (colorDepth === 32) ? ItemLayer.Bpp32 : ItemLayer.Bpp16Alpha
    ...
    Rectangle {
        anchors.fill: parent
        color: "white"

        Rectangle {
            id: textBox
            ...
            Column {
                id: textColumn
                ...
                Text {
                    text: colorDepth + " bpp item layer"
                    ...
                }
                Text {
                    text: "Refresh interval: " + itemLayer.refreshInterval
                    ...
                }
            }
        }

        Image {
            ...
            source: "qt-logo.png"
        }

        Rectangle {
            ...
            color: "red"
        }
    }
}
MovingImageLayer
MovingImageLayer.qml创建单ImageLayer并定义其动画。
import QtQuick 2.15
import QtQuickUltralite.Layers 2.0

ImageLayer {
    id: root

    Component.onCompleted: {
        root.x = 1 + Math.floor(Math.random() * (container.width - root.width - 2))
        root.y = 1 + Math.floor(Math.random() * (container.height - root.height - 2))
        ...
    }

    onTChanged: {
        root.x += vx
        root.y += vy
        ...
    }

    property real t: 0
    NumberAnimation on t {
        running: true
        loops: Animation.Infinite
        from: 0
        to: 1
    }
}
文件
- layers/AnimatingItemLayer.qml
- layers/CMakeLists.txt
- layers/MovingImageLayer.qml
- layers/layers.qml
- layers/mcu_layers.qmlproject
- layers/mcu_layers_background_nocaching.qmlproject
图像
在特定Qt许可下提供。
了解更多。
