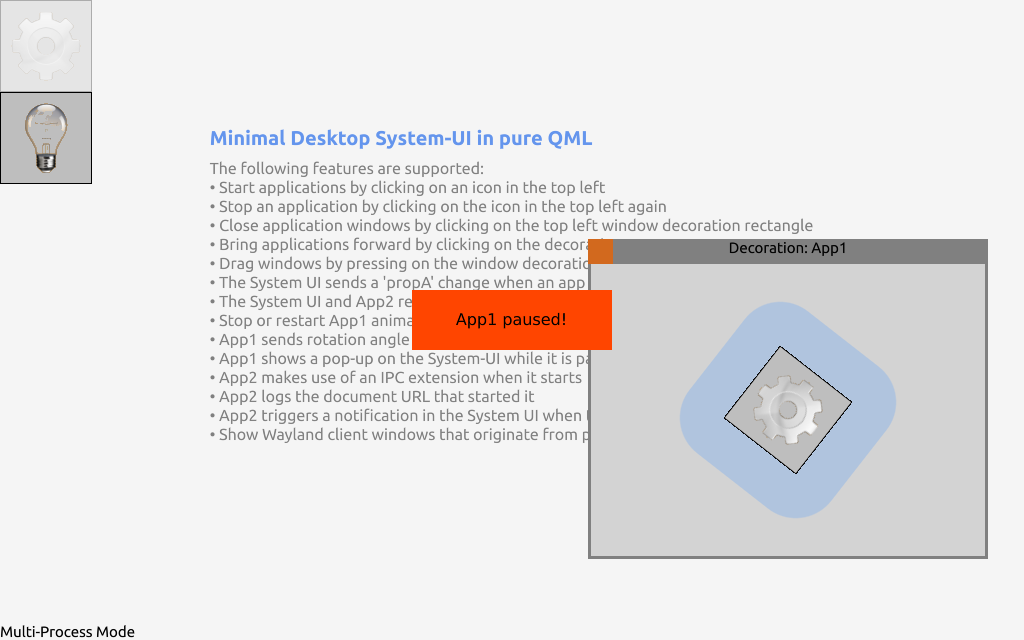
桌面系统UI示例
展示了使用纯QML实现的简易桌面系统UI。

简介
本示例以简单的方式展示了应用程序管理API,作为一个具有服务器端窗口装饰的经典桌面。示例更侧重于概念,而不是优雅或完整性。例如,没有进行错误检查。在此简易桌面系统中,某些功能仅打印调试消息。
以下功能受到支持
- 在左上角图标上点击以启动应用程序
- 再次在左上角的图标上点击以停止应用程序
- 通过点击右上角的窗口装饰矩形来关闭应用程序窗口
- 通过点击装饰来将应用程序置于前台
- 通过按住窗口装饰并移动它们来拖动窗口
- 系统UI在应用程序启动时发送一个'propA'更改
- 系统UI和App2通过调试消息对窗口属性更改做出响应
- 通过单击来停止或重启App1动画
- 当停止时,App1将旋转角度作为窗口属性发送到系统UI
- 当暂停时,App1在系统UI上显示一个弹出窗口
- App2在其启动时使用一个IPC扩展
- App2记录启动它的文档URL
- 当点击灯泡图标时,App2在小工具UI中触发一个通知
- 显示来自外部
appman进程的Wayland客户端窗口
注意:此示例可以以单进程或多进程模式运行。下面说明中,我们使用多进程及其对应的术语。术语客户端和应用程序;服务器和系统UI可以互换使用。系统UI包含合成和通用进程间通信(IPC)。
要启动示例,导航到minidesk文件夹,并运行以下命令
<path-to-appman-binary> -c am-config.yaml
通常将appman二进制文件(可执行文件)位于Qt安装的bin文件夹中。
说明
系统UI窗口
import QtQuick 2.11
import QtQuick.Window 2.11
import QtApplicationManager.SystemUI 2.0

Window {
    title: "Minidesk - QtApplicationManager Example"
    width: 1024
    height: 640
    color: "whitesmoke"

    Readme {}

    Text {
        anchors.bottom: parent.bottom
        text: (ApplicationManager.singleProcess ? "Single" : "Multi") + "-Process Mode"
    }
    ...
要访问应用程序管理API,必须导入QtApplicationManager.SystemUI模块。系统UI窗口具有固定大小和“whitesmoke”背景颜色。根元素可以是普通的项,如Rectangle,而不是Window。应用程序管理器会为您包裹它。在背景之上,我们显示包含可用功能信息的Readme元素。左下角有一个文本指示,说明应用程序管理器是在单进程模式或多进程模式下运行。
启动器
    // Application launcher panel
    Column {
        Repeater {
            model: ApplicationManager

            Image {
                source: icon
                opacity: isRunning ? 0.3 : 1.0

                MouseArea {
                    anchors.fill: parent
                    onClicked: isRunning ? application.stop() : application.start("documentUrl");
                }
            }
        }
    }
一个 重复器 提供了在系统用户界面左上角按列排列的应用程序图标;ApplicationManager 元素是模型。其中,ApplicationManager 提供了 icon 角色,该角色用作 Image 的源 URL。该 icon URL 定义在应用程序的 info.yaml 文件中。为了表示应用程序已启动,将相应的应用程序图标的透明度通过绑定到 isRunning 角色来降低。
单击应用程序图标会通过调用 ApplicationObject.start() 启动相应的应用程序。该函数可以通过在 ApplicationManager 模型中的 application 角色访问。两个应用程序都使用(可选的)文档 URL documentUrl 启动。如果该应用程序已经在运行,则调用 ApplicationObject.stop()。
系统用户界面中的应用程序窗口
    // System UI chrome for applications
    Repeater {
        model: ListModel { id: topLevelWindowsModel }

        delegate: Image {
            source: "chrome-bg.png"
            z: model.index

            Text {
                anchors.horizontalCenter: parent.horizontalCenter
                text: "Decoration: " + (model.window.application ? model.window.application.name("en")
                                                                 : 'External Application')
            }

            MouseArea {
                anchors.fill: parent
                drag.target: parent
                onPressed: topLevelWindowsModel.move(model.index, topLevelWindowsModel.count - 1, 1);
            }

            Rectangle {
                width: 25; height: 25
                color: "chocolate"

                MouseArea {
                    anchors.fill: parent
                    onClicked: model.window.close();
                }
            }

            WindowItem {
                anchors.fill: parent
                anchors.margins: 3
                anchors.topMargin: 25
                window: model.window

                Connections {
                    target: window
                    function onContentStateChanged() {
                        if (window.contentState === WindowObject.NoSurface)
                            topLevelWindowsModel.remove(model.index, 1);
                    }
                }
            }

            Component.onCompleted: {
                x = 300 + model.index * 50;
                y =  10 + model.index * 30;
            }
        }
    }
这个第二个 Repeater 为其代理人中的应用程序窗口提供了窗口边框。模型是一个纯 ListModel,其中填充了 窗口对象,正如由 WindowManager 创建的那样。下面的代码显示了填充此 ListModel 窗口角色的代码。目前让我们关注这个 Repeater 的代理人由哪些组成。
- 一个大部分透明的背景 Image。位置取决于
model.index,因此每个应用程序窗口都有一个不同的初始位置。 - 创建该窗口的应用程序名称,顶上带有“装饰”。该名称来自应用程序的 info.yaml 文件中定义的相关 ApplicationObject。
- 一个 MouseArea,用于拖放和提升窗口。该 MouseArea 填充整个窗口。《a href="https://doc.qt.ac.cn/qt-5/qml-qtquick-mousearea.html">MouseArea》放置在包含应用程序窗口的 MouseArea 上方,因此它将不会处理拖放。
- 右上角一个小巧的巧克力色的 Rectangle,用于关闭窗口(见 WindowObject.close())。由于我们的示例应用程序只有一个顶级窗口,关闭它将导致相应的应用程序退出。
- 核心:一个 WindowItem,用于在系统用户界面中渲染
WindowObject;类似于图像文件与 QML 的 Image 组件之间的关系。 - 最后,当应用程序(客户端)从应用程序(客户端)端破坏了其窗口时,从 ListModel 中删除行的代码 - 要么是因为它被关闭了,要么是因为它变得不可见,要么是应用程序本身退出或崩溃。这些情况中的任何一种都会导致 WindowObject 失去其表面。更高级的系统用户界面可以在 Animated Windows System UI 示例 中动画显示窗口的消失。
弹出式窗口
在系统用户界面中显示弹出式窗口实现了两种方法
- 通过客户端应用程序渲染的窗口
- 通过应用程序管理器提供的通知 API
这是相应的系统用户界面代码
    // System UI for a pop-up
    WindowItem {
        id: popUpContainer
        z: 9998
        width: 200; height: 60
        anchors.centerIn: parent

        Connections {
            target: popUpContainer.window
            function onContentStateChanged() {
                if (popUpContainer.window.contentState === WindowObject.NoSurface) {
                    popUpContainer.window = null;
                }
            }
        }
    }

    // System UI for a notification
    Text {
        z: 9999
        font.pixelSize: 46
        anchors.centerIn: parent
        text: NotificationManager.count > 0 ? NotificationManager.get(0).summary : ""
    }
客户端应用程序渲染
App1在其根元素ApplicationManagerWindow内部实例化了另一个ApplicationManagerWindow用于弹出窗口,如图所示
    ApplicationManagerWindow {
        id: popUp
        visible: false
        color: "orangered"

        Text {
            anchors.centerIn: parent
            text: "App1 paused!"
        }

        Component.onCompleted: setWindowProperty("type", "pop-up");
    }
使用ApplicationManagerWindow.setWindowProperty()方法设置一个自由选择的共享属性。这里我们选择了type: "pop-up"来表示该窗口应该以弹出窗口的形式显示。
在下方的WindowManager::onWindowAdded()信号处理器中,系统UI检查这个属性,并相应地以弹出窗口的方式处理窗口。
弹出窗口将在 System UI 代码中的popUpContainerWindowItem中被设定为内容窗口。为了演示目的,实现仅支持同时一个弹出窗口。这足够了,因为只有在App1的动画暂停时,它将显示一个弹出窗口。重要的是要理解,系统UI和应用程序之间必须就窗口映射达成一致。与可以自由拖动、有标题栏和边框的常规应用程序窗口相比,弹出窗口仅居中显示,没有任何装饰。注意在popUpContainer中如何处理WindowObject.contentStateChanged信号:当不再有任何表面相关联时,将释放窗口。这对于释放窗口对象使用的任何资源非常重要。注意,当直接使用WindowManager模型时,这会隐式执行。建议使用这种方法,因为它更加方便。
通知API使用
除了窗口属性方法外,还可以在应用程序(客户端)端使用应用程序管理器的通知 API 和在系统UI(服务器)端使用NotificationManager API。以下代码是在App2中点击螺栓图标时调用的
                var notification = ApplicationInterface.createNotification();
                notification.summary = "Let there be light!"
                notification.show();
App2创建一个新的通知元素,设置其摘要属性,并调用其上的显示。该调用增加了系统UI端的NotificationManager.count,并且随后将文本元素的文本属性设置为由第一个通知的summary字符串。为了简洁,示例中只展示了第一个通知。
WindowManager信号处理器
    // Handler for WindowManager signals
    Connections {
        target: WindowManager
        function onWindowAdded(window) {
            if (window.windowProperty("type") === "pop-up") {
                popUpContainer.window = window;
            } else {
                topLevelWindowsModel.append({"window": window});
                window.setWindowProperty("propA", 42);
            }
        }

        function onWindowPropertyChanged(window, name, value) {
            console.log("SystemUI: OnWindowPropertyChanged [" + window + "] - " + name + ": " + value);
        }
    }
这是系统UI的关键部分,其中将应用程序的窗口(表面)映射到系统UI中的WindowItem。当新应用程序窗口可用(可见)时,将调用onWindowAdded处理器。
只有App1的“弹出”ApplicationManagerWindow设置了用户定义的type属性。这样的窗口被放置在popUpContainerWindowItem中。所有其他窗口都没有type属性;它们被添加到topLevelWindowsModel中。此模型在上面的系统UI铬模型中使用。因此,作为onWindowAdded参数传递的窗口对象被设置为WindowItem的window属性(在Repeater的代理内)。
偶然的是,由应用程序管理器之外启动的进程中的任何Wayland客户端窗口也将显示,因为配置文件中设置了"flags/noSecurity: yes",例如在KDE的计算器中。
$ QT_WAYLAND_DISABLE_WINDOWDECORATION=1 WAYLAND_DISPLAY=qtam-wayland-0 kcalc -platform wayland
进程间通信(IPC)扩展
以下代码示例展示了如何使用ApplicationIPCInterface来定义一个IPC扩展。IPC接口必须在系统UI中定义,例如
    // IPC extension
    ApplicationIPCInterface {
        property double pi
        signal computed(string what)
        readonly property var _decltype_circumference: { "double": [ "double", "string" ] }
        function circumference(radius, thing) {
            console.log("SystemUI: circumference(" + radius + ", \"" + thing + "\") has been called");
            pi = 3.14;
            var circ = 2 * pi * radius;
            computed("circumference for " + thing);
            return circ;
        }

        Component.onCompleted: ApplicationIPCManager.registerInterface(this, "tld.minidesk.interface", {});
    }
在这里,定义了一个pi属性,以及一个computed信号和一个circumference函数。在用ApplicationIPCManager.registerInterface()注册此接口后,它可以由应用进程使用。
在应用方面,必须使用ApplicationInterfaceExtension类型。下面是如何App2利用这个接口扩展的例子
    ApplicationInterfaceExtension {
        id: extension
        name: "tld.minidesk.interface"

        onReadyChanged: console.log("App2: circumference function returned: "
                              + object.circumference(2.0, "plate") + ", it used pi = " + object.pi);
    }

    Connections {
        target: extension.object
        function onComputed(what) {
            console.log("App2: " + what + " has been computed");
        }
        function onPiChanged() {
            console.log("App2: pi changed: " + target.pi);
        }
    }
接口在准备好后立即使用。当然,接口也可以从其他地方访问。ApplicationInterfaceExtension.name必须与其在ApplicationIPCManager.registerInterface()中注册的名称相匹配。
应用程序终止
当应用程序通过ApplicationManager.stopApplication()从系统UI停止时,它会接收到ApplicationInterface.quit()信号。然后,应用程序可以做一些清理工作,接着必须像App2那样通过ApplicationInterface.acknowledgeQuit()进行确认。
    Connections {
        target: ApplicationInterface
        function onOpenDocument(documentUrl, mimeType) {
            console.log("App2: onOpenDocument - " + documentUrl);
        }
        function onQuit() {
            target.acknowledgeQuit();
        }
    }
请注意,App1的行不为良好:它未确认quit信号,因此将被应用管理器直接终止。
©2019 Luxoft Sweden AB。本文档内的文档贡献是各自所有者的版权。提供的文档根据自由软件基金会的发布,受GNU自由文档许可协议版本1.3的条款许可。Qt及其相关商标是芬兰的Qt公司及其它国家和地区的商标。所有其他商标归其所有者所有。