C
多屏启动器
演示了使用具有多屏支持的 Qt Android Apps Utils API 的用法。

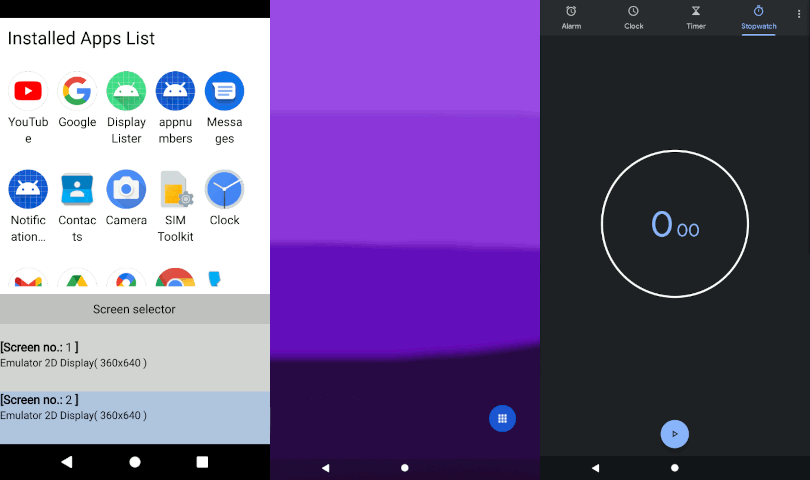
本例演示了如何使用 Qt Android Automotive Base 在 Android 或 Android Automotive 设备上显示已安装应用程序的列表,并如何在所选屏幕上运行特定应用程序。应用程序用户界面是通过使用 Qt Quick 创建的。
在启动应用程序时,除系统应用程序外,显示所有已安装应用程序的列表,如下所示:GridView。按下图标即可启动应用程序。在应用程序网格下方是可用屏幕的列表。所选应用程序将运行在列表中选定的屏幕上。
运行示例
要从 Qt Creator 中运行示例,打开 欢迎 模式并从 示例 中选择示例。有关更多信息,请参阅 Qt Creator:教程:构建和运行。
使用模型
已安装应用程序模型基于 C++ 中的 QAbstractListModel,并将其扩展到 QML。该模型可以像在 App Lister 示例中一样,在需要时与 ListView 或 GridView 一起使用。
在示例中,使用了 ListView 来显示可用的屏幕。模型如下附加到屏幕列表中
    ListView {
        id: screensListView

        anchors.left: parent.left
        anchors.right: parent.right
        anchors.bottom: parent.bottom
        height: 200

        model: Application.screens
现在,我们将列表的代理设置为显示可用屏幕信息,并选择首选屏幕。所选屏幕将作为运行应用程序的目标。
        id: screenItemDelegate

        Rectangle {
            id: screenItemRectangle

            required property QtObject modelData
            required property int index
            color: ListView.isCurrentItem ? "lightsteelblue" : "lightgrey"
            width: window.width
            height: 80 - window.marginSize
            Column {
                Text {
                    id: screenItemIdLabel

                    font.pointSize: 16
                    text: "<b>[Screen no.:</b> " + screenItemRectangle.index + " <b>]</b>"
                    horizontalAlignment: Text.AlignLeft
                    maximumLineCount: 1
                }
                Text {
                    id: screenItemNameLabel

                    font.pointSize: 14
                    text: screenItemRectangle.modelData.name + "( "
                          + screenItemRectangle.modelData.width + "x"
                          + screenItemRectangle.modelData.height + " )"
                }
            }
            MouseArea {
                id: screenItemArea

                anchors.fill: parent
                onClicked: {
                    screensListView.currentIndex = screenItemRectangle.index
                }
            }
        }
    }
使用 API 调用
在 ListView 代理内部,我们可以访问来自 Android Apps Utils 的一些信息,并使用它们来启动应用程序,例如
                        AndroidAppsUtils.startAppOnScreen(delegate.model.packageName, screen)
                    }
                }
            }

            Text {
                id: appName

                text: delegate.model.appName
                width: delegate.width
                anchors.top: appIcon.bottom
                anchors.topMargin: window.marginSize / 3
                horizontalAlignment: Text.AlignHCenter
                elide: Text.ElideRight
                wrapMode: Text.Wrap
                maximumLineCount: 2
            }
        }
    }

    ListView {
        id: screensListView

        anchors.left: parent.left
        anchors.right: parent.right
        anchors.bottom: parent.bottom
        height: 200

        model: Application.screens
        headerPositioning: ListView.OverlayHeader
        header: screensListHeader
        delegate: screenItemDelegate
        focus: true
        clip: true
    }

    Component {
        id: screensListHeader

        Rectangle {
            z: 2
            width: window.width
            height: 40
            visible: true
            color: "silver"
            Text {
                anchors.centerIn: parent
                text: qsTr("Screen selector")
            }
        }
    }

    Component {
        id: screenItemDelegate

        Rectangle {
            id: screenItemRectangle

            required property QtObject modelData
            required property int index
            color: ListView.isCurrentItem ? "lightsteelblue" : "lightgrey"
            width: window.width
            height: 80 - window.marginSize
            Column {
                Text {
                    id: screenItemIdLabel

                    font.pointSize: 16
                    text: "<b>[Screen no.:</b> " + screenItemRectangle.index + " <b>]</b>"
                    horizontalAlignment: Text.AlignLeft
                    maximumLineCount: 1
                }
                Text {
                    id: screenItemNameLabel

                    font.pointSize: 14
                    text: screenItemRectangle.modelData.name + "( "
                          + screenItemRectangle.modelData.width + "x"
                          + screenItemRectangle.modelData.height + " )"
                }
            }
            MouseArea {
                id: screenItemArea

                anchors.fill: parent
                onClicked: {
                    screensListView.currentIndex = screenItemRectangle.index
另请参阅 Qt for Android。
在特定的 Qt 许可证下提供。
了解更多信息。
