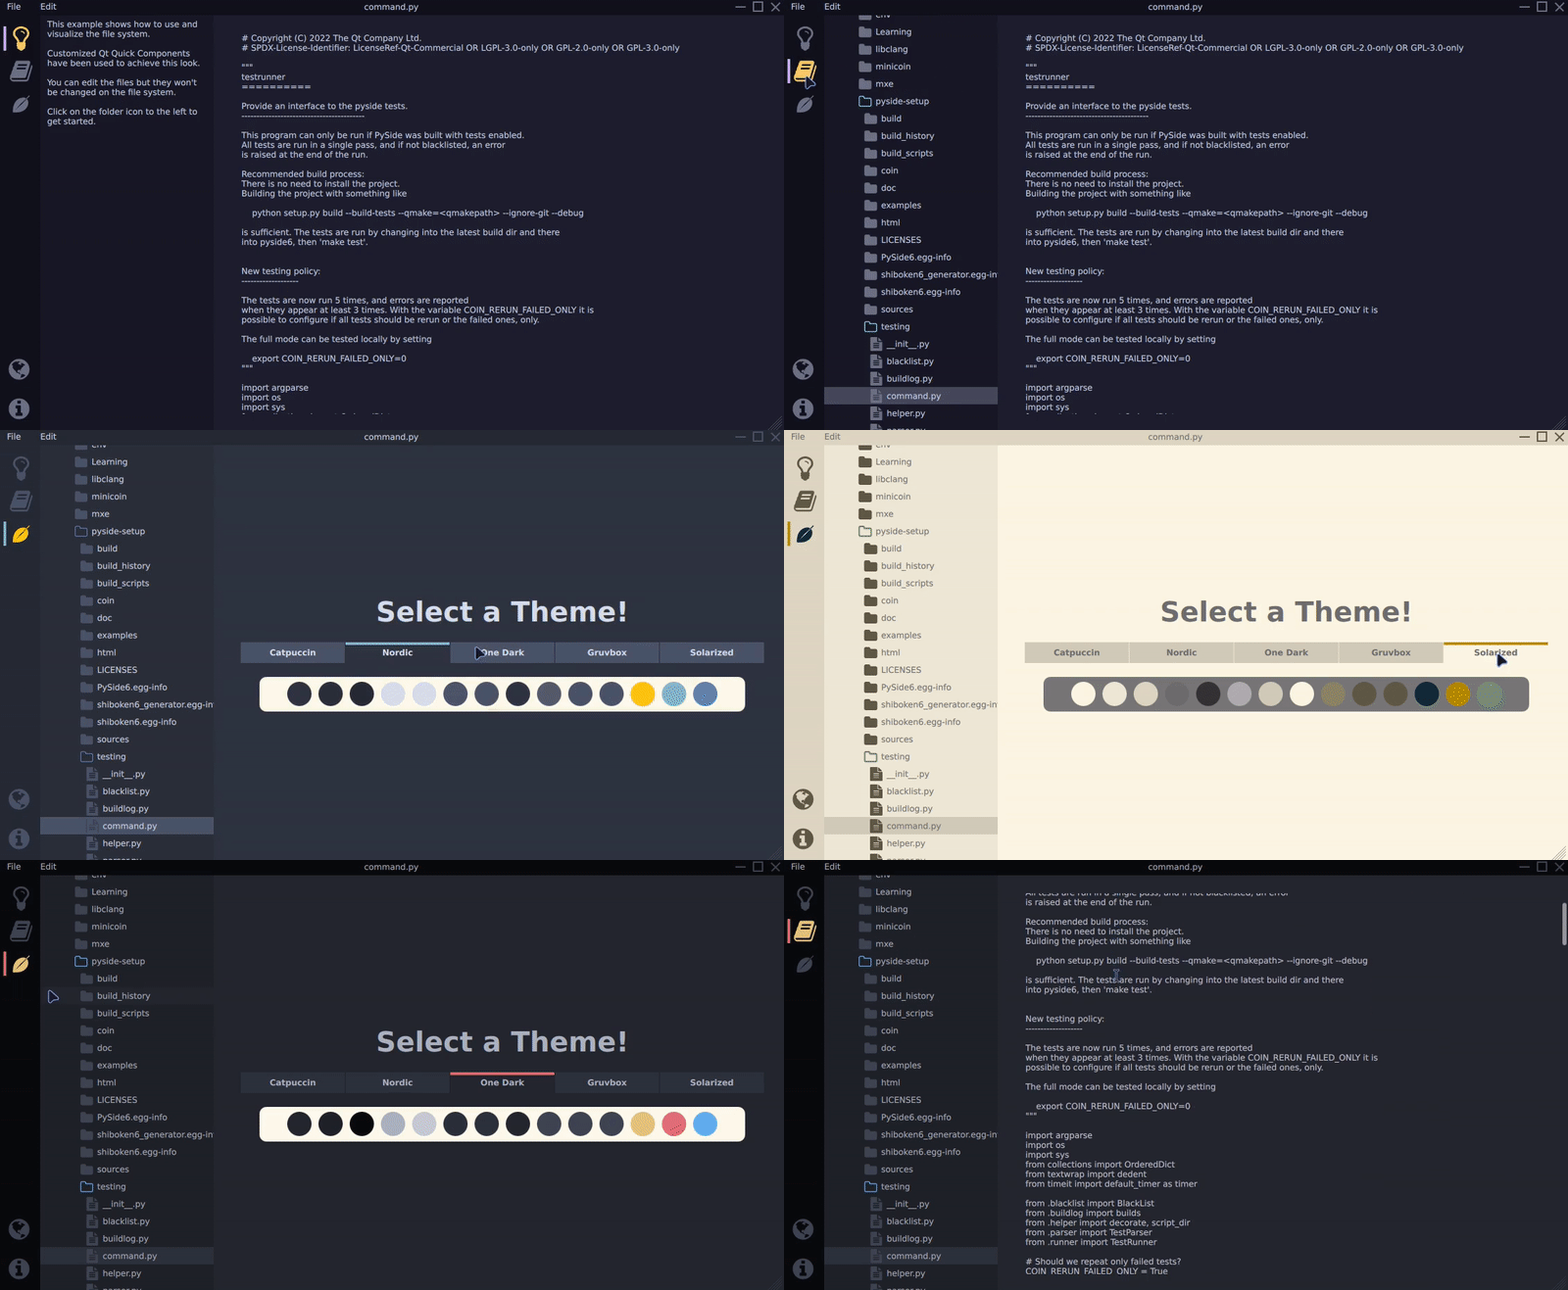
扩展文件系统资源管理器示例#
本教程展示了如何通过添加简单的方案管理器来扩展 文件系统资源管理器示例,这个特性将允许你在应用程序运行时切换颜色方案。颜色方案将声明在JSON格式下,并通过自定义Python-QML插件提供。

定义颜色方案#
为了定义您的颜色方案,您可以像原始示例一样使用相同的颜色名称,这样您就不必重命名每个实例。原始颜色定义在Colors.qml文件中,如下所示
 1QtObject {
 2    readonly property color background: "#23272E"
 3    readonly property color surface1: "#1E2227"
 4    readonly property color surface2: "#090A0C"
 5    readonly property color text: "#ABB2BF"
 6    readonly property color textFile: "#C5CAD3"
 7    readonly property color disabledText: "#454D5F"
 8    readonly property color selection: "#2C313A"
 9    readonly property color active: "#23272E"
10    readonly property color inactive: "#3E4452"
11    readonly property color folder: "#3D4451"
12    readonly property color icon: "#3D4451"
13    readonly property color iconIndicator: "#E5C07B"
14    readonly property color color1: "#E06B74"
15    readonly property color color2: "#62AEEF"
16}
“schemes.json”文件包含了颜色方案。为了开始实现这一功能,您可以使用Catppuccin方案。
 1  "Catppuccin": {
 2    "background": "#1E1E2E",
 3    "surface1": "#181825",
 4    "surface2": "#11111B",
 5    "text": "#CDD6F4",
 6    "textFile": "#CDD6F4",
 7    "disabledText": "#363659",
 8    "selection": "#45475A",
 9    "active": "#1E1E2E",
10    "inactive": "#6C7086",
11    "folder": "#6C7086",
12    "icon": "#6C7086",
13    "iconIndicator": "#FFCC66",
14    "color1": "#CBA6F7",
15    "color2": "#89DCEB"
16  },
除了“Catppuccin”颜色方案外,还实现了另外四种颜色方案:Nordic、One Dark、Gruvbox和Solarized。但是,您可以自由发挥创意并尝试您自己的方案。
要定义一个新颜色方案,复制上面的结构并提供您的颜色值
实现方案管理器#
在定义了颜色方案后,您可以实际实现方案管理器。该管理器将读取schemes.json文件,并在运行时提供QML绑定以切换方案。
为了实现方案管理器,创建一个Python-QML插件,将该SchemeManager对象暴露给QML。此对象将具有从schemes.json文件中加载颜色方案并在它们之间切换的方法。
在您的项目目录中创建一个名为schememanager.py的新Python文件。在此文件中,定义SchemeManager类
1QML_IMPORT_NAME = "FileSystemModule"
2QML_IMPORT_MAJOR_VERSION = 1
3
4
5@QmlNamedElement("Colors")
6@QmlSingleton
7class SchemeManager(QObject):
为了顺利整合到现有的代码中,将SchemeManager附加到已经存在、具有QML_IMPORT_NAME = "FileSystemModule"的同一QML模块中。此外,使用@QmlNamedElement装饰器,平稳过渡到使用自定义插件而不是Colors.qml文件。进行这些更改后,我们可以避免编辑之前所有的赋值。
import FileSystemModule
...
Rectangle {
    color: Colors.background
}
构造函数在应用程序启动时读取schemes.json文件一次,然后调用setTheme成员函数。
1    schemeChanged = Signal()
2
3    def __init__(self, parent=None):
4        super().__init__(parent=parent)
5        with open(Path(__file__).parent / "schemes.json", 'r') as f:
6            self.m_schemes = json.load(f)
7        self.m_activeScheme = {}
将SchemeManager作为可调用的QML元素命名为Colors添加到FileSystemModule中,现在在代码中可以不引入它即可访问该类,无需编辑之前的赋值。这反过来又会简化工作流程。
在定义JSON格式的方案并将SchemeManager类定义为QML下的可调用元素(命名为Colors)之后,还有两个剩余步骤可以将新的方案管理器完全整合到示例中。
第一步是在SchemeManager类中创建一个函数来从JSON文件加载颜色方案。第二步是使用与之前相同的名称,语法为Colors.<previousName>,使单个颜色可用于QML作为可赋值属性。
1        self.setScheme(self.m_activeSchemeName)
2
3    @Slot(str)
4    def setScheme(self, theme):
5        for k, v in self.m_schemes[theme].items():
6            self.m_activeScheme[k] = QColor.fromString(v)
setScheme方法负责在颜色方案之间切换。为了使此方法可在QML中访问,使用@Slot(str)装饰器,并指定它接受一个字符串作为输入参数。在这个方法中,我们使用来自JSON文件的色彩值填充字典。
注意:由于简单起见,没有执行其他错误检查。您可能想要验证json中包含的键。
1    @Property(QColor, notify=schemeChanged)
2    def background(self):
3        return self.m_activeScheme["background"]
为了使颜色属性在QML中可赋值,使用@Property装饰器。我们只需从字典中返回每个属性的相应颜色值。这个过程会为应用程序中使用的其他所有颜色重复进行。此时,应用程序应使用构造函数中活动的方案提供的颜色启动。
将方案切换添加到QML#
为了可视化当前方案并启用交互式方案切换,首先向Sidebar.qml文件中添加一个新条目。
1            // Shows the scheme switcher
2            SidebarEntry {
3                icon.source: "../icons/leaf.svg"
4                checkable: true
5
6                Layout.alignment: Qt.AlignHCenter
7            }
要更新应用程序的主要内容区域以显示ColorScheme,检查Sidebar按钮中的活动索引的逻辑需要进行修改。必要的更改将在Main.qml文件中进行
 1            // The main view that contains the editor or the scheme-manager.
 2            StackLayout {
 3                currentIndex: sidebar.currentTabIndex > 1 ? 1 : 0
 4
 5                SplitView.fillWidth: true
 6                SplitView.fillHeight: true
 7
 8                Editor {
 9                    id: editor
10                    showLineNumbers: root.showLineNumbers
11                    currentFilePath: root.currentFilePath
12                }
13
14                ColorScheme {
15                    Layout.fillWidth: true
16                    Layout.fillHeight: true
17                }
此外,更改应用程序的行为,使其具有两个StackLayouts:一个用于可调整大小的导航,另一个用于显示颜色方案切换功能的主要内容区域。这些更改也将应用到Main.qml文件中。
1                // selected buttons inside the sidebar.
2                StackLayout {
3                    anchors.fill: parent
4                    currentIndex: sidebar.currentTabIndex > 1 ? 1 : sidebar.currentTabIndex
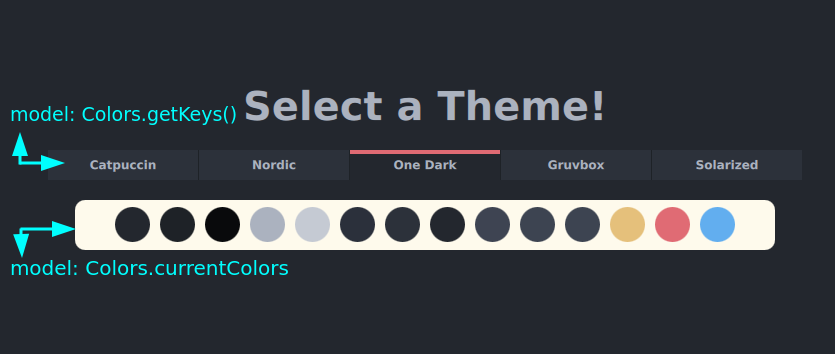
为了完成我们的实现,需要创建一个ColorScheme.qml文件。实现方法直接,遵循与原始示例相同的原理。如果有任何不清楚的地方,请参阅那里提供的文档。要显示所有颜色和方案名称,请使用Repeater。Repeater的模型由我们的scheme_manager.py文件作为QStringList提供。
 1        // Display all used colors inside a row
 2        Row {
 3            anchors.centerIn: parent
 4            spacing: 10
 5
 6            Repeater {
 7                model: Colors.currentColors
 8                Rectangle {
 9                    width: 35
10                    height: width
11                    radius: width / 2
12                    color: modelData
13                }
14            }
15        }
在更详细地检查代码时,你会发现有多种方法可以检索模型。getKeys()方法被定义为槽,因此调用时需要带括号。另一方面,currentColors模型被定义为属性,因此在QML中作为属性进行赋值。这样做的原因是,在颜色方案切换时可以接收通知,以便更新应用程序中显示的颜色。颜色方案的键只在实际应用程序启动时加载一次,不依赖于任何通知。
