C
自定义材料和效果
Qt 3D Studio 支持自定义 材料 和 层效果。这些是由文件格式包装的任意 GLSL 着色器,为艺术家提供了在 Studios 中调整属性的用户友好界面。
您可以为 Qt 3D Studio 编写自己的材料和效果,这需要您了解 OpenGL 着色语言 (GLSL)。
本文档解释了 .effect 和 .shader 文件的结构,但并没有说明如何在 GLSL 中编写着色器。
概述
.effect 和 .shader 的总体结构几乎相同。唯一的区别在于 <Effect> 和 <Material> 元素。
注意:此处显示的一些属性和元素是可选的(并且此示例未包含所有可能的属性)。
.effect 文件的结构。如上所述,同样的结构也适用于 .shader 文件,唯一的区别是您需要使用 <Material> 和 </Material> 而不是 <Effect> 和 </Effect>。
<Effect>
    <MetaData>
        <Property name="..."/>
        <Property name="..."/>
    </MetaData>
    <Shaders>
        <Shared>
        </Shared>
        <Shader>
            <FragmentShader>
            </FragmentShader>
        </Shader>
        <Shader>
            <VertexShader>
            </VertexShader>
        </Shader>
    </Shaders>
    <Passes>
        <Buffer name="..."/>
        <Pass>
            <DepthInput/>
        </Pass>
        <Pass>
            <BufferInput/>
        </Pass>
    </Passes>
</Effect>
元素
<Effect>
<Effect> 元素是文档的根元素。文档中的所有内容都需要被包装在 <Effect> 元素中。
<MetaData>
<MetaData> 元素可以包含零个或多个 <Property> 元素。该元素是可选的。
<Property>
<Property> 元素必须被包装在 <MetaData> 元素中。该元素描述了 效果 或 材料 的属性。大多数属性默认在 Studios 中可见和可调整。下面你可以看到示例中属性可能的外观。

property 元素可以有以下属性
| 属性 | 值 | 默认值 | 描述 |
|---|---|---|---|
| name | 文本 | - | 属性的内部名称(必须是唯一的标识符)。 |
| formalName | 文本 | name 属性。 | 在 检查器调色板 中显示的名称。 |
| description | 文本 | - | 在 检查器调色板 中显示的工具提示。 |
| type | PropertyType | Float | 属性的类型。 |
| min | Float | - | 数值类型的最大值。 |
| max | Float | - | 数值类型的最大值。 |
| default | 文本 | 0 或 ""。 | 默认值。 |
| animatable | 布尔型 | True | 设置属性的可动画性。请注意,不是所有类型都可以动画。 |
| hidden | 布尔型 | False | 设置在 检查器调色板 中的可见性。 |
| clamp | 文本 | 夹具 | 仅对 Texture 类型,将纹理设置为 clamp 或 repeat。 |
| filter | 文本 | 仅对 Texture 类型,设置纹理过滤器为 最近 或 线性。 | |
| list | 文本 | - | 创建 UI 下拉列表。 |
| category | 文本 | 用于将材料属性分组到单独的分类中。 注意:材料的必填字段。如果不添加此项,则属性将不会在检查器面板中显示。添加包含空字符串的分类还不够。 |
在<property>元素中,唯一的必填属性是name。
如果数值property同时指定了max和min属性,则在Studio中将以滑块的形式显示。否则,将以文本框的形式显示。
PropertyType
PropertyType设置元素的性质类型。以下性质类型有效
| PropertyType | 值 | 描述 | 示例 |
|---|---|---|---|
| 布尔型 | 真或假。 | 布尔值,将在Studio中显示为复选框。 | <Property type="Boolean" default="True"... |
| 颜色 | RGB标准化小数值。 | RGB颜色,将在Studio中显示为颜色选择工具。 | <Property type="Color" default="0.5 0.5 0.5"... |
| Float | Float | 数值,将在Studio中显示为文本框。 | <Property type="Float" default="0.5"... |
| Float2 | 两个浮点值。 | 两个数值,将在Studio中显示为两个文本框。 | <Property type="Float2" default="0.5 0.75"... |
| 字体 | 字体 | 将在Studio中显示为字体选择器。 | <Property type="Font" default="Arial"... |
| FontSize | 长 | 字体大小,将在Studio中显示为下拉菜单。 | <Property type="FontSize" default="36"... |
| Image2D | 图像路径 | 图像文件,将在Studio中显示为文件选择器。 | <Property type="Image2D" default=".\maps\bump-map.png"... |
| 纹理 | 图像路径 | 用作纹理的图像文件,将在Studio中显示为文件选择器。 | <Property type="Texture" default=".\maps\bump-map.png"... |
<showifequal>和<hideifequal>
可以基于其他属性的值通过使用<showifequal>和<hideifequal>元素来切换性质的UI可见性。
这些元素需要两个属性
| 属性 | 描述 |
|---|---|
| 属性 | 应影响可见性的name属性的值。 |
| 值 | 属性应更改可见性的value。 |
在下面的示例代码中,只有当opacity属性的值为0时,backgroundColor属性的调色板工具才会可见。
<property name="opacity" formalName="Opacity" type="Float" min="0" max="1" />
<property name="backgroundColor" formalName="Background color" type="color">
    <showifequal property="opacity" value="0" />
</property>在同一个<property>元素内,可以同时使用多个<showifequal>和<hideifequal>元素。在这些情况下,如果满足任何条件之一,可见性都会切换。在下面的示例代码中,backgroundColor属性的调色板工具将只有在opacity属性的值等于0或showAll属性的值为True时可见。
<property name="showAll" formalName="Show all" type="Boolean" />
<property name="opacity" formalName="Opacity" type="Float" min="0" max="1" />
<property name="backgroundColor" formalName="Background color" type="color">
    <showifequal property="opacity" value="0" />
    <showifequal property="showAll" value="True" />
</property>list属性
可以创建一个在Studio中显示为下拉菜单的性质。为了做到这一点,您需要为<property>元素指定name和list属性。list属性的值需要是逗号(,)或冒号(:)分隔的文本字符串。
在Studio中,这将以下拉菜单的形式显示,带有四个选项右、左、上和下。可以通过使用default属性指定默认值,如果没有指定,则将为空。
<property name="alignment" list="Right:Left:Up:Down" Default="Up"/>
请注意,您无需为属性指定type。
<Shaders>
<Shaders>元素必须包含至少一个<Shader>元素。
<Shader>
<Shader>元素必须包含一个<FragmentShader>元素或一个<VertexShader>元素。该<Shader>元素有一个属性,即name。它是可选的,应该包含类似标识符的名称。
<Shader name="tonemap">
<Passes>
<Passes> 元素可以包含 <Pass> 元素。
<Pass>
<Pass> 元素包含应用于通行证的不同属性。更多详情请参考特效参考。
<Depth>
自定义材质包含一个额外的 Depth 通行证元素,该元素不为特效提供。它决定了自定义着色器在此通行证期间使用的深度函数和遮罩。
元素属性包括
| 属性 | 值 | description |
|---|---|---|
| 函数 |
| 指定使用的深度函数。 |
| 遮罩 | 布尔值 | 指定是否写入深度。如果为 "true",则写入深度;如果为 "false",则不写入。 |
注意事项
材料
当创建具有多个属性的自定义材料时,使用类别将它们分开是一种好的做法。如果需要能够更改网格的材料,至少需要在 材料 类别中添加一个属性。这将把 材料类型 和 着色器 属性引入检查器调色板。
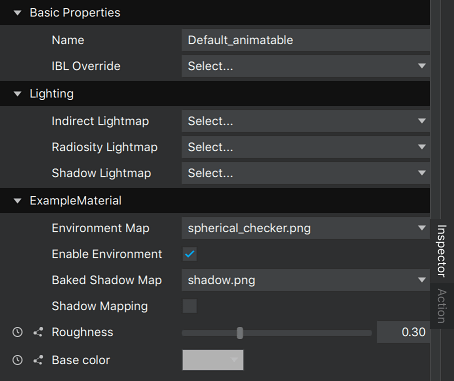
考虑以下元数据的自定义材料
<MetaData >
    <Property category="ExampleMaterial" formalName="Environment Map" name="uEnvironmentTexture" description="Environment texture for the material" type="Texture" filter="linear" minfilter="linearMipmapLinear" clamp="repeat" usage="environment" default="./maps/materials/spherical_checker.png"/>
    <Property category="ExampleMaterial" formalName="Enable Environment" name="uEnvironmentMappingEnabled" description="Enable environment mapping" type="Boolean" default="True"/>
    <Property category="ExampleMaterial" formalName="Baked Shadow Map" name="uBakedShadowTexture" description="Baked shadow texture for the material" type="Texture" filter="linear" minfilter="linearMipmapLinear" clamp="repeat" usage="shadow" default="./maps/materials/shadow.png"/>
    <Property category="ExampleMaterial" formalName="Shadow Mapping" name="uShadowMappingEnabled" description="Enable shadow mapping" type="Boolean" default="False"/>
    <Property category="ExampleMaterial" formalName="Roughness" name="roughness" type="Float" min="0.0" max="1.0" default="0.3" description="Roughness of the material.\n0 = fully specular\n1 = fully diffuse"/>
    <Property category="ExampleMaterial" formalName="Base color" name="base_color" type="Color" default="0.7 0.7 0.7" description="Color of the material"/>
</MetaData>
以及同一材料,定义为合理类别的材料,包括 材料
<MetaData >
    <Property category="Environment" formalName="Environment Map" name="uEnvironmentTexture" description="Environment texture for the material" type="Texture" filter="linear" minfilter="linearMipmapLinear" clamp="repeat" usage="environment" default="./maps/materials/spherical_checker.png"/>
    <Property category="Environment" formalName="Enable Environment" name="uEnvironmentMappingEnabled" description="Enable environment mapping" type="Boolean" default="True"/>
    <Property category="Shadow" formalName="Baked Shadow Map" name="uBakedShadowTexture" description="Baked shadow texture for the material" type="Texture" filter="linear" minfilter="linearMipmapLinear" clamp="repeat" usage="shadow" default="./maps/materials/shadow.png"/>
    <Property category="Shadow" formalName="Shadow Mapping" name="uShadowMappingEnabled" description="Enable shadow mapping" type="Boolean" default="False"/>
    <Property category="Material" formalName="Roughness" name="roughness" type="Float" min="0.0" max="1.0" default="0.3" description="Roughness of the material.\n0 = fully specular\n1 = fully diffuse"/>
    <Property category="Material" formalName="Base color" name="base_color" type="Color" default="0.7 0.7 0.7" description="Color of the material"/>
</MetaData>
第一种选项的结果是
而第二种选项的结果是

控制自定义属性
当自定义材料或特效中的某些属性需要运行时调整时,需要 setAttribute API。根据控制的属性,使用方法可能略有不同,因为自定义材料和特效中的所有属性都作为动态属性处理。
注意:自 2.8 版本起,自定义属性纹理使用图像,并且与标准材料纹理的控制方式相同。
控制标准材料中的纹理
<presentation id>.setAttribute("<element path to texture>", "sourcepath", "<path to image>");例如
myPresentation.setAttribute("Scene.Layer.Sphere.Default_animatable.diffusemap", "sourcepath", "../maps/myTexture.png");控制自定义材料中的纹理
<presentation id>.setAttribute("<element path to material>", "sourcepath", "<path to image>");使用具有以下元数据的材料
<MetaData >
    ...
    <Property name="diffuseTexture" type="Texture" category="Material" formalName="Diffuse texture"/>
    ...
</MetaData>
这是控制它的方法
myPresentation.setAttribute("Scene.Layer.Sphere.MyMaterial.diffuseTexture", "sourcepath", "../maps/myTexture.png");在某些 Qt 许可证下可用。
了解更多信息。