Qt Quick 3D - 快速球示例
演示如何使用 Quick3D 创建一个简单游戏。

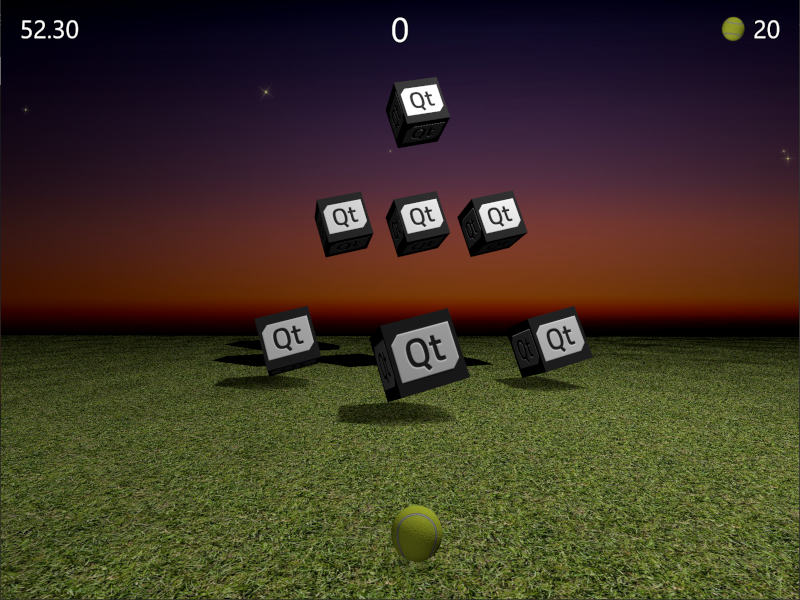
此示例演示如何结合 Qt Quick 和 Qt Quick 3D 创建一个简单的 3D 游戏。游戏的目标是通过扔球来击中目标箱子。根据击倒所有目标的速度和球数多少来给分。瞄准准,但要快!
源代码在一个单独的 QML 文件中,以强调这个例子是多么紧凑,考虑到它是一个可以完整玩的游戏。让我们先看看主要属性。这些都是相当自解释的,你可以轻易调整它们来看看它们如何影响游戏。
// Scaling helpper
readonly property real px: 0.2 + Math.min(width, height) / 800
// This is false until the first game has started
property bool playingStarted: false
// This is true whenever game is on
property bool gameOn: false
// Sizes of our 3D models
readonly property real ballSize: 40
readonly property real targetSize: 120
// Playing time in seconds
readonly property real gameTime: 60
property real currentTime: 0
// Amount of balls per game
readonly property int gameBalls: 20
property int currentBalls: 0
// Scores
property int score: 0
property int timeBonus: 0
property int ballsBonus: 0
游戏逻辑用 JavaScript 实现。《View3D》包含一个开始游戏的函数,该函数初始化所有需要的变量并创建关卡目标。它还包含一个计算游戏结束时最终得分的函数。
function createLevel1() {
    // Simple level of target items
    var level1 = [{ "x": 0, "y": 100, "z": -100, "points": 10 },
                  { "x": -300, "y": 100, "z": -400, "points": 10 },
                  { "x": 300, "y": 100, "z": -400, "points": 10 },
                  { "x": -200, "y": 400, "z": -600, "points": 20 },
                  { "x": 0, "y": 400, "z": -600, "points": 20 },
                  { "x": 200, "y": 400, "z": -600, "points": 20 },
                  { "x": 0, "y": 700, "z": -600, "points": 30 }];
    targetsNode.addTargets(level1);
}

function startGame() {
    ballModel.resetBall();
    targetsNode.resetTargets();
    createLevel1();
    score = timeBonus = ballsBonus = 0;
    currentBalls = gameBalls;
    gameOn = true;
    playingStarted = true;
}

function endGame() {
    if (targetsNode.currentTargets == 0) {
        // If we managed to get all targets down -> bonus points!
        timeBonus = mainWindow.currentTime;
        ballsBonus = currentBalls * 10;
    }
    gameOn = false;
}
视图还包含一个《PointLight》节点来照亮场景。它位于对象上方,并设置为投射阴影。注意,游戏结束后,亮度用于使游戏区域变暗。《ambientColor》属性用于软化光对比度,因为在没有它的情况下,物体的底部部分会非常暗。
PointLight {
    x: 400
    y: 1200
    castsShadow: true
    shadowMapQuality: Light.ShadowMapQualityHigh
    shadowFactor: 50
    quadraticFade: 2
    ambientColor: "#202020"
    brightness: mainWindow.gameOn ? 200 : 40
    Behavior on brightness {
        NumberAnimation {
            duration: 1000
            easing.type: Easing.InOutQuad
        }
    }
}
扔球使用 Qt Quick 《MouseArea》项,只在游戏进行中且球未移动时启用。
MouseArea {
    anchors.fill: parent
    enabled: mainWindow.gameOn && !ballModel.ballMoving
    onPressed: {
        ballModel.moveBall(mouseX, mouseY);
    }
    onPositionChanged: {
        ballModel.moveBall(mouseX, mouseY);
    }
    onReleased: {
        ballModel.throwBall();
    }
}
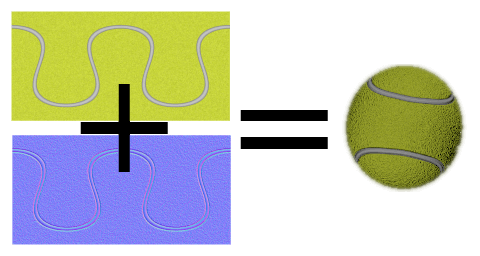
然后我们进入实际的 3D 模型。球模型是最大的,因为它包含球的行为逻辑、动画和击打检测。让我们首先看看球属性。球使用内置的球体模型,根据 ballSize 缩放。我们使用 DefaultMaterial,并带有 diffuseMap 和 normalMap 来创建网球外观。

Model {
    id: ballModel
    property real directionX: 0
    property real directionY: 0
    // How many ms the ball flies
    readonly property real speed: 2000
    readonly property real ballScale: mainWindow.ballSize / 100
    property var moves: []
    readonly property int maxMoves: 5
    readonly property bool ballMoving: ballAnimation.running

    source: "#Sphere"
    scale: Qt.vector3d(ballScale, ballScale, ballScale)

    materials: DefaultMaterial {
        diffuseMap: Texture {
            source: "images/ball.jpg"
        }
        normalMap: Texture {
            source: "images/ball_n.jpg"
        }
        bumpAmount: 1.0
    }
当鼠标移动或触摸屏滑动时,在松开球之前的 maxMoves 个位置存储到 moves 数组中。当用户松开球时,调用 throwBall(),该函数根据这些最新的位置计算球的方向,并开始动画化它。
function resetBall() {
    moves = [];
    x = 0;
    y = mainWindow.ballSize/2;
    z = 400;
}

function moveBall(posX, posY) {
    var pos = view3D.mapTo3DScene(Qt.vector3d(posX, posY, ballModel.z + mainWindow.ballSize));
    pos.y = Math.max(mainWindow.ballSize / 2, pos.y);
    var point = {"x": pos.x, "y": pos.y };
    moves.push(point);
    if (moves.length > maxMoves) moves.shift();
    // Apply position into ball model
    ballModel.x = pos.x;
    ballModel.y = pos.y;
}

function throwBall() {
    mainWindow.currentBalls--;
    var moveX = 0;
    var moveY = 0;
    if (moves.length >= 2) {
        var first = moves.shift();
        var last = moves.pop();
        moveX = last.x - first.x;
        moveY = last.y - first.y;
        if (moveY < 0) moveY = 0;
    }
    directionX = moveX * 20;
    directionY = moveY * 4;
    ballAnimation.start();
}
球的位置在各个轴向上独立动画化。这些动画使用之前分配的 directionX 和 directionY 来定义球移动到的位置,以及 speed 用于球的飞行时间。垂直位置有两个连续的动画,这样我们就可以使用缓动函数来模拟球的弹跳。当位置动画完成后,我们将检查是否还有球剩余或游戏应该结束。最后,我们也会动画化球体的旋转,这样用户就可以扔弧线球。
ParallelAnimation {
    id: ballAnimation
    running: false
    // Move forward
    NumberAnimation {
        target: ballModel
        property: "z"
        duration: ballModel.speed
        to: -ballModel.directionY * 5
        easing.type: Easing.OutQuad
    }
    // Move up & down with a bounce
    SequentialAnimation {
        NumberAnimation {
            target: ballModel
            property: "y"
            duration: ballModel.speed * (1 / 3)
            to: ballModel.y + ballModel.directionY
            easing.type: Easing.OutQuad
        }
        NumberAnimation {
            target: ballModel
            property: "y"
            duration: ballModel.speed * (2 / 3)
            to: mainWindow.ballSize / 4
            easing.type: Easing.OutBounce
        }
    }
    // Move sideways
    NumberAnimation {
        target: ballModel
        property: "x"
        duration: ballModel.speed
        to: ballModel.x + ballModel.directionX
    }

    onFinished: {
        if (mainWindow.currentBalls <= 0)
            view3D.endGame();
        ballModel.resetBall();
    }
}

NumberAnimation on eulerRotation.z {
    running: ballModel.ballMoving
    loops: Animation.Infinite
    from: ballModel.directionX < 0 ? 0 : 720
    to: 360
    duration: 10000 / (2 + Math.abs(ballModel.directionX * 0.05))
}
游戏的重要部分是检测球何时击中目标。每当球在z方向上发生位置变化时,就会遍历targets数组,使用fuzzyEquals()检测球是否触碰了它们中的任何一个。一旦检测到击中,我们会调用目标的hit()函数并检查所有目标是否都被击中。
onZChanged: {
    // Loop through target items and detect collisions
    var hitMargin = mainWindow.ballSize / 2 + mainWindow.targetSize / 2;
    for (var i = 0; i < targetsNode.targets.length; ++i) {
        var target = targetsNode.targets[i];
        var targetPos = target.scenePosition;
        var hit = ballModel.scenePosition.fuzzyEquals(targetPos, hitMargin);
        if (hit) {
            target.hit();
            if (targetsNode.currentTargets <= 0)
                view3D.endGame();
        }
    }
}
然后我们可以切换到目标。这些目标动态地生成到一个分组节点中,该节点包含辅助函数,允许例如成组地动画所有目标。注意,需要currentTargets属性,因为在QML中数组的改变不会触发绑定,因此我们将手动更新目标数量。
Node {
    id: targetsNode

    property var targets: []
    property int currentTargets: 0

    function addTargets(items) {
        items.forEach(function (item) {
            let instance = targetComponent.createObject(
                    targetsNode, { "x": item.x, "startPosY": item.y, "z": item.z, "points": item.points});
            targets.push(instance);
        });
        currentTargets = targets.length;
    }

    function removeTarget(item) {
        var index = targets.indexOf(item);
        targets.splice(index, 1);
        currentTargets = targets.length;
    }

    function resetTargets() {
        while (targets.length > 0)
            targets.pop().destroy();
        currentTargets = targets.length;
    }
}
目标是由一个立方体模型和一个用于显示得分的文本元素组成的节点。与球模型类似,我们使用diffuseMap和normalMap纹理来创建带有Qt标志的立方体。检测到击中后,我们将按顺序动画这个立方体并显示从该目标获得的得分。一旦动画完成,我们将动态地移除目标节点。
Component {
    id: targetComponent
    Node {
        id: targetNode

        property int points: 0
        property real hide: 0
        property real startPosY: 0
        property real posY: 0
        property real pointsOpacity: 0

        function hit() {
            targetsNode.removeTarget(this);
            mainWindow.score += points;
            hitAnimation.start();
            var burstPos = targetNode.mapPositionToScene(Qt.vector3d(0, 0, 0));
            hitParticleEmitter.burst(100, 200, burstPos);
        }

        y: startPosY + posY
        SequentialAnimation {
            running: mainWindow.gameOn && !hitAnimation.running
            loops: Animation.Infinite
            NumberAnimation {
                target: targetNode
                property: "posY"
                from: 0
                to: 150
                duration: 3000
                easing.type: Easing.InOutQuad
            }
            NumberAnimation {
                target: targetNode
                property: "posY"
                to: 0
                duration: 1500
                easing.type: Easing.InOutQuad
            }
        }

        SequentialAnimation {
            id: hitAnimation
            NumberAnimation {
                target: targetNode
                property: "hide"
                to: 1
                duration: 800
                easing.type: Easing.InOutQuad
            }
            NumberAnimation {
                target: targetNode
                property: "pointsOpacity"
                to: 1
                duration: 1000
                easing.type: Easing.InOutQuad
            }
            NumberAnimation {
                target: targetNode
                property: "pointsOpacity"
                to: 0
                duration: 200
                easing.type: Easing.InOutQuad
            }
            ScriptAction {
                script: targetNode.destroy();
            }
        }

        Model {
            id: targetModel

            readonly property real targetScale: (1 + targetNode.hide) * (mainWindow.targetSize / 100)

            source: "#Cube"
            scale: Qt.vector3d(targetScale, targetScale, targetScale)
            opacity: 0.99 - targetNode.hide * 2
            materials: DefaultMaterial {
                diffuseMap: Texture {
                    source: "images/qt_logo.jpg"
                }
                normalMap: Texture {
                    source: "images/qt_logo_n.jpg"
                }
                bumpAmount: 1.0
            }
            Vector3dAnimation on eulerRotation {
                loops: Animation.Infinite
                duration: 5000
                from: Qt.vector3d(0, 0, 0)
                to: Qt.vector3d(360, 360, 360)
            }
        }
        Text {
            anchors.centerIn: parent
            scale: 1 + targetNode.pointsOpacity
            opacity: targetNode.pointsOpacity
            text: targetNode.points
            font.pixelSize: 60 * mainWindow.px
            color: "#808000"
            style: Text.Outline
            styleColor: "#f0f000"
        }
    }
}
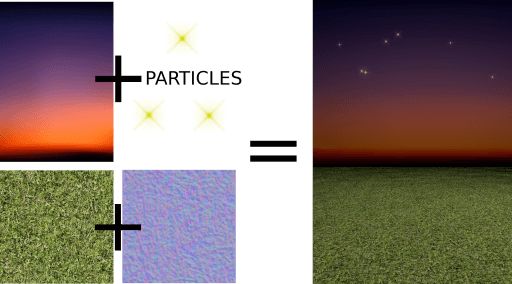
我们还需要一些用于游戏区域的模型。地面模型是一个草纹理填充的大面积矩形。
Model {
    source: "#Rectangle"
    scale: Qt.vector3d(50, 50, 1)
    eulerRotation.x: -90
    materials: DefaultMaterial {
        diffuseMap: Texture {
            source: "images/grass.jpg"
            tilingModeHorizontal: Texture.Repeat
            tilingModeVertical: Texture.Repeat
            scaleU: 25.0
            scaleV: 25.0
        }
        normalMap: Texture {
            source: "images/grass_n.jpg"
        }
        bumpAmount: 0.6
    }
}
天空模型位于更后面,我们不希望天空出现阴影,因此将receivesShadows设置为false。对于天空,我们使用Qt Quick Particles模块添加一些星星。类似于其他2D Qt Quick元素,粒子也可以直接添加到3D节点内部。
Model {
    id: sky
    property real scaleX: 100
    property real scaleY: 20
    source: "#Rectangle"
    scale: Qt.vector3d(sky.scaleX, sky.scaleY, 1)
    position: Qt.vector3d(0, 960, -2000)
    // We don't want shadows casted into sky
    receivesShadows: false
    materials: DefaultMaterial {
        diffuseMap: Texture {
            source: "images/sky.jpg"
        }
    }
    // Star particles
    Node {
        z: 500
        y: 30
        // Stars are far away, scale up to half the resolution
        scale: Qt.vector3d(2 / sky.scaleX, 2 / sky.scaleY, 1)
        ParticleSystem {
            anchors.horizontalCenter: parent.horizontalCenter
            anchors.top: parent.top
            width: 3000
            height: 400
            ImageParticle {
                source: "qrc:///particleresources/star.png"
                rotationVariation: 360
                color: "#ffffa0"
                colorVariation: 0.1
            }
            Emitter {
                anchors.fill: parent
                emitRate: 4
                lifeSpan: 6000
                lifeSpanVariation: 4000
                size: 30
                sizeVariation: 20
            }
        }
    }
}
当我们组合上述地面和天空模型时,我们得到了如下这样的3D世界

最后,我们为目标添加了一些闪光,这次使用的是QtQuick3D.Particles3D模块。ParticleSystem3D包含一个SpriteParticle3D,我们为它们分配了200个,这对于同时产生100次粒子爆发来说是足够的。ParticleEmitter3D定义了粒子的发射属性,如缩放、旋转、速度和生命周期。我们还添加了Gravity3D影响器,以合适的强度将粒子向下拉。
ParticleSystem3D {
    id: psystem
    SpriteParticle3D {
        id: sprite
        sprite: Texture {
            source: "images/particle.png"
        }
        color: Qt.rgba(1.0, 1.0, 0.0, 1.0)
        colorVariation: Qt.vector4d(0.4, 0.6, 0.0, 0.0)
        unifiedColorVariation: true
        maxAmount: 200
    }
    ParticleEmitter3D {
        id: hitParticleEmitter
        particle: sprite
        particleScale: 4.0
        particleScaleVariation: 2.0
        particleRotationVariation: Qt.vector3d(0, 0, 180)
        particleRotationVelocityVariation: Qt.vector3d(0, 0, 250)
        velocity: VectorDirection3D {
            direction: Qt.vector3d(0, 300, 0)
            directionVariation: Qt.vector3d(200, 150, 100)
        }
        lifeSpan: 800
        lifeSpanVariation: 200
        depthBias: 100
    }
    Gravity3D {
        magnitude: 600
    }
}
这标志着我们游戏3D部分的结束。还有一些2D Qt Quick元素用于显示时间、得分、开始按钮等,这些对游戏很重要,但与这份Quick 3D文档无关。
现在球在你的这一边(这不是误会)。请随意以不同的方式扩展游戏并生成新的疯狂关卡!
文件
- quickball/CMakeLists.txt
- quickball/main.cpp
- quickball/main.qml
- quickball/qml.qrc
- quickball/quickball.pro
图像
© 2024 Qt公司有限公司。此处包含的文档贡献仍为各自所有者的版权。此处提供的文档受GNU自由文档许可协议版本1.3的条款约束,该协议由自由软件基金会发布。Qt及其相关标志是芬兰的和/或其他国家的Qt公司有限公司的商标。所有其他商标均为其各自所有者的财产。
