C
创建 Renesas e2 Studio 项目
本主题为您提供了创建 Renesas e2 studio 项目、集成为应用和平台源代码的逐步指导。
以下指导将引导您完成整个流程
创建 e2 studio 项目并配置 FSP
- 启动 e2 studio 并使用 文件 > 新建 > Renesas C/C++ 项目 > Renesas RA 创建针对 RA6M3G 的新项目。
- 选择 C++ 作为项目语言,然后单击 下一步。
- 选择 可执行文件 和 FreeRTOS,然后单击 下一步。
- 将 FreeRTOS - 最小化 - 静态分配 作为项目模板。遵循向导并完成步骤以创建项目。
- 按照Renesas RA6M3G FSP 配置 主题中的说明配置 FSP Stacks。
导出平台源代码
- 请运行以下命令以导出平台源代码
export QUL_ROOT=/path/to/QtMCUs/2.8.0
$QUL_ROOT/bin/qmlprojectexporter --platform-metadata $QUL_ROOT/lib/QulPlatformTargets_<PLATFORM_NAME>-export.json --outdir <DESTINATION_FOLDER> --project-type cmake --no-export-qml
set QUL_ROOT=C:\path\to\QtMCUs\2.8.0
%QUL_ROOT%\bin\qmlprojectexporter.exe --platform-metadata %QUL_ROOT%\lib\QulPlatformTargets_<PLATFORM_NAME>-export.json --outdir <DESTINATION_FOLDER> --project-type cmake --no-export-qml
- 将导出的平台源代码导入名为 platform 的顶级目录中。要将平台源代码导入项目,
- 在项目下创建一个名为 platform 的新文件夹
- 右击文件夹名称,然后转到 导入 -> 文件系统。
- 在 导入 对话框中,浏览平台源代码文件夹。
- 选择所有源代码和头文件,除了已由 e2 studio 生成的 FreeRTOSConfig.h 和链接器文件 ek-ra6m3g.ld,以外的所有内容。
- 打开 platform/boards/renesas/ek-ra6m3g-freertos/platform_config.h 并取消注释
#define QUL_ENABLE_PERFORMANCE_LOGGING以禁用性能记录。
注意:要启用性能记录,您必须启用
uxTaskGetStackHighWaterMark()函数,并且定义QUL_STACK_SIZE以与 Qt Quick Ultralite 应用程序任务的堆栈大小匹配(默认值为 24576)。
开发应用程序后端
- 创建 UI 通信结构体
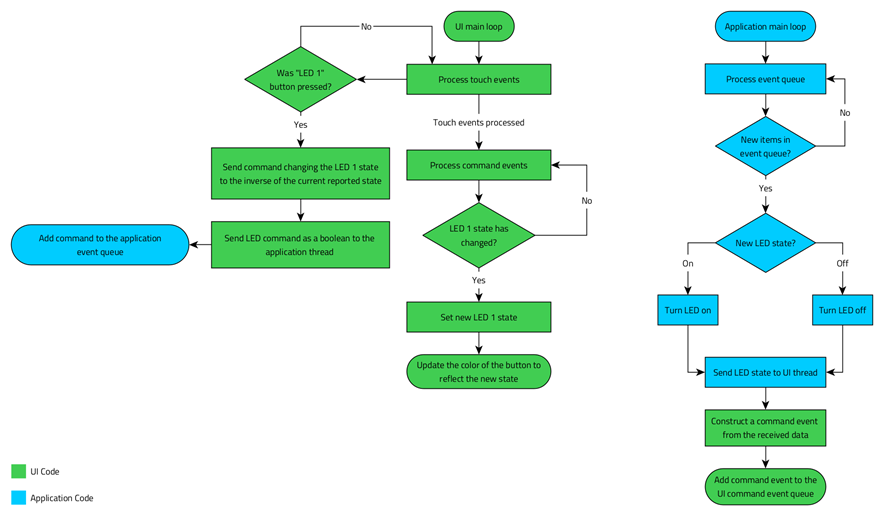
后端允许应用程序的 UI 与平台进行通信,并从硬件获取所需信息。在这种情况下,通信器获取板上 LED 的状态。以下图表示这两者之间的工作流程。

- 在 项目资源管理器 中右键点击 源 文件夹,然后选择 新建 > 类。
- 将
UICommunicator放入类名字段中。将头文件和源文件分别重命名为 uicommunicator.h 和 uicommunicator.cpp,然后点击 完成。 - 打开 uicommunicator.h 并将其修改如下
#ifndef UICOMMUNICATOR_H
#define UICOMMUNICATOR_H

#include <qul/singleton.h>
#include <qul/property.h>
#include <qul/eventqueue.h>

struct UICommunicator : public Qul::Singleton<UICommunicator>
{
    friend struct Qul::Singleton<UICommunicator>;

    enum Command { LED1State };

    Qul::Property<bool> led1Status;

    void sendFromUI(Command command, bool commandData);
    void receiveToUI(Command command, bool commandData);

private:
    UICommunicator();
    UICommunicator(const UICommunicator &);
    UICommunicator &operator=(const UICommunicator &);
};

struct CommandEvent
{
    UICommunicator::Command command;
    bool commandData;
};

class CommandEventQueue : public Qul::EventQueue<struct CommandEvent, Qul::EventQueueOverrunPolicy_Discard, 10>
{
public:
    void onEvent(const CommandEvent &commandEvent);
};

#endif // UICOMMUNICATOR_H
头文件声明了继承自
Qul::Singleton的UICommunicator结构,使其能够轻松与 UI 代码集成。有关更多信息,请参阅 Singleton 类参考。头文件还声明了具有一系列命令的Command枚举以及用于管理队列的CommandEventQueue。使用枚举在 UI 与应用程序之间建立通信。头文件还声明了led1Status属性,用于指示板上 LED 的状态。该属性公开给 QML 上下文,用于确定按钮的颜色。UICommunicator类还有sendFromUI和receiveToUI函数用于发送和接收命令。此外,使用CommandEventQueue以线程安全的方式与 UI 线程通信。而不是从应用程序线程调用receiveToUI,将命令添加到CommandEventQueue中,然后由 QUL 线程处理以调用receiveToUI。 - 打开 uicommunicator.cpp 并将其修改如下
#include "uicommunicator.h"

extern void sendCommandToAppThread(bool led1Status);

UICommunicator::UICommunicator()
{
    led1Status.setValue(false);
}

void UICommunicator::sendFromUI(Command command, bool commandData)
{
    QUL_UNUSED(command)

    sendCommandToAppThread(commandData);
}

void UICommunicator::receiveToUI(Command command, bool commandData)
{
    switch (command) {
    case LED1State:
        led1Status.setValue(commandData);
        break;
    default:
        break;
    }
}

void CommandEventQueue::onEvent(const CommandEvent &commandEvent)
{
    UICommunicator::instance().receiveToUI(commandEvent.command, commandEvent.commandData);
}

static CommandEventQueue commandEventQueue;

void sendToUI(bool led1Data)
{
    CommandEvent commandEvent;
    commandEvent.command = UICommunicator::LED1State;
    commandEvent.commandData = led1Data;
    commandEventQueue.postEvent(commandEvent);
}
UICommunicator类将led1Status初始化为false。它的sendFromUI()成员函数将包含 LED 新状态的布尔值发送到应用程序线程。receiveToUI()成员函数使用命令参数查找属性是否需要更新。接下来,覆盖CommandEventQueue类的onEvent()函数。此函数覆盖调用UICommunicator实例上的receiveToUI(),带有command和commandData参数。此外,为sendToUI()函数创建CommandEventQueue的静态实例以发布事件。该函数从给定的布尔值构造CommandEvent并将其添加到commandEventQueue以供处理。sendToUI()在 LED 状态更改时从应用程序线程调用。
导出 UI 源
- 将 YourProject.qmlproject 文件更改为添加前面步骤中创建的接口文件 uicommunicator.h。
InterfaceFiles { files: ["/path/to/uicommunicator.h"] } - 使用
qmlprojectexporter工具导出 UI 源。export QUL_ROOT=/path/to/QtMCUs/2.8.0 export QMLPROJECT_FILE=/path/to/YourProject.qmlproject export BOARDDEFAULTS=$QUL_ROOT/platform/boards/renesas/ek-ra6m3g-freertos/cmake/BoardDefaults_16bpp.qmlprojectconfig export APPLICATION_EXPORT_DIR=<DESTINATION_FOLDER>/ui_sources $QUL_ROOT/bin/qmlprojectexporter $QMLPROJECT_FILE --platform=ek-ra6m3g-freertos --toolchain=GCC --boarddefaults=$BOARDDEFAULTS --outdir=$APPLICATION_EXPORT_DIR
set QUL_ROOT=C:\path\to\QtMCUs\2.8.0
set QMLPROJECT_FILE=C:\path\to\YourProject.qmlproject
set BOARDDEFAULTS=%QUL_ROOT%\platform\boards\renesas\ek-ra6m3g-freertos\cmake\BoardDefaults_16bpp.qmlprojectconfig
set APPLICATION_EXPORT_DIR=<DESTINATION_FOLDER>\ui_sources

%QUL_ROOT%\bin\qmlprojectexporter.exe %QMLPROJECT_FILE% --platform=ek-ra6m3g-freertos --toolchain=GCC --boarddefaults=%BOARDDEFAULTS% --outdir=%APPLICATION_EXPORT_DIR%
- 将 UI 源导入到 ui_sources 顶级目录。要将 UI 源导入到项目中,请
- 在 项目资源管理器 中右键点击项目名称。
- 转到 新建 -> 文件夹。
- 在 新建文件夹向导 中,点击 高级 并选择 链接到备用位置。
- 浏览到在前面步骤中生成的 <DESTINATION_FOLDER>\ui_sources 文件夹。
- 点击 完成。
配置 e2 studio 项目
- 打开 C/C++ 项目设置。在 项目资源管理器 中右键点击项目,并从上下文菜单中选择 属性 以进行以下更改
- 将
platform和ui_sources文件夹添加到项目的源位置。在 项目资源管理器 中右键单击项目,选择 属性,然后选择 C/C++ 通用 > 路径和符号 > 源位置。 - 将 IDE-Import-Instructions.txt 中的包含路径添加到 C/C++ 通用 > 路径和符号 > 包含 下的 C++ 包含目录列表中。勾选 添加到所有配置 和 添加到所有语言。对于此应用程序,请添加以下包含目录
- <QUL_ROOT>/include
- <QUL_ROOT>/src/3rdparty/qoi
- <QUL_ROOT>/src/3rdparty/nanopb
- <QUL_ROOT>/src/3rdparty/minihdlc
- <PROJECT_LOC>/platform/boards/renesas/ek-ra6m3g-freertos
- <PROJECT_LOC>/platform/boards/renesas/ek-ra6m3g-common
- <PROJECT_LOC>/ui_sources
- 将以下库添加到 C/C++ 构建与设置 > 工具设置 > GNU Arm Cross C++ 链接器 > 库 列表
- 从以下位置添加以下内容:
<Qt-install-dir>/QtMCUs/<QUL-version>/liblibQulMonotypeUnicode_cortex-m4-hf-fpv4-sp-d16_Linux_armgcc _MinSizeRel.alibQulMonotypeUnicodeEngineShaperDisabled_cortex-m4-hf-fpv4 -sp-d16_Linux_armgcc_MinSizeRel.alibQulPNGDecoderLodePNG_cortex-m4-hf-fpv4-sp-d16 _Linux_armgcc_MinSizeRel.alibQulCore_cortex-m4-hf-fpv4-sp-d16_Linux_armgcc_MinSizeRel.alibQulDeviceLink_ek-ra6m3g-freertos_Linux_armgcc_MinSizeRel.a
注意:
%APPLICATION_EXPORT_DIR%\config\YourProject.1.libraries.txt文件列出了应用程序应与之链接的 Qt Quick Ultralite 库。 - 从以下位置添加以下内容:
- 在 C/C++ 构建与设置 > 工具设置 > Gnu Arm Cross C++ 编译器 > 优化 下将 C++ 语言标准设置为 GNU ISO 2014 C++。选择 不使用异常、不使用 RTTI 和 不使用线程安全的静态 选项。
注意:将这些设置应用于所有项目配置。
- 在 C/C++ 构建与设置 > 工具设置 > GNU Arm Cross C 编译器 下添加预处理器定义
ucHeap=__HeapBase。注意:这启用了 FreeRTOS 使用通常为
std malloc保留的堆。确保您的项目没有使用std mallocs或移动 FreeRTOS 堆。当前的 RA6 FreeRTOS 平台端口使用 FreeRTOSpvPortMalloc(),因此它需要一个相当大的 RAM 部分才能工作。您可以通过在 platform/mem-freertos.cpp 中重写函数来更改此行为。
- 将
- 编辑 script/fsp.ld 并添加以下代码
QulModuleResourceData : { . = ALIGN(4); __qspi_flash_start__ = .; *(QulModuleResourceData) } > QSPI_FLASH QulFontResourceData : { . = ALIGN(4); *(QulFontResourceData) } > QSPI_FLASH QulResourceData : { . = ALIGN(4); *(QulResourceData) . = ALIGN(4); __qspi_flash_end__ = .; } > QSPI_FLASH PROVIDE(__defaultTotalHeapSize = 102400); - 编辑 src/hal_entry.cpp 以在
R_BSP_WarmStart()函数定义中插入以下代码。它启用了板上的 S1 按钮。R_ICU_ExternalIrqOpen(&g_S1_irq_ctrl, &g_S1_irq_cfg); R_ICU_ExternalIrqEnable(&g_S1_irq_ctrl);
注意:此代码应在
BSP_WARM_START_POST_Cif 块内部,紧随R_IOPORT_Open()之后。 - 编辑 app_thread_entry.cpp 并替换以下代码
#include "app_thread.h"

extern void sendToUI(bool led1Data);

void app_thread_entry(void *pvParameters)
{
    FSP_PARAMETER_NOT_USED(pvParameters);
    bool led1State;
    while (true) {
        // Wait for an event from the user interface
        if (pdTRUE == xQueueReceive(g_app_queue, (void *) &led1State, portMAX_DELAY)) {
            bsp_io_level_t level;
            level = led1State ? BSP_IO_LEVEL_HIGH : BSP_IO_LEVEL_LOW;
            R_BSP_PinAccessEnable();
            R_BSP_PinWrite(BSP_IO_PORT_04_PIN_03, level); // blue LED on EK-RA6M3
            R_BSP_PinAccessDisable();
            sendToUI(led1State);
        }
    }
}

static bool led1Level = false;
extern "C" void s1_irq_callback(external_irq_callback_args_t *p_args)
{
    FSP_PARAMETER_NOT_USED(p_args);
    R_BSP_PinAccessEnable();
    uint32_t level = R_BSP_PinRead(BSP_IO_PORT_04_PIN_03); // blue LED on EK-RA6M3
    R_BSP_PinAccessDisable();
    led1Level = !(level & 0x01);
    xQueueSendFromISR(g_app_queue, &led1Level, NULL);
}
第一行声明
sendToUI外部符号。接着,app_thread_entry()函数使用一个简单的 while 循环,等待g_app_queue上的项目。当它找到队列上的项目(一个bool值)时,它会根据项目值打开/关闭蓝色 LED1。最后,它向 UI 线程发送更改通知。最后一个函数是 FSP 配置中定义的 s1 中断的回调。它检查 LED1 状态并将相反的值添加到
g_app_queue,以根据其先前状态切换 LED1 的状态。 - 编辑 qul_thread_entry.cpp 并替换现有代码以下面的代码
#include "qul_thread.h"

#include <qsg_ui.h>

#include <qul/application.h>
#include <qul/qul.h>

#include <platforminterface/log.h>

#include <FreeRTOS.h>
#include <task.h>

extern "C" {
void vApplicationStackOverflowHook(TaskHandle_t xTask, signed char *pcTaskName)
{
    (void) xTask;
    (void) pcTaskName;

    Qul::PlatformInterface::log("vApplicationStackOverflowHook");
    configASSERT(false);
}

void vApplicationMallocFailedHook(void)
{
    Qul::PlatformInterface::log("vApplicationMallocFailedHook");
    configASSERT(false);
}
}

void qul_thread_entry(void *pvParameters)
{
    FSP_PARAMETER_NOT_USED(pvParameters);

    Qul::Application _qul_app;
    static struct ::qsg_ui _qul_item;

    Qul::initHardware();
    Qul::initPlatform();

    _qul_app.setRootItem(&_qul_item);
#ifdef APP_DEFAULT_UILANGUAGE
    _qul_app.settings().uiLanguage.setValue(APP_DEFAULT_UILANGUAGE);
#endif
    _qul_app.exec();
}

static bool ledEvent = false;
void sendCommandToAppThread(bool led1Status)
{
    ledEvent = led1Status;
    xQueueSend(g_app_queue, &ledEvent, 0);
}
qul_thread_entry()函数在指定的线程中启动 Qt Quick Ultralite UI。从 UI 代码调用sendCommandToAppThread()函数,获取所需的led1Status并将其发布到g_app_queue。qul_thread_entry()创建应用程序实例,并作为 Quick Ultralite 处理循环的入口点。
您的应用程序现在已准备好。构建并将其闪存到 RA6M3G 板上以测试一切是否按预期工作。接下来,您可以尝试对代码进行实验。例如,为 S2 按钮配置一个中断,并实现一个回调来切换 LED2 并在 UI 中更新 LED 的状态。
受特定 Qt 许可的约束下可用。
了解更多信息。
