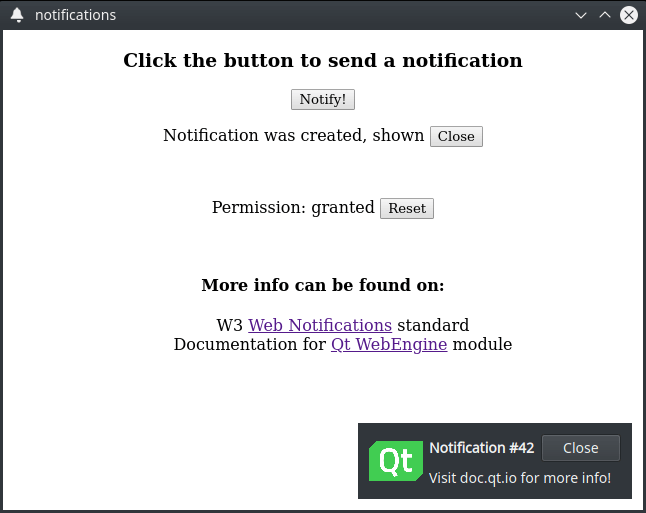
WebEngine 通知示例
演示如何将 HTML5 网页通知传递给用户。

WebEngine 通知演示了如何使用 QWebEngineProfile::setNotificationPresenter() 方法和 QWebEngineNotification 类向用户显示 HTML5 网页通知。
运行示例
要从 Qt Creator 运行示例,请打开 欢迎 模式并从 示例 中选择示例。有关更多信息,请访问 构建和运行示例。
HTML 页面
在本示例中,我们创建了一个内部 HTML 页面,通过资源集合文件 (.qrc) 添加。页面显示请求权限的按钮,并包含触发此请求所需的必要 JavaScript 代码
            Notification.requestPermission().then(function (permission) {
                if (permission == 'granted')
                    createNotification()
            })
还包含创建通知的按钮。以下 JavaScript 结构在按下事件时执行
    function createNotification() {
        let title = 'Notification #' + ++notificationsCreated
        let options = { body: 'Visit doc.qt.io for more info!', icon: 'icon.png', }

        let notification = new Notification(title, options)
    }
主函数
在 main 函数中,我们实例化了一个 QWebEngineView,加载我们的内部 HTML 页面,并设置了处理通知所需的回调。
请求功能权限
然后我们使用 QWebEnginePage::featurePermissionRequested() 调用来请求用户在他们的设备上显示通知的权限。
    QObject::connect(view.page(), &QWebEnginePage::featurePermissionRequested,
                     [&] (const QUrl &origin, QWebEnginePage::Feature feature) {
                         if (feature != QWebEnginePage::Notifications)
                             return;
                         view.page()->setFeaturePermission(origin, feature, QWebEnginePage::PermissionGrantedByUser);
                     });
处理新通知
接下来,我们构建一个 NotificationPopup,它封装了 HTML 网页通知的数据。我们还使用 QWebEngineProfile::setNotificationPresenter() 调用来设置我们的处理程序,我们使用该处理程序与我们的 popup 一起处理所有新通知。
    auto popup = new NotificationPopup(&view);
    profile->setNotificationPresenter([&] (std::unique_ptr<QWebEngineNotification> notification)
                                      { popup->present(notification); });
向用户显示通知
本示例中的 NotificationPopup 类是一个简单的基于 QWidget 的类,它使用多个 QLabel 实例来显示通知的标题、消息和图标。
class NotificationPopup : public QWidget
{
    Q_OBJECT

    QLabel m_icon, m_title, m_message;
    std::unique_ptr<QWebEngineNotification> notification;
显示通知
在 present 方法内部,我们首先关闭并释放先前的通知,如果有,然后通过在内部通知实例上调用 std::unique_ptr::swap 方法来获得新通知的所有权。
    void present(std::unique_ptr<QWebEngineNotification> &newNotification)
    {
        if (notification) {
            notification->close();
            notification.reset();
        }

        notification.swap(newNotification);
然后我们通过调用 QWebEngineNotification::title()、QWebEngineNotification::message()、QWebEngineNotification::icon() 来查询通知实例的标题、消息和图标,并在弹出窗口中设置适当的标签。
        m_title.setText("<b>" + notification->title() + "</b>");
        m_message.setText(notification->message());
        m_icon.setPixmap(QPixmap::fromImage(notification->icon()).scaledToHeight(m_icon.height()));
在此之后,我们准备好通过调用QWidget::show()方法向用户显示通知。在此步骤中,我们还调用QWebEngineNotification::show()方法来通知我们的show事件。
        show();
notification->show();最后,我们设置一个回调来处理来自JavaScript方面的close事件,通过连接到QWebEngineNotification::closed()信号。我们还安排了一个定时器事件来自动关闭我们的活动通知。
        connect(notification.get(), &QWebEngineNotification::closed, this, &NotificationPopup::onClosed);
        QTimer::singleShot(10000, notification.get(), [&] () { onClosed(); });

    }
关闭活动通知
我们通过超时或通过处理JavaScript事件来执行当前活动的通知的close步骤。首先,通过调用QWidget::hide()来隐藏弹出小部件本身。然后,通过调用QWebEngineNotification::close()方法通知JavaScript代码。最后,通过调用std::unique_ptr::reset()方法来销毁通知对象。
    void onClosed()
    {
        hide();
        notification->close();
        notification.reset();
    }
实现用户交互
要实现通知的click步骤,我们通过QWidget::mouseReleaseEvent()来处理鼠标交互。在这个事件中,通过调用QWebEngineNotification::click()方法来通知JavaScript代码。然后我们自动执行close步骤,因为通知被认为已经完全处理,不再需要,因此可以被销毁。
    void mouseReleaseEvent(QMouseEvent *event) override
    {
        QWidget::mouseReleaseEvent(event);
        if (notification && event->button() == Qt::LeftButton) {
            notification->click();
            onClosed();
        }
    }
© 2024 Qt公司。本文档中的文档贡献包括各自所有者的版权。提供的文档在自由软件基金会的发布下,根据GNU自由文档许可证版本1.3的条款进行许可。Qt及其标志是芬兰及/或全球其他国家的Qt公司的商标。所有其他商标均属于其各自所有者。
