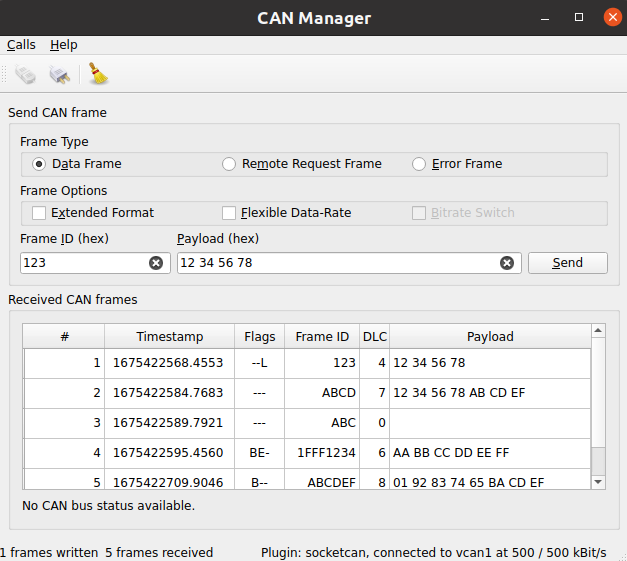
CAN 总线管理器
示例发送和接收 CAN 总线帧。
示例发送和接收 CAN 总线帧。接收到的帧按其类型排序。提供连接对话框以调整 CAN 总线连接参数。
此示例中使用的 Qt Serial Bus 关键类

创建 QCanBusDevice
执行任何 CAN 通信都需要 QCanBusDevice 的一个实例。
ConnectDialog 允许指定所有必需的参数。之后,使用提供的插件和接口名称创建设备
    QString errorString;
    m_canDevice.reset(QCanBus::instance()->createDevice(p.pluginName, p.deviceInterfaceName,
                                                        &errorString));
    connect(m_canDevice.get(), &QCanBusDevice::errorOccurred,
            this, &MainWindow::processErrors);
    connect(m_canDevice.get(), &QCanBusDevice::framesReceived,
            this, &MainWindow::processReceivedFrames);
    connect(m_canDevice.get(), &QCanBusDevice::framesWritten,
            this, &MainWindow::processFramesWritten);
建立的连接允许处理传入的帧,控制发送的帧并处理错误。
设备创建后,使用 QCanBusDevice::connectDevice() 开始通信。
处理传入帧
QCanBusDevice 在新帧可用时发出 framesReceived() 信号。当有可用的帧时,可以使用 readFrame() 方法读取单个 QCanBusFrame。一旦接收到帧,就可以从中提取单个参数,如 frameId、timeStamp 或 payload
    while (m_canDevice->framesAvailable()) {
        m_numberFramesReceived++;
        const QCanBusFrame frame = m_canDevice->readFrame();

        QString data;
        if (frame.frameType() == QCanBusFrame::ErrorFrame)
            data = m_canDevice->interpretErrorFrame(frame);
        else
            data = QString::fromLatin1(frame.payload().toHex(' ').toUpper());

        const QString time = QString::fromLatin1("%1.%2  ")
                .arg(frame.timeStamp().seconds(), 10, 10, ' '_L1)
                .arg(frame.timeStamp().microSeconds() / 100, 4, 10, '0'_L1);

        const QString flags = frameFlags(frame);

        const QString id = QString::number(frame.frameId(), 16).toUpper();
        const QString dlc = QString::number(frame.payload().size());

        m_model->appendFrame(QStringList({QString::number(m_numberFramesReceived),
                                          time, flags, id, dlc, data}));
    }
发送帧
要使用 CAN 总线发送自定义数据,用户至少需要提供 frameId 和 payload。可选地,还可以配置其他 QCanBusFrame 参数
    const uint frameId = m_ui->frameIdEdit->text().toUInt(nullptr, 16);
    QString data = m_ui->payloadEdit->text();
    m_ui->payloadEdit->setText(formatHexData(data));
    const QByteArray payload = QByteArray::fromHex(data.remove(u' ').toLatin1());

    QCanBusFrame frame = QCanBusFrame(frameId, payload);
    frame.setExtendedFrameFormat(m_ui->extendedFormatBox->isChecked());
    frame.setFlexibleDataRateFormat(m_ui->flexibleDataRateBox->isChecked());
    frame.setBitrateSwitch(m_ui->bitrateSwitchBox->isChecked());

    if (m_ui->errorFrame->isChecked())
        frame.setFrameType(QCanBusFrame::ErrorFrame);
    else if (m_ui->remoteFrame->isChecked())
        frame.setFrameType(QCanBusFrame::RemoteRequestFrame);
一旦准备就绪,就可以使用 QCanBusDevice::writeFrame() 方法发送该帧。
m_canDevice->writeFrame(frame);
运行示例
要从 Qt Creator 运行此示例,请打开 欢迎 模式并从 示例 中选择该示例。有关更多信息,请参阅 构建和运行示例。
© 2024 Qt 公司有限公司。此处包含的文档贡献的版权分别为其所有者所有。此处提供的文档已在自由软件基金会发布的 GNU 自由文档许可证版本 1.3 条件下授权。Qt 以及相应的商标是芬兰的 Qt 公司有限公司或其他国家和地区的商标。所有其他商标均为其各自所有者的财产。
