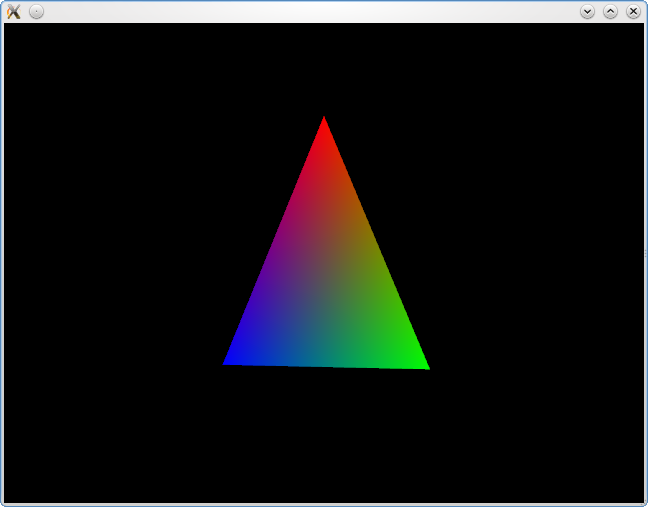
OpenGL窗口示例
本示例展示了如何创建一个基于QWindow的最小应用程序,用于使用OpenGL。

注意:这是一个如何使用QWindow的底层示例,实际操作中应考虑使用更高层的QOpenGLWindow类。有关QOpenGLWindow便捷类的演示,请参阅Hello GLES3示例。
OpenGLWindow超类
我们的OpenGLWindow类作为API,然后被子类化以执行实际的渲染。它有请求调用render()的方法,可以立即调用renderNow()或事件循环完成后调用renderLater()。OpenGLWindow子类可以选择重新实现基于OpenGL的render()方法,或者为使用QPainter的渲染调用render(QPainter *)。使用OpenGLWindow::setAnimating(true)来确保render()在垂直刷新率下调用,假设底层OpenGL驱动程序启用了垂直同步。
在执行OpenGL渲染的类中,通常希望从QOpenGLFunctions继承,就像我们的OpenGLWindow一样,以获得对OpenGL ES 2.0函数的平台无关访问。通过从QOpenGLFunctions继承,它包含的OpenGL函数将具有优先权,并且如果您希望应用程序同时与OpenGL和OpenGL ES 2.0一起工作,则无需担心解决这些函数。
class OpenGLWindow : public QWindow, protected QOpenGLFunctions
{
    Q_OBJECT
public:
    explicit OpenGLWindow(QWindow *parent = nullptr);
    ~OpenGLWindow();

    virtual void render(QPainter *painter);
    virtual void render();

    virtual void initialize();

    void setAnimating(bool animating);

public slots:
    void renderLater();
    void renderNow();

protected:
    bool event(QEvent *event) override;

    void exposeEvent(QExposeEvent *event) override;

private:
    bool m_animating = false;

    QOpenGLContext *m_context = nullptr;
    QOpenGLPaintDevice *m_device = nullptr;
};
窗口的表面类型必须设置为QSurface::OpenGLSurface,表示窗口将用于OpenGL渲染,而不是使用QPainter和QBackingStore渲染光栅内容。
OpenGLWindow::OpenGLWindow(QWindow *parent)
    : QWindow(parent)
{
    setSurfaceType(QWindow::OpenGLSurface);
}
可以通过覆盖initialize()函数来执行任何必要的OpenGL初始化,该函数在调用render()之前仅被调用一次,带有有效的当前QOpenGLContext。以下代码片段显示了默认的render(QPainter *)和initialize()实现都是空的,而默认的render()实现初始化一个QOpenGLPaintDevice并调用render(QPainter *)。
void OpenGLWindow::render(QPainter *painter)
{
    Q_UNUSED(painter);
}

void OpenGLWindow::initialize()
{
}

void OpenGLWindow::render()
{
    if (!m_device)
        m_device = new QOpenGLPaintDevice;

    glClear(GL_COLOR_BUFFER_BIT | GL_DEPTH_BUFFER_BIT | GL_STENCIL_BUFFER_BIT);

    m_device->setSize(size() * devicePixelRatio());
    m_device->setDevicePixelRatio(devicePixelRatio());

    QPainter painter(m_device);
    render(&painter);
}
renderLater()函数简单地调用QWindow::requestUpdate()来安排系统准备重绘时的更新。
当接收到暴露事件时,我们还会调用renderNow()。exposeEvent() 是通知窗口其暴露(即可见性)在屏幕上已更改的事件。当收到暴露事件时,你可以查询 QWindow::isExposed() 以确定窗口目前是否暴露。在窗口接收到其第一个暴露事件之前,不要对其进行渲染或调用 QOpenGLContext::swapBuffers() ,因为在那时其最终大小可能未知,并且渲染的内容甚至可能不会出现在屏幕上。
void OpenGLWindow::renderLater()
{
    requestUpdate();
}

bool OpenGLWindow::event(QEvent *event)
{
    switch (event->type()) {
    case QEvent::UpdateRequest:
        renderNow();
        return true;
    default:
        return QWindow::event(event);
    }
}

void OpenGLWindow::exposeEvent(QExposeEvent *event)
{
    Q_UNUSED(event);

    if (isExposed())
        renderNow();
}
在renderNow()中,如果我们尚未暴露,则返回,此时渲染将延迟到我们实际收到暴露事件。如果我们还没有,我们使用与OpenGLWindow上设置相同的 QSurfaceFormat 创建 QOpenGLContext,并为子类调用initialize(),以及调用initializeOpenGLFunctions() 以使 QOpenGLFunctions 超类与正确的 QOpenGLContext 关联。在任何情况下,我们通过调用 QOpenGLContext::makeCurrent() 使上下文当前,然后调用render() 执行实际渲染,最后通过调用以OpenGLWindow为参数的 QOpenGLContext::swapBuffers() 安排使渲染内容可见。
通过调用 QOpenGLContext::makeCurrent() 初始化OpenGL上下文,并指定渲染的表面后,可以发出OpenGL命令。命令可以通过包含系统OpenGL头文件的 <qopengl.h> 直接发出,或者通过使用 QOpenGLFunctions发出该类,可以为了方便从该类中继承或者通过使用QOpenGLContext::functions() 访问。 QOpenGLFunctions 提供对OpenGL ES 2.0级别的所有OpenGL调用的访问,这些调用在OpenGL ES 2.0和桌面OpenGL中尚未标准化。有关OpenGL和OpenGL ES API的更多信息,请参阅官方的 OpenGL注册表 和 Khronos OpenGL ES API注册表。
如果使用OpenGLWindow::setAnimating(true) 启用了动画,我们调用renderLater()以安排新的更新请求。
void OpenGLWindow::renderNow()
{
    if (!isExposed())
        return;

    bool needsInitialize = false;

    if (!m_context) {
        m_context = new QOpenGLContext(this);
        m_context->setFormat(requestedFormat());
        m_context->create();

        needsInitialize = true;
    }

    m_context->makeCurrent(this);

    if (needsInitialize) {
        initializeOpenGLFunctions();
        initialize();
    }

    render();

    m_context->swapBuffers(this);

    if (m_animating)
        renderLater();
}
启用动画也会根据下面的代码片段安排一个更新请求。
void OpenGLWindow::setAnimating(bool animating)
{
    m_animating = animating;

    if (animating)
        renderLater();
}
示例OpenGL渲染子类
在这里,我们通过派生OpenGLWindow来展示如何使用OpenGL绘制旋转三角形。通过间接派生 QOpenGLFunctions,我们能够访问OpenGL ES 2.0级别的所有功能。
class TriangleWindow : public OpenGLWindow
{
public:
    using OpenGLWindow::OpenGLWindow;

    void initialize() override;
    void render() override;

private:
    GLint m_posAttr = 0;
    GLint m_colAttr = 0;
    GLint m_matrixUniform = 0;

    QOpenGLShaderProgram *m_program = nullptr;
    int m_frame = 0;
};
在我们的主函数中,我们初始化 QGuiApplication 并实例化我们的TriangleOpenGLWindow。我们给它一个 QSurfaceFormat,指定我们想要四个多采样抗锯齿样本,以及默认几何形状。由于我们想要动画,我们使用true作为参数调用上面提到的setAnimating()函数。
int main(int argc, char **argv)
{
    QGuiApplication app(argc, argv);

    QSurfaceFormat format;
    format.setSamples(16);

    TriangleWindow window;
    window.setFormat(format);
    window.resize(640, 480);
    window.show();

    window.setAnimating(true);

    return app.exec();
}
下面的代码片段显示了在此示例中使用的OpenGL着色器程序。顶点着色器和片段着色器相对简单,执行顶点变换和插值顶点着色。
static const char *vertexShaderSource =
    "attribute highp vec4 posAttr;\n"
    "attribute lowp vec4 colAttr;\n"
    "varying lowp vec4 col;\n"
    "uniform highp mat4 matrix;\n"
    "void main() {\n"
    "   col = colAttr;\n"
    "   gl_Position = matrix * posAttr;\n"
    "}\n";

static const char *fragmentShaderSource =
    "varying lowp vec4 col;\n"
    "void main() {\n"
    "   gl_FragColor = col;\n"
    "}\n";
以下是加载着色器和初始化着色器程序(通过使用QOpenGLShaderProgram而不是原始OpenGL)的代码。通过这种方式,我们在桌面OpenGL中消除了高p、中p和低p的限定符,因为在标准中它们不是组成部分。我们将属性和统一变量存储到成员变量中,以避免在每一帧中进行位置查找。
void TriangleWindow::initialize()
{
    m_program = new QOpenGLShaderProgram(this);
    m_program->addShaderFromSourceCode(QOpenGLShader::Vertex, vertexShaderSource);
    m_program->addShaderFromSourceCode(QOpenGLShader::Fragment, fragmentShaderSource);
    m_program->link();
    m_posAttr = m_program->attributeLocation("posAttr");
    Q_ASSERT(m_posAttr != -1);
    m_colAttr = m_program->attributeLocation("colAttr");
    Q_ASSERT(m_colAttr != -1);
    m_matrixUniform = m_program->uniformLocation("matrix");
    Q_ASSERT(m_matrixUniform != -1);
}
最后,这是我们的render()函数,我们在此使用OpenGL设置视口、清除背景并渲染一个旋转三角形。
void TriangleWindow::render()
{
    const qreal retinaScale = devicePixelRatio();
    glViewport(0, 0, width() * retinaScale, height() * retinaScale);

    glClear(GL_COLOR_BUFFER_BIT);

    m_program->bind();

    QMatrix4x4 matrix;
    matrix.perspective(60.0f, 4.0f / 3.0f, 0.1f, 100.0f);
    matrix.translate(0, 0, -2);
    matrix.rotate(100.0f * m_frame / screen()->refreshRate(), 0, 1, 0);

    m_program->setUniformValue(m_matrixUniform, matrix);

    static const GLfloat vertices[] = {
         0.0f,  0.707f,
        -0.5f, -0.5f,
         0.5f, -0.5f
    };

    static const GLfloat colors[] = {
        1.0f, 0.0f, 0.0f,
        0.0f, 1.0f, 0.0f,
        0.0f, 0.0f, 1.0f
    };

    glVertexAttribPointer(m_posAttr, 2, GL_FLOAT, GL_FALSE, 0, vertices);
    glVertexAttribPointer(m_colAttr, 3, GL_FLOAT, GL_FALSE, 0, colors);

    glEnableVertexAttribArray(m_posAttr);
    glEnableVertexAttribArray(m_colAttr);

    glDrawArrays(GL_TRIANGLES, 0, 3);

    glDisableVertexAttribArray(m_colAttr);
    glDisableVertexAttribArray(m_posAttr);

    m_program->release();

    ++m_frame;
}
© 2024 Qt公司有限公司。本文件中包含的文档贡献均为各自所有者的版权。所提供的文档根据自由软件基金会发布的《GNU自由文档许可证版本1.3》的条款进行许可。Qt及其相应的标志在芬兰和/或全球其他国家的The Qt Company有限公司注册为商标。所有其他商标均为各自拥有者的财产。
