Qt界面框架生成器教程
逐步演示如何基于QML应用生成中间件API。

本教程演示了如何通过扩展自动生成的中间件API来扩展QML应用。我们使用一个现有的QML仪表盘应用,并按照以下步骤进行:
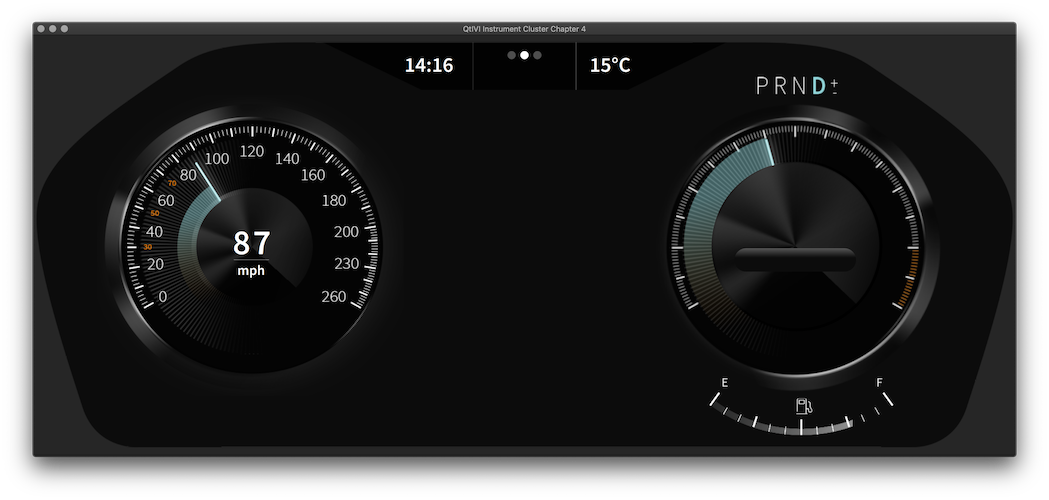
在我们开始实际的中间件集成之前,让我们看看现有的仪表盘QML代码和它支持的所有功能
images– 本文件夹包含QML代码中使用的所有图像。Cluster.qml– 将所有其他QML组件组合在一起的主要QML文件。Dial.qml– 用于显示速度或每分钟转速(RPM)等值的基础组件,使用指针显示。Fuel.qml– 用于显示实际燃油水平的组件。Label.qml– 一个小型辅助组件,用于设置用于显示文本的所有常用设置。LeftDial.qml– 使用指针组件和文本以及当前速度的英里每小时(mph)或千米每小时(km/h)显示当前速度。RightDial.qml– 显示当前RPM并提供显示警告指示器的方式。Top.qml– 显示当前日期和当前温度的顶部栏。
接下来,我们使用我们的中间件API来添加以下功能的支持:
- 在左侧拨号器中显示当前速度。
- 在右侧拨号器中显示当前RPM。
- 在不同的计量单位之间切换。
- 在顶部栏中显示当前温度。
- 在右侧拨号器上显示不同的警告。
- 指示仪表盘是否连接并显示实际数据。
最终目标是连接所有这些功能,以模拟这种实时驾驶体验
第1章:使用界面框架生成器的基本中间件API
在本章中,我们将中间件API集成到现有的仪表盘QML代码中。我们不是像大多数基本QML示例那样手动编写所有这些部分,我们将使用界面框架生成器来自动生成所需的部件。
接口定义语言
要能自动生成中间件API,界面框架生成器需要一些有关要生成的内容的输入。这个输入是以接口定义语言(IDL),QFace的形式提供的,非常简单地描述了API。
让我们从定义一个非常简单的接口开始,这个接口提供给我们一个速度属性
ch1-basics/instrument-cluster.qface:
module Example.If.InstrumentClusterModule 1.0

interface InstrumentCluster {
    int speed;
}
首先,我们需要定义我们想要描述哪个模块。该模块充当命名空间,因为IDL文件可以包含多个接口。
ch1-basics/instrument-cluster.qface:
module Example.If.InstrumentClusterModule 1.0
模块最重要的部分是其接口定义。
ch1-basics/instrument-cluster.qface:
interface InstrumentCluster {
    int speed;
}在这种情况下,我们定义了一个名为InstrumentCluster的接口,它包含一个属性。每个属性定义必须至少包含一个类型和一个名称。大部分基本类型都是内建的,可以在QFace IDL语法中找到。
自动生成
现在我们的第一个IDL文件已经准备好了,是时候使用接口框架生成工具从它中自动生成一个API了。使用qmake,这个自动生成过程被集成到构建系统中,并在编译时完成。类似于moc。使用CMake,生成是在配置时发生的。
以下代码段展示如何根据我们的IDL文件构建一个C++库
CMake:
ch1-basics/frontend/CMakeLists.txt:
find_package(Qt6 REQUIRED COMPONENTS Core InterfaceFramework Qml Quick)

qt_add_library(libIc_ch1)
set_target_properties(libIc_ch1 PROPERTIES OUTPUT_NAME "InstrumentCluster")
set_target_properties(libIc_ch1 PROPERTIES RUNTIME_OUTPUT_DIRECTORY ../)

# Interface Framework Generator:
qt_ifcodegen_extend_target(libIc_ch1
    IDL_FILES ../instrument-cluster.qface
    TEMPLATE frontend
)

set(import_path "${CMAKE_CURRENT_BINARY_DIR}/frontend/qml")
if (NOT ${import_path} IN_LIST QML_IMPORT_PATH)
    list (APPEND QML_IMPORT_PATH "${import_path}")
    set(QML_IMPORT_PATH ${QML_IMPORT_PATH} CACHE INTERNAL "" FORCE)
endif()首先使用find_package获取所有所需的库到CMake构建系统中。使用qt_add_library定义一个新的库,并且使用CMake的target_properties设置输出名和输出目录。由于我们将来需要链接到这个库,因此将其放置在上一个目录中更容易。
通过调用qt_ifcodegen_extend_target函数,调用autogenerator并使用之前定义的库扩展生成的文件。使用IDL_FILES参数指定输入文件。有关更多信息,请参阅构建系统集成。
qmake:
ch1-basics/frontend/frontend.pro:
TARGET = $$qtLibraryTarget(QtIfInstrumentCluster)
TEMPLATE = lib
DESTDIR = ..

QT += interfaceframework qml quick

CONFIG += ifcodegen
IFCODEGEN_SOURCES = ../instrument-cluster.qface
大多数的.pro文件是一个标准的用于定义C++库的设置,使用"lib" TEMPLATE并在TARGET变量中定义所需的文件名。我们使用的qtLibraryTarget函数有助于正确附加"debug"后缀,为提供调试信息的库。将来我们需要链接这个文件,因此我们将DESTDIR设置为上一个目录以简化这一过程。
注意:Windows会在同一目录下自动搜索库。
激活接口框架生成器集成需要将CONFIG变量设置为指定ifcodegen选项。这确保在构建过程中调用接口框架生成器,使用在IFCODEGEN_SOURCES中指定的QFace文件。有关更多信息,请参阅构建系统集成。
哪些文件会自动生成
接口框架生成器基于生成模板工作。这些模板定义了从QFace文件生成什么内容。使用qmake,需要使用IFCODEGEN_TEMPLATE变量来定义模板。如果没有定义,它将默认为"frontend"模板。在CMake中,需要使用qt_ifcodegen_extend_target及其关联函数的TEMPLATE参数来指定模板。有关这些模板的更多详细信息,请参阅使用生成器。
简而言之,"frontend"模板为QFace文件中的每个接口生成
- 一个来自QIfAbstractFeature的C++类
- 一个模块类,它有助于将所有接口注册到QML中,并存储全局类型和函数。
要自行检查C++代码,您可以查看库构建文件夹中的这些文件。
目前对我们来说最重要的自动生成文件是我们的定义接口的C++类。它看起来是这样的
ch1-basics/frontend/frontend/instrumentcluster.h:
/****************************************************************************
** Generated from 'instrument-cluster.qface': module Example.If.InstrumentClusterModule
**
** Created by: The Qt Interface Framework Generator (6.7.0)
**
** WARNING! All changes made in this file will be lost!
*****************************************************************************/

#ifndef INSTRUMENTCLUSTERMODULE_INSTRUMENTCLUSTER_H_
#define INSTRUMENTCLUSTERMODULE_INSTRUMENTCLUSTER_H_

#include "instrumentclustermodule.h"

#include <QtInterfaceFramework/QIfAbstractFeature>
#include <QtInterfaceFramework/QIfPendingReply>
#include <QtInterfaceFramework/QIfPagingModel>

class InstrumentClusterPrivate;
class InstrumentClusterBackendInterface;

class Q_EXAMPLE_IF_INSTRUMENTCLUSTERMODULE_EXPORT InstrumentCluster : public QIfAbstractFeature
{
    Q_OBJECT
    QML_NAMED_ELEMENT(InstrumentCluster)
    Q_PROPERTY(int speed READ speed WRITE setSpeed NOTIFY speedChanged FINAL)

public:
    explicit InstrumentCluster(QObject *parent = nullptr);
    ~InstrumentCluster() override;

    static void registerQmlTypes(const QString& uri, int majorVersion=1, int minorVersion=0);

    int speed() const;

public Q_SLOTS:
    void setSpeed(int speed);

Q_SIGNALS:
    void speedChanged(int speed);

protected:
    InstrumentClusterBackendInterface *instrumentclusterBackend() const;

    void connectToServiceObject(QIfServiceObject *service) Q_DECL_OVERRIDE;
    void clearServiceObject() Q_DECL_OVERRIDE;

private:
    Q_PRIVATE_SLOT(d_func(), void onSpeedChanged(int speed))
    Q_DECLARE_PRIVATE(InstrumentCluster)
};

#endif // INSTRUMENTCLUSTERMODULE_INSTRUMENTCLUSTER_H_
正如你所见,自动生成的C++类实现了一个我们在QFace文件中之前定义的speed(速度)属性。通过使用Q_OBJECT和Q_PROPERTY宏,这个类现在可以直接在您的QML代码中使用。
将前端库与QML代码集成
为了这个集成,我们使用由QML代码自动生成的前端库。为了简单起见,我们遵循标准的Qt示例模式,使用一个小的C++主函数,该函数将我们的自动生成的类型注册到QML,并将仪表集群QML代码加载到QQmlApplicationEngine中
ch1-basics/instrument-cluster/main.cpp:
#include "instrumentclustermodule.h"

using namespace Qt::StringLiterals;

int main(int argc, char *argv[])
{
    QGuiApplication app(argc, argv);

    QQmlApplicationEngine engine;
    InstrumentClusterModule::registerQmlTypes();
    engine.load(QUrl(u"qrc:///Cluster.qml"_s));

    return app.exec();
}
现在我们只需要实际集成InstrumentCluster QML元素,并将speed属性连接到leftDial。这通过首先使用instrumentCluster ID实例化元素来完成。
ch1-basics/instrument-cluster/Cluster.qml:
import QtQuick
import QtQuick.Window
import Example.If.InstrumentClusterModule

Window {
    id: root

    width: 1920
    height: 720
    title: qsTr("QtIF Instrument Cluster Chapter 1")
    visible: true
    color: "#0c0c0c"

    InstrumentCluster {
        id: instrumentCluster
    }
最后,我们可以创建一个绑定,将LeftDial Item的value属性绑定到我们的InstrumentCluster API的speed属性。
    LeftDial {
        id: leftDial
        anchors.left: parent.left
        anchors.leftMargin: 0.1 * width

        value: instrumentCluster.speed
    }
第二章:扩展接口并添加注解
在本章中,我们通过枚举和定义自己的结构来通过API添加更多属性,扩展我们的中间件API。
将速度定义为只读属性
之前,我们在QFace文件中以以下方式定义了speed属性
ch1-basics/instrument-cluster.qface:
module Example.If.InstrumentClusterModule 1.0

interface InstrumentCluster {
    int speed;
}
该属性被定义为可读和可写,因为我们没有使用任何额外的指定符。然而,对于我们的仪表集群示例来说,不需要可写speed属性,因为它不是用来加速汽车,而只是用来可视化当前状态。
要将属性定义为只读,请使用readonly关键字。
ch2-enums-structs/instrument-cluster.qface:
module Example.If.InstrumentClusterModule 1.0

interface InstrumentCluster {
    readonly int speed;
}
当我们再次构建我们的应用时,构建系统会识别这个更改并运行接口框架生成器来生成C++代码的更新版本。接口框架生成器完成后,打开构建文件夹中的instrumentcluster.h,你会注意到生成的speed属性已更改——它不再有设置器,现在是只读的。
ch2-enums-structs/frontend/frontend/instrumentcluster.h:
class Q_EXAMPLE_IF_INSTRUMENTCLUSTERMODULE_EXPORT InstrumentCluster : public QIfAbstractFeature
{
    Q_OBJECT
    QML_NAMED_ELEMENT(InstrumentCluster)
    Q_PROPERTY(int speed READ speed NOTIFY speedChanged FINAL)
    ...
};
扩展接口
为了实现提供完整仪表集群模拟的目标,我们需要将更多属性添加到我们的QFace文件中:rpm、fuel 和 temperature
ch2-enums-structs/instrument-cluster.qface:
module Example.If.InstrumentClusterModule 1.0

interface InstrumentCluster {
    readonly int speed;
    readonly int rpm;
    readonly real fuel;
    readonly real temperature;
}
你可能已经注意到,我们对fuel和temperature属性使用了不同的类型。在这里我们使用real,因为我们想以浮点数显示温度,显示当前油量时作为一个介于0和1之间的值。
定义一个新的枚举类型
一个有用的功能是能够在公制和英制系统之间切换,因此我们需要定义一个属性来表示我们当前使用的系统。使用布尔属性可能会工作,但不会提供良好的API,因此在QFace文件中定义一个新的枚举类型,并将其用作新system属性的类型。
ch2-enums-structs/instrument-cluster.qface:
module Example.If.InstrumentClusterModule 1.0

interface InstrumentCluster {
    readonly int speed;
    readonly int rpm;
    readonly real fuel;
    readonly real temperature;
    readonly SystemType systemType;
}

enum SystemType {
    Imperial,
    Metric
}
在自动生成的代码中,这导致枚举成为模块类的一部分,使得相同的枚举可以被同一模块中的多个类使用
ch2-enums-structs/frontend/frontend/instrumentclustermodule.h:
/****************************************************************************
** Generated from 'instrument-cluster.qface': module Example.If.InstrumentClusterModule
**
** Created by: The Qt Interface Framework Generator (6.7.0)
**
** WARNING! All changes made in this file will be lost!
*****************************************************************************/

#ifndef INSTRUMENTCLUSTERMODULE_H_
#define INSTRUMENTCLUSTERMODULE_H_

#include "instrumentclustermoduleglobal.h"

#include <QtCore/QObject>

class Q_EXAMPLE_IF_INSTRUMENTCLUSTERMODULE_EXPORT InstrumentClusterModule : public QObject
{
    Q_OBJECT

public:
    InstrumentClusterModule(QObject *parent=nullptr);

    enum SystemType {
        Imperial = 0,
        Metric = 1,
    };
    Q_ENUM(SystemType)
    static SystemType toSystemType(quint32 v, bool *ok);

    static void registerTypes();
    static void registerQmlTypes(const QString& uri = QStringLiteral("Example.If.InstrumentClusterModule"), int majorVersion = 1, int minorVersion = 0);
};

Q_EXAMPLE_IF_INSTRUMENTCLUSTERMODULE_EXPORT QDataStream &operator<<(QDataStream &out, InstrumentClusterModule::SystemType var);
Q_EXAMPLE_IF_INSTRUMENTCLUSTERMODULE_EXPORT QDataStream &operator>>(QDataStream &in, InstrumentClusterModule::SystemType &var);

#endif // INSTRUMENTCLUSTERMODULE_H_
添加一个新的结构
为了在仪表盘的右侧旋钮上显示警告,我们希望使用一个存储颜色、图标和文本的结构的警告;而不是使用三个独立的属性。类似于定义接口,我们可以在我们的QFace文件中使用struct关键字
ch2-enums-structs/instrument-cluster.qface:
struct Warning {
    string color
    string text
    string icon
}
将这个新结构用作属性的类型,其工作方式与使用枚举时相同。QFace文件现在应该看起来像这样
ch2-enums-structs/instrument-cluster.qface:
module Example.If.InstrumentClusterModule 1.0

interface InstrumentCluster {
    readonly int speed;
    readonly int rpm;
    readonly real fuel;
    readonly real temperature;
    readonly SystemType systemType;
    readonly Warning currentWarning;
}

enum SystemType {
    Imperial,
    Metric
}

struct Warning {
    string color
    string text
    string icon
}
集成新属性
像上一章一样,实际上集成新引入的属性涉及到创建绑定。rpm属性可以直接连接到rightDial项的value属性;同样的方法也被用于顶部的temperature属性。为了控制左旋钮显示哪个单位,leftDial项提供了布尔属性metricSystem。因为我们已经在QFace文件中使用了枚举,我们需要首先通过测试"Metric"的systemType属性来转换值。
ch2-enums-structs/instrument-cluster/Cluster.qml:
    LeftDial {
        id: leftDial
        anchors.left: parent.left
        anchors.leftMargin: 0.1 * width

        value: instrumentCluster.speed
        metricSystem: instrumentCluster.systemType === InstrumentClusterModule.Metric
    }
这些枚举是模块类的一部分,也被导出到QML为InstrumentClusterModule。要触发rightDial项中的警告,我们使用三个绑定来连接结构中的三个成员变量
    RightDial {
        id: rightDial
        anchors.right: parent.right
        anchors.rightMargin: 0.1 * width

        value: instrumentCluster.rpm
        warningColor: instrumentCluster.currentWarning.color
        warningText: instrumentCluster.currentWarning.text
        warningIcon: instrumentCluster.currentWarning.icon
        fuelLevel: instrumentCluster.fuel
    }
第三章:使用QML插件添加仿真后端和注释
在前两章中,我们使用QFace文件编写了一个中间件API,并使用接口框架生成器自动生成一个以库形式存在的C++ API。现在,在这一章中,我们进一步扩展这一功能,通过引入仿真后端和使用注释来为我们的仿真定义默认值。
前端和后端的分离
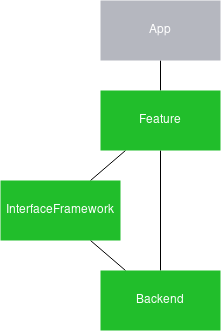
QtInterfaceFramework和接口框架生成器都允许你编写将前端从后端分离的代码。这允许你将API与其实际实现分开。Qt已经在许多领域使用这一概念,最显著的是在使用各种Qt平台(如Linux的XCB和macOS的Cocoa)时在底层窗口系统技术中的应用。
我们的中间件API也采用了这种分离,前端将API作为库提供;后端提供此API的实现。这个实现基于QtInterfaceFramework的Dynamic Backend System,这使我们能够在运行时在这些后端之间切换。

添加仿真后端
对于我们的仪表盘,我们希望添加这样的后端来提供实际值。现在,我们只希望有一些模拟行为,因为我们不能轻松地将其连接到真实车辆。这就是为什么这些后端被称为“仿真后端”。要添加这种类型的后端,再次使用接口框架生成器为我们做繁重的工作并生成一个。这项工作是以与我们使用“前端”模板生成库类似的方式进行。但现在,我们使用“backend_simulator”模板
CMake:
ch3-simulation-backend/backend_simulator/CMakeLists.txt
find_package(Qt6 REQUIRED COMPONENTS Core Gui InterfaceFramework)

qt_add_plugin(ic_ch3_simulation PLUGIN_TYPE interfaceframework)
set_target_properties(ic_ch3_simulation PROPERTIES LIBRARY_OUTPUT_DIRECTORY ../interfaceframework)

# Interface Framework Generator:
qt_ifcodegen_extend_target(ic_ch3_simulation
    IDL_FILES ../instrument-cluster.qface
    TEMPLATE backend_simulator
)与前端的库类似,首先使用find_package导入所使用的组件。因为我们想构建一个在运行时加载的插件(动态库)而不是链接到它,所以我们使用qt_add_plugin函数。这里的一个重要方面是库名以"_simulation"结尾,这是一种告诉QtInterfaceFramework这是一个模拟后端的方式。当可用的“生产”后端时,它会 prefers 与“模拟”后端。有关更多信息,请参阅动态后端系统。
与之前一样,通过使用qt_ifcodegen_extend_target函数调用接口框架生成器,这次设置TEMPLATE为"backend_simulator"。
qmake:
ch3-simulation-backend/backend_simulator/backend_simulator.pro:
TEMPLATE = lib
TARGET = $$qtLibraryTarget(instrumentcluster_simulation)
QT += core interfaceframework
CONFIG += ifcodegen plugin

IFCODEGEN_TEMPLATE = backend_simulator
IFCODEGEN_SOURCES = ../instrument-cluster.qface
PLUGIN_TYPE = interfaceframework

# Additional import path used to resolve QML modules in Qt Creator's code model
QML_IMPORT_PATH = $$OUT_PWD/../frontend/qml
与前端库类似,项目文件构建一个lib,并使用qtLibraryTarget定义库名,也支持Windows调试后缀。这里的一个重要方面是库名以"_simulation"结尾,这是一种告诉QtInterfaceFramework这是一个模拟后端的方式。当可用的“生产”后端时,它 prefered 与“模拟”后端。有关更多信息,请参阅动态后端系统。
启用接口框架生成器的方法与我们 earlier 相同:使用相同的IFCODEGEN_SOURCES变量,但将IFCODEGEN_TEMPLATE定义为"backend_simulator",以使用正确的生成模板。此外,我们需要将'plugin'添加到CONFIG变量中,使这个库成为Qt插件,可以轻松在运行时加载。
链接设置和定位插件
现在尝试直接编译项目文件将导致编译和链接错误。这是因为:为了进行前端和后端的分离,我们需要后端实现一个定义的接口类,这个类为前端所知。这个接口称为“后端接口”,它是前端库的一部分自动生成的。因为这个类提供了信号和槽并使用QObject作为其基类,所以当你从它继承时需要链接到前端库。因为这对于后端插件是必需的,所以我们需要添加以下行
CMake:
ch3-simulation-backend/backend_simulator/CMakeLists.txt:
target_link_libraries(ic_ch3_simulation PUBLIC
    libIc_ch3
)

set(import_path "${CMAKE_CURRENT_BINARY_DIR}/backend_simulator/qml")
if (NOT ${import_path} IN_LIST QML_IMPORT_PATH)
    list (APPEND QML_IMPORT_PATH "${import_path}")
    set(QML_IMPORT_PATH ${QML_IMPORT_PATH} CACHE INTERNAL "" FORCE)
endif()通过将前端库libIc_ch3定义为目标链接库,相应的更新了包含路径。
qmake:
ch3-simulation-backend/backend_simulator/backend_simulator.pro:
LIBS += -L$$OUT_PWD/../ -l$$qtLibraryTarget(QtIfInstrumentCluster)
INCLUDEPATH += $$OUT_PWD/../frontend
现在项目应该可以顺利构建,并在您的构建文件夹中创建插件;或者如果您没有使用阴影构建,则是插件文件夹。再次启动仪表盘时,您应该看到以下消息
There is no production backend implementing "Example.If.InstrumentCluster.InstrumentCluster" .
There is no simulation backend implementing "Example.If.InstrumentCluster.InstrumentCluster" .
No suitable ServiceObject found.
此消息表示QtInterfaceFramework仍然无法找到我们刚刚创建的模拟插件。在此处,您需要了解一些关于Qt插件系统的更多信息,特别是它如何查找插件。
Qt在其多个目录中搜索插件,第一个是插件文件夹plugins,这是Qt安装的一部分。在插件文件夹中,每个插件类型都有自己的子文件夹,例如用于与底层平台API和窗口系统通信的平台插件platforms。
类似地,QtInterfaceFramework在其interfaceframework文件夹中查找后端插件。
为了确保我们的模拟后端最终落在这个文件夹中,我们在我们的构建系统文件中添加以下更改
CMake:
ch3-simulation-backend/backend_simulator/CMakeLists.txt:
set_target_properties(ic_ch3_simulation PROPERTIES LIBRARY_OUTPUT_DIRECTORY ../interfaceframework)
qmake:
ch3-simulation-backend/backend_simulator/backend_simulator.pro:
DESTDIR = ../interfaceframework
您可能想知道在上级目录中创建一个interfaceframework文件夹如何解决插件查找的问题,因为这个文件夹并不属于系统的插件文件夹。但Qt支持在多个文件夹中搜索此类插件,其中一个文件夹是可执行文件所在路径。
或者,我们可以使用QCoreApplication::addLibraryPath()函数或使用环境变量QT_PLUGIN_PATH来添加额外的插件路径。更多信息,请参考如何创建Qt插件。
现在一切准备就绪,但由于我们的插件链接到前端库,我们需要确保动态链接器可以找到库。这可以通过将环境变量LD_LIBRARY_PATH设置为我们库文件夹实现。但这会导致这样的问题,即每个用户都需要设置这个变量才能使用我们的应用程序。
CMake:
使用CMake,自动将前端库的位置添加到二进制文件的RUNPATH中,无需进一步操作。
qmake:
在qmake中,我们可以使用相对的RPATH替代LD_LIBRARY_PATH,并注释我们的插件,提供链接器可能找到所需库的信息,这些库相对于插件的位置。
ch3-simulation-backend/backend_simulator/backend_simulator.pro:
INCLUDEPATH += $$OUT_PWD/../frontend
QMAKE_RPATHDIR += $$QMAKE_REL_RPATH_BASE/../
在QML插件中导出QML类型
在第一章中,我们扩展了我们的main.cpp以注册我们自动生成的中间件API的所有类型。尽管这样操作是可行的,但在大型项目中通常使用QML插件并能够使用qml可执行文件进行开发。尽管执行这一操作的代码并不复杂,但接口框架生成器也支持这种操作并使操作更加简单。
从第一章中我们知道,模块名称用于QML导入URI。这对于QML插件来说非常重要,因为QmlEngine期望插件位于一个特定文件夹中,该文件夹遵循模块名称,其中模块名称的每个部分都是一个子文件夹。我们的构建系统文件以生成QML插件如下所示
CMake:
ch3-simulation-backend/imports/CMakeLists.txt:
qt_ifcodegen_import_variables(CLUSTER
    IDL_FILES ../instrument-cluster.qface
    TEMPLATE qmlplugin
)

qt_add_qml_module(ic_ch3_imports
    OUTPUT_DIRECTORY "${CMAKE_CURRENT_BINARY_DIR}/${CLUSTER_URI_PATH}"
    URI ${CLUSTER_URI}
    VERSION ${CLUSTER_VERSION}
    CLASS_NAME InstrumentClusterModuleQmlPlugin
    RESOURCE_PREFIX "/"
    PLUGIN_TARGET ic_ch3_imports
    NO_PLUGIN_OPTIONAL
    NO_GENERATE_PLUGIN_SOURCE
    IMPORTS QtInterfaceFramework
    SOURCES
        ${CLUSTER_SOURCES}
)

target_link_libraries(ic_ch3_imports PUBLIC
    libIc_ch3
)与之前所有的生成器调用不同,我们不是扩展一个之前定义的目标,而是将生成的代码导入CMake,并将其传递给qt_add_qml_module函数。函数qt_ifcodegen_import_variables将调用生成器并将以CLUSTER作为前缀的变量导出到当前CMake作用域。这些变量引用了自动生成代码,但同时也公开了其他信息,如QML导入URI。在下一个调用中,使用这些变量定义了具有正确URI和版本的QML模块(如我们的IDL文件中所指定)。通过使用OUTPUT_DIRECTORY变量,我们可以确保生成正确的文件夹结构,并可以直接从构建文件夹中导入QML插件。
注意:除了生成QML插件外,新引入的QML类型注册也可以使用,该机制在6.3版本中引入。为了使用这种新机制,前端CMakeLists.txt必须像这样扩展
qt_ifcodegen_extend_target(libIc_ch3
    IDL_FILES ../instrument-cluster.qface
    PREFIX CLUSTER
    TEMPLATE frontend
)
qt_add_qml_module(libIc_ch3
    OUTPUT_DIRECTORY "${CMAKE_CURRENT_BINARY_DIR}/../imports/${CLUSTER_URI_PATH}"
    URI ${CLUSTER_URI}
    VERSION ${CLUSTER_VERSION}
    RESOURCE_PREFIX "/"
    IMPORTS QtInterfaceFramework/auto
)有关更多信息,请参阅QML类型注册。
qmake:
ch3-simulation-backend/imports/imports.pro:
TEMPLATE = lib
CONFIG += plugin
QT += interfaceframework

LIBS += -L$$OUT_PWD/../ -l$$qtLibraryTarget(QtIfInstrumentCluster)
INCLUDEPATH += $$OUT_PWD/../frontend

IFCODEGEN_TEMPLATE = qmlplugin
IFCODEGEN_SOURCES = ../instrument-cluster.qface

load(ifcodegen)

DESTDIR = $$OUT_PWD/$$replace(URI, \\., /)
QMAKE_RPATHDIR += $$QMAKE_REL_RPATH_BASE/../../../../

exists($$OUT_PWD/qmldir) {
    cpqmldir.files = $$OUT_PWD/qmldir \
                     $$OUT_PWD/plugins.qmltypes
    cpqmldir.path = $$DESTDIR
    cpqmldir.CONFIG = no_check_exist
    COPIES += cpqmldir
}
所有直到 IFCODEGEN_SOURCES 的行都应该很熟悉。我们使用 CONFIG 来构建插件,然后定义链接器设置以链接到我们的前端库。然后,我们使用 IFCODEGEN_TEMPLATE 来定义 "qmlplugin" 作为生成模板。这次我们不是将 ifcodegen 添加到 CONFIG 中,而是使用 qmake 的 load() 函数 来明确加载功能。这使我们能够使用 "qmlplugin" 生成模板中的 URI 变量。这个 URI 可以用来通过将所有点替换为斜杠来定义 DESTDIR。
除了文件夹结构外,QmlEngine 还需要一个 qmldir 文件,该文件指示哪些文件是插件的一部分以及在哪个 URI 下。有关更多信息,请参阅 模块定义 qmldir 文件。此 qmldir 文件和用于提供有关代码完成信息的 plugins.qmltypes 文件都由接口框架生成器自动生成;但它们需要放在库旁边。为此,我们向类似于 INSTALL 目标的范围内添加文件,但将其添加到 COPIES 变量中。这样,确保在构建插件时复制文件。
现在插件已准备好使用,但我们的仪表盘集群应用程序不知道在哪里查找它,仍在使用旧的硬编码注册。因此,我们现在可以从 instrument-cluster 构建系统文件中删除链接步骤,并相应地更改我们的主文件
ch3-simulation-backend/instrument-cluster/main.cpp:
#include <QGuiApplication>
#include <QQmlApplicationEngine>

using namespace Qt::StringLiterals;

int main(int argc, char *argv[])
{
    QGuiApplication app(argc, argv);

    QQmlApplicationEngine engine;
    engine.addImportPath(app.applicationDirPath() + "/imports");
    engine.load(QUrl(u"qrc:///Cluster.qml"_s));

    return app.exec();
}
变化之处在于我们现在添加了一个额外的导入路径,使用 addImportPath 函数,它指向二进制文件位置的 "imports" 文件夹。
第四章:添加自定义模拟
到目前为止,我们已经创建了一个中间件 API,并将其集成到我们的仪表盘集群 QML 代码中,扩展了它并使用一个 QML 插件,还生成了模拟后端。在后台,为了支持我们,已经发生了很多事情;但在 UI 方面,至今没有太大的变化。本章将介绍通过定义合理的默认值和开始模拟真实的车程来激活我们的模拟后端。
定义默认值
我们首先使用 QFace 文件中的注解来定义属性的默认值。注解是一种特殊的注释类型,它可以为接口、方法、属性等添加额外数据。对于此用例,我们使用 config_simulator 注解。有关更多信息,请参阅 注解。所有支持注解的参考资料可以在 此处 找到。
目前,在我们的仪表盘集群中,温度默认为 0。让我们将其更改为春天的温度,15 摄氏度,以下 YAML 片段需要添加到 qface 文件中属性定义之上。
ch4-simulation-behavior/instrument-cluster.qface:
    readonly int speed;
    readonly int rpm;
    readonly real fuel;
    @config_simulator: { default: 15 }
    readonly real temperature;
为了使这个温度变化反映在我们的仪表盘集群中,重新编译插件。让我们看看这样实际上是如何工作的:当启动接口框架生成器时,config_simulator 注解被转换成 JSON 文件,现在它是 "simulation backend" 构建文件夹的一部分。这个 JSON 文件看起来像这样
ch4-simulation-behavior/backend_simulator/backend_simulator/instrumentclustermodule_simulation_data.json:
{
  "InstrumentCluster": {
    "temperature": {
      "default": 15
    }
  }
}但是这个JSON文件是如何与实际的模拟后端代码相关联的呢?自动生成的模拟后端代码使用了QIfSimulationEngine,它读取JSON文件并将数据提供给QML模拟文件。同时也会自动生成一个默认的QML文件,并通过QIfSimulationEngine加载。这个默认的QML文件定义了模拟后端应执行的行为。
在下一节中,我们将探讨QML文件以及如何对其进行更改。但在那之前,让我们看看如何更动态地更改默认值。
当设置环境变量QTIF_SIMULATION_DATA_OVERRIDE时,QIfSimulationEngine允许我们覆盖要加载到引擎中的JSON文件。由于可能存在多个由不同后端运行的不同引擎,因此我们需要定义我们指的是哪个引擎。在自动生成的代码中,模块名称总是用作引擎指定器。对于本章,我们已经准备了一个位于源目录中的第二个JSON文件。按照以下方式设置环境变量,可以将systemType从mph更改为km/h
QTIF_SIMULATION_DATA_OVERRIDE=example.if.instrumentclustermodule=<path-to-file>/kmh.json
定义QML行为
在我们定义自定义行为之前,让我们看看为我们自动生成的代码。有两个QML文件:第一个是instrumentcluster_simulation.qml,相当简单。它定义了一个入口实例化第二个文件,即InstrumentClusterSimulation.qml文件。这种分割是为了存在多个接口定义属于同一个模块的情况。
注意:一个QML引擎只能有一个入口点。当QIfSimulationEngine具有相同的限制,并且如果您有一个具有多个接口的模块,并且您希望有多个模拟文件——每个接口一个。这就是为什么第一个QML文件只实例化了所有它支持的接口的QML文件。在我们的例子中,只有一个接口。
InstrumentClusterSimulation.qml文件非常有趣
ch4-simulation-behavior/backend_simulator/backend_simulator/InstrumentClusterSimulation.qml:
/****************************************************************************
** Generated from 'instrument-cluster.qface': module Example.If.InstrumentClusterModule
**
** Created by: The Qt Interface Framework Generator (6.7.0)
**
** WARNING! All changes made in this file will be lost!
*****************************************************************************/

import QtQuick
import Example.If.InstrumentClusterModule.simulation

InstrumentClusterBackend {
    id: backend

    property QtObject d: QtObject {
        id: d
        property var settings: IfSimulator.findData(IfSimulator.simulationData, "InstrumentCluster")
        property bool defaultInitialized: false
        property LoggingCategory qLcInstrumentCluster: LoggingCategory {
            name: "example.if.instrumentclustermodule.simulation.instrumentclusterbackend"
        }
    }

    function initialize() {
        console.log(d.qLcInstrumentCluster, "INITIALIZE")
        if (!d.defaultInitialized) {
            IfSimulator.initializeDefault(d.settings, backend)
            d.defaultInitialized = true
        }
        Base.initialize()
    }

    function setSpeed(speed) {
        if ("speed" in d.settings && !IfSimulator.checkSettings(d.settings["speed"], speed)) {
            console.error(d.qLcInstrumentCluster, "SIMULATION changing speed is not possible: provided: " + speed + " constraint: " + IfSimulator.constraint(d.settings["speed"]));
            return;
        }

        console.log(d.qLcInstrumentCluster, "SIMULATION speed changed to: " + speed);
        backend.speed = speed
    }

    function setRpm(rpm) {
        if ("rpm" in d.settings && !IfSimulator.checkSettings(d.settings["rpm"], rpm)) {
            console.error(d.qLcInstrumentCluster, "SIMULATION changing rpm is not possible: provided: " + rpm + " constraint: " + IfSimulator.constraint(d.settings["rpm"]));
            return;
        }

        console.log(d.qLcInstrumentCluster, "SIMULATION rpm changed to: " + rpm);
        backend.rpm = rpm
    }

    function setFuel(fuel) {
        if ("fuel" in d.settings && !IfSimulator.checkSettings(d.settings["fuel"], fuel)) {
            console.error(d.qLcInstrumentCluster, "SIMULATION changing fuel is not possible: provided: " + fuel + " constraint: " + IfSimulator.constraint(d.settings["fuel"]));
            return;
        }

        console.log(d.qLcInstrumentCluster, "SIMULATION fuel changed to: " + fuel);
        backend.fuel = fuel
    }

    function setTemperature(temperature) {
        if ("temperature" in d.settings && !IfSimulator.checkSettings(d.settings["temperature"], temperature)) {
            console.error(d.qLcInstrumentCluster, "SIMULATION changing temperature is not possible: provided: " + temperature + " constraint: " + IfSimulator.constraint(d.settings["temperature"]));
            return;
        }

        console.log(d.qLcInstrumentCluster, "SIMULATION temperature changed to: " + temperature);
        backend.temperature = temperature
    }

    function setSystemType(systemType) {
        if ("systemType" in d.settings && !IfSimulator.checkSettings(d.settings["systemType"], systemType)) {
            console.error(d.qLcInstrumentCluster, "SIMULATION changing systemType is not possible: provided: " + systemType + " constraint: " + IfSimulator.constraint(d.settings["systemType"]));
            return;
        }

        console.log(d.qLcInstrumentCluster, "SIMULATION systemType changed to: " + systemType);
        backend.systemType = systemType
    }

    function setCurrentWarning(currentWarning) {
        if ("currentWarning" in d.settings && !IfSimulator.checkSettings(d.settings["currentWarning"], currentWarning)) {
            console.error(d.qLcInstrumentCluster, "SIMULATION changing currentWarning is not possible: provided: " + currentWarning + " constraint: " + IfSimulator.constraint(d.settings["currentWarning"]));
            return;
        }

        console.log(d.qLcInstrumentCluster, "SIMULATION currentWarning changed to: " + currentWarning);
        backend.currentWarning = currentWarning
    }
}
首先,有一个settings属性,它使用从IfSimulator.findData方法返回的值进行初始化,该方法采用IfSimulator.simulationData和字符串作为输入。simulationData是以JavaScript对象表示的JSON文件。
《code translate="no">findData方法帮助我们从对这个接口感兴趣的数据中提取数据InstrumentCluster。接下来的属性帮助接口了解是否设置了默认值。LoggingCategory用于识别来自这个模拟文件的计算输出。
之后,实际行为通过实例化一个InstrumentClusterBackend项并将其扩展为更多功能来定义。InstrumentClusterBackend是向我们的 InstrumentCluster QML前端类的接口。但是,除了前端外,这些属性也是可写的,以便可以将它们更改以提供有用的模拟。
每次前端实例连接到后端时,都会调用initialize()函数。对于QML模拟也是如此:当initialize() C++函数将其转发给QML实例时。这也适用于所有其他函数,例如属性的设置器和获取器或方法。有关更多详细信息,请参阅QIfSimulationEngine。
在QML的initialize()函数中,我们调用IfSimulator.initializeDefault(),从simulationData对象中读取默认值并初始化所有属性。这是仅一次执行的,因为我们不希望在下次前端实例连接到后端时将属性重置为默认值。最后,调用基本实现以确保向前端发送initializationDone信号。
类似地,为每个属性定义了一个setter函数;它们使用IfSimulator.checkSettings()从simulationData读取特定约束设置,并检查这些约束对新值是否有效。如果这些约束无效,则使用IfSimulator.constraint()向用户提供一个有意义的错误消息。
定义我们自己的QML模拟
如上所述,InstrumentClusterBackend项目提供了我们QFace文件的所有属性。这可以通过更改属性为我们想要的值来模拟行为。这种方法的最简单形式就是值赋值,但这将会非常静态,并非我们想要 达到的。相反,我们使用QML动画对象来在时间上改变值。
ch4-simulation-behavior/backend_simulator/simulation.qml:
                    NumberAnimation {
                        target: backend
                        property: "speed"
                        from: 0
                        to: 80
                        duration: 4000
                    }
上述代码示例将速度属性在4000秒内改为80,并模拟一辆加速的汽车。通过将其他属性的应用扩展到时间和并行动画,我们可以创建一个完整的模拟。
ch4-simulation-behavior/backend_simulator/simulation.qml:
        property var animation: SequentialAnimation {
            loops: Animation.Infinite
            running: true

            ParallelAnimation {
                SequentialAnimation {

                    NumberAnimation {
                        target: backend
                        property: "speed"
                        from: 0
                        to: 80
                        duration: 4000
                    }

                    NumberAnimation {
                        target: backend
                        property: "speed"
                        to: 50
                        duration: 2000
                    }

                    NumberAnimation {
                        target: backend
                        property: "speed"
                        to: 200
                        duration: 7000
                    }

                    ScriptAction {
                        script: {
                            backend.currentWarning = InstrumentClusterModule.warning("red","LOW FUEL", "images/fuelsymbol_orange.png")
                        }
                    }

                    NumberAnimation {
                        target: backend
                        property: "speed"
                        to: 0
                        duration: 5000
                    }

                    ScriptAction {
                        script: {
                            backend.currentWarning = InstrumentClusterModule.warning()
                        }
                    }
                }

                NumberAnimation {
                    target: backend
                    property: "fuel"
                    from: 1
                    to: 0.22
                    duration: 18000
                }
            }

            NumberAnimation {
                target: backend
                property: "fuel"
                from: 0.22
                to: 1
                duration: 4000
            }
        }
然后,为了为rpm属性提供一个良好的模拟,我们使用一个绑定,该绑定根据当前速度执行一些计算。完整的模拟文件看起来像这样
ch4-simulation-behavior/backend_simulator/simulation.qml:
import QtQuick
import Example.If.InstrumentClusterModule.simulation

QtObject {
    property var settings : IfSimulator.findData(IfSimulator.simulationData, "InstrumentCluster")
    property bool defaultInitialized: false
    property LoggingCategory qLcInstrumentCluster: LoggingCategory {
        name: "example.if.instrumentclustermodule.simulation.instrumentclusterbackend"
    }
    property var backend : InstrumentClusterBackend {

        function initialize() {
            console.log(qLcInstrumentCluster, "INITIALIZE")
            if (!defaultInitialized) {
                IfSimulator.initializeDefault(settings, backend)
                defaultInitialized = true
            }
            Base.initialize()
        }

        property int gearSpeed: 260 / 6
        property int currentGear: speed / gearSpeed
        rpm : currentGear >= 1 ? 3000 + (speed % gearSpeed) / gearSpeed * 2000
                               : (speed % gearSpeed) / gearSpeed * 5000

        property var animation: SequentialAnimation {
            loops: Animation.Infinite
            running: true

            ParallelAnimation {
                SequentialAnimation {

                    NumberAnimation {
                        target: backend
                        property: "speed"
                        from: 0
                        to: 80
                        duration: 4000
                    }

                    NumberAnimation {
                        target: backend
                        property: "speed"
                        to: 50
                        duration: 2000
                    }

                    NumberAnimation {
                        target: backend
                        property: "speed"
                        to: 200
                        duration: 7000
                    }

                    ScriptAction {
                        script: {
                            backend.currentWarning = InstrumentClusterModule.warning("red","LOW FUEL", "images/fuelsymbol_orange.png")
                        }
                    }

                    NumberAnimation {
                        target: backend
                        property: "speed"
                        to: 0
                        duration: 5000
                    }

                    ScriptAction {
                        script: {
                            backend.currentWarning = InstrumentClusterModule.warning()
                        }
                    }
                }

                NumberAnimation {
                    target: backend
                    property: "fuel"
                    from: 1
                    to: 0.22
                    duration: 18000
                }
            }

            NumberAnimation {
                target: backend
                property: "fuel"
                from: 0.22
                to: 1
                duration: 4000
            }
        }
    }
}
下一步是将我们的新模拟文件通知接口框架生成器和QIfSimulationEngine。类似于QML文件,这里最好的方法是将模拟文件放入一个资源文件中。在我们的例子中,我们添加了一个名为simulation.qrc的新文件,该文件包含了我们的simulation.qml,使用/前缀。
在我们的QFace文件中,现在需要将此位置以注释的形式添加
ch4-simulation-behavior/instrument-cluster.qface;
@config_simulator: { simulationFile: "qrc:/simulation.qml" }
module Example.If.InstrumentClusterModule 1.0
...现在,重建模拟后端将模拟文件嵌入到插件中,并将其传递给QIfSimulationEngine,加载时启动模拟。
第5章:添加结合QtRemoteObjects的模拟服务器
在本章中,我们将仪表盘扩展以使用进程间通信(IPC)机制,并使用两个进程。目前,模拟作为插件加载,使其成为同一服务的一部分。虽然这对小型示例应用来说已经足够好了,但这不是现代多进程架构中常用的方法,在这些架构中,多个进程需要能够访问相同的值并对其变化做出反应。我们可以编写第二个应用程序来使用相同的Middlewar eAPI。然而,我们只需要启动仪表盘两次并检查动画是否同步即可实现相同的效果。目前,它们并没有同步。
添加QtRemoteObjects集成
本例的IPC为