应用功能示例
展示具有各种功能和QML模块化的客户端应用程序。

注意:如果您想在Linux机器上构建示例,请阅读此内容。
简介
本示例演示了如何在应用程序中实现一些特定的功能,例如
- 如何实现嵌套合成器
- 如何模拟崩溃并从中恢复
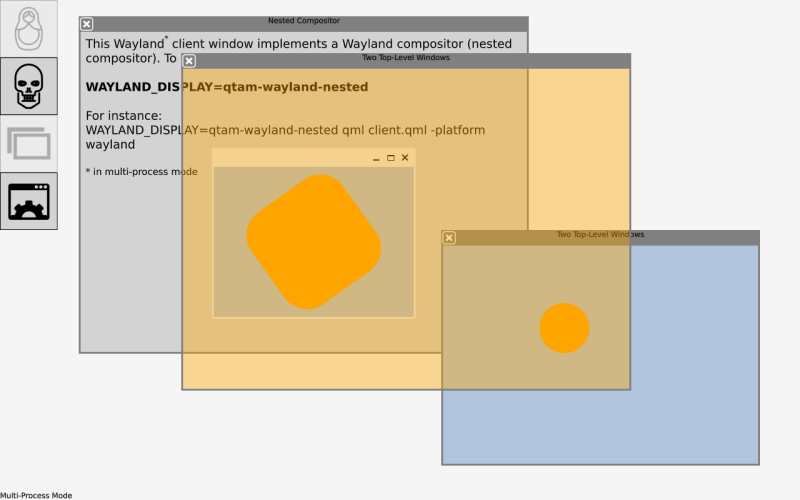
- 如何同时显示多个顶级窗口
- 如何使用本地运行时,无需QML
大多数这些功能只在多进程模式下得到充分支持。
本例关注于应用程序(客户端)方面。系统UI(合成器/服务器)基于桌面系统UI示例,并进行了一些修改。有关如何实现系统UI的更多详细信息,请参阅该示例。
此外,本示例演示了如何在应用程序管理器上下文中编写和使用QML模块,详见下文。
嵌套合成器
嵌套合成器应用程序演示了如何在应用程序(Wayland客户端)窗口内部实现一个Wayland合成器。这个合成器是用纯QML实现的,并且尽可能地简易。要在此合成器中显示Wayland客户端,您需要适当地设置环境变量WAYLAND_DISPLAY。
通过命令行设置环境变量来启动客户端
WAYLAND_DISPLAY=qtam-wayland-nested qml client.qml -platform wayland
此命令只在多进程模式下有效,因为嵌套合成器需要一个真实的窗口作为其根元素。
嵌套合成器应用程序的QML代码如下
import QtQuick
import QtApplicationManager.Application
import QtWayland.Compositor
import QtWayland.Compositor.XdgShell
import QtWayland.Compositor.WlShell

ApplicationManagerWindow {
    id: root
    color: "lightgrey"

    property ListModel shellSurfaces: ListModel {}

    Text {
        anchors.fill: parent
        anchors.margins: 8
        font.pointSize: 14
        wrapMode: Text.Wrap
        textFormat: Text.RichText
        text: "This Wayland<sup>*</sup> client window implements a Wayland compositor (nested compositor). " +
              "To display Wayland clients here, set:<br><br><b>WAYLAND_DISPLAY=qtam-wayland-nested</b>" +
              "<br><br>For instance:<br>WAYLAND_DISPLAY=qtam-wayland-nested qml client.qml -platform wayland" +
              "<br><br><small>* in multi-process mode</small>"
    }

    WaylandCompositor {
        socketName: "qtam-wayland-nested"

        WaylandOutput {
            window: root.backingObject
            sizeFollowsWindow: true
        }

        WlShell {
            onWlShellSurfaceCreated: (shellSurface) => root.shellSurfaces.append({shellSurface: shellSurface});
        }

        XdgShell {
            onToplevelCreated: (toplevel, xdgSurface) => root.shellSurfaces.append({shellSurface: xdgSurface});
        }
    }

    Repeater {
        model: root.shellSurfaces
        ShellSurfaceItem {
            required property var modelData
            required property int index
            shellSurface: modelData
            onSurfaceDestroyed: root.shellSurfaces.remove(index)
        }
    }

    Component.onCompleted: console.info("Start a client application in the nested compositor for instance with:\n  " +
                                        "WAYLAND_DISPLAY=qtam-wayland-nested QT_WAYLAND_DISABLE_WINDOWDECORATION=1 " +
                                        "QT_WAYLAND_SHELL_INTEGRATION=xdg-shell qml client.qml -platform wayland");
}
崩溃模拟和恢复
此应用程序提供了多种强制应用程序崩溃的方式,例如段错误。它利用了包括C++和QML代码在内的QML模块;特别是,提供的QML类型Terminator1和Terminator2用于触发崩溃。应用程序管理器随后打印出现原因和相关信息,如回溯。系统UI实现了基本形式的崩溃恢复:重新启动应用程序。当然,崩溃恢复只在多进程模式下有效。在单进程模式下,崩溃会影响整个程序(系统UI)。
崩溃模拟和恢复应用程序的QML代码如下
import QtQuick
import QtApplicationManager.Application
import Crash
import Sequel

ApplicationManagerWindow {
    id: root

    readonly property var modes: ({
           illegalMemory: [ "Illegal memory access", root.accessIllegalMemory ],
           illegalMemoryInThread: [ "Illegal memory access in a thread", t2.accessIllegalMemoryInThread ],
           stackOverflow: [ "Force stack overflow", t2.forceStackOverflow ],
           divideByZero: [ "Divide by zero", t2.divideByZero ],
           raise: [ "Raise signal 7", t2.raise ],
           abort: [ "Call abort", Terminator1.abort ],
           unhandledException: [ "Throw unhandled exception", Terminator1.throwUnhandledException ],
           gracefully: [ "Exit gracefully", Terminator1.exitGracefully ]
    })

    property var accessIllegalMemory: (function() {
        let count = 0;
        return function recursive() {
            if (++count > 9)
                t2.accessIllegalMemory();
            else
                root.accessIllegalMemory();
        }
    })()

    color: "black"

    Terminator2 {
        id: t2
        signum: 7
    }

    CrashAnimation {
        id: crashAnimation;
        scaleTarget: content
        colorTarget: root
        onFinished: root.modes[mode][1]();
    }

    Grid {
        id: content
        anchors.centerIn: parent
        columns: 2
        Repeater {
            model: Object.keys(root.modes)
            Rectangle {
                required property var modelData
                width: root.width / 2
                height: root.height / 4
                border.width: 1
                color: "lightgrey"

                Text {
                    anchors.fill: parent
                    horizontalAlignment: Text.AlignHCenter
                    verticalAlignment: Text.AlignVCenter
                    wrapMode: Text.Wrap
                    font.pointSize: 14
                    text: modes[parent.modelData][0]
                }

                MouseArea {
                    anchors.fill: parent
                    onClicked: crashAnimation.mode = parent.modelData;
                }
            }
        }
    }
}
两个顶级窗口
此应用程序说明您可以通过将QtObject用作应用程序的根元素来显示多个顶级窗口。
两个顶级窗口应用程序的QML代码如下
import QtQuick
import QtApplicationManager.Application

QtObject {
    property var win1: ApplicationManagerWindow {
        color: "lightsteelblue"

        Rectangle {
            width: 80; height: 80; radius: 40
            color: "orange"

            MouseArea {
                anchors.fill: parent
                drag.target: parent
            }
        }
    }

    property var win2: ApplicationManagerWindow {
        color: "transparent"

        Rectangle {
            id: rect
            anchors.fill: parent
            color: "orange"
            opacity: 0.4
        }

        ApplicationManagerWindow {
            id: popup
            width: 300; height: 100

            Rectangle {
                anchors.fill: parent
                border.width: 1
                color: "orangered"
            }

            Text {
                anchors.centerIn: parent
                text: "Click to hide!"
            }

            MouseArea {
                anchors.fill: parent
                onClicked: popup.visible = false;
            }

            Component.onCompleted: setWindowProperty("type", "pop-up");
        }
    }
}
本地小部件
此应用基于QWidget。与其他本例中的QML应用相比,此应用使用本地运行时。因此,应用程序的入口点不是一个main.qml文件,而是一个可执行文件。这是一个基本的应用程序,仍遵循特定的系统UI。它的目的是说明概念:系统UI需要一个type窗口属性来区分普通窗口和弹出窗口。
此应用只能在多进程模式下工作,因为应用程序进程不能在单进程模式下启动。
默认情况下,链接到私有应用程序管理器模块是禁止的,以避免来自QML插件的双重符号可能引起的问题。但是,在这里构建对它们是有意且必需的,因此我们需要设置定义AM_COMPILING_LAUNCHER
target_compile_definitions(widgets PRIVATE AM_COMPILING_LAUNCHER)
本地小部件应用使用的C++代码如下
#include <QApplication>
#include <QPushButton>
#include <QDialog>
#include <QVBoxLayout>

#include <QtAppManCommon/logging.h>
#include <QtAppManApplicationMain/applicationmain.h>
#include <QtAppManSharedMain/notification.h>

int main(int argc, char *argv[])
{
    QtAM::Logging::initialize(argc, argv);
    QtAM::Logging::setApplicationId("widgets");

    try {
        QtAM::ApplicationMain am(argc, argv);

        am.setup();

        QWidget window;
        QVBoxLayout layout(&window);

        // Popup using application manager window property
        QPushButton button1(QStringLiteral("Click to open/close a popup"));
        button1.setStyleSheet(QStringLiteral("QPushButton { background-color : limegreen; font-size: 36px; }"));
        layout.addWidget(&button1);

        QDialog *popup1 = new QDialog(&window);
        (new QPushButton(QStringLiteral("I'm a popup!"), popup1))->resize(340, 140);
        popup1->setStyleSheet(QStringLiteral("QPushButton { background-color : limegreen; color : white; font-size: 24px; }"));
        QObject::connect(&button1, &QPushButton::clicked, popup1, [&popup1, &am] () {
            popup1->setVisible(!popup1->isVisible());
            am.setWindowProperty(popup1->windowHandle(), QStringLiteral("type"), QStringLiteral("pop-up"));
        });

        // Notification
        QPushButton button2(QStringLiteral("Click to open a notification"));
        button2.setStyleSheet(QStringLiteral("QPushButton { background-color : darkgrey; font-size: 36px; }"));
        layout.addWidget(&button2);

        QtAM::Notification *notification = am.createNotification(&am);
        notification->setSummary(QStringLiteral("I'm a notification"));
        QObject::connect(&button2, &QPushButton::clicked, notification, &QtAM::Notification::show);

        // Application interface for handling quit
        QObject::connect(&am, &QtAM::ApplicationMain::quit, &am, &QCoreApplication::quit);

        am.processEvents();
        window.showNormal();

        return am.exec();

    } catch (const std::exception &e) {
        qWarning() << "ERROR:" << e.what();
    }
}
代码结构
与其他完全基于QML的Qt应用程序管理器示例相比,此示例需要您显式构建它。代码结构化,最终应用程序文件夹只包含运行应用程序所需的艺术品。因此,您可以打包这些应用程序并将它们安装。
要构建Qt应用程序管理器,包括其示例,您需要在CMake中传递-DQT_BUILD_EXAMPLES=ON。有关更多详细信息,请参阅构建。
系统UI和崩溃应用会产生QML模块。这些模块作为包含所有C++和QML代码以及其他资源(如图像)的库生成。因此,只需要从本地文件系统加载库,而不是单个QML文件,图像或其他此类资产。作为额外的好处,您还可以获得预编译的QML,linting检查,以及如qmldir等的自动生成文件。
系统UI QML模块
在SystemUi/CMakeLists.txt文件中,定义了systemuimodule
qt_policy(SET QTP0001 NEW)   # "qt/qml/" default resource prefix

qt6_add_qml_module(
    systemuimodule
    URI "SystemUi"
    NO_PLUGIN
    RESOURCES grab.png close.png
    QML_FILES main.qml
)这里使用默认的"qt/qml"资源前缀。通过提供NO_PLUGIN关键字,只创建一个动态后端库。不需要QML插件,因为这个库会被显式加载(参见下面)。为了简单起见,模块保存在与其URI(SystemUi)相同的目录中。模块中添加了两个图像和main.qml文件(虽然没有使用C++代码)。
systemuimodule动态库被添加到在am-config.yaml文件(键ui/resources)启动时加载的资源列表中。
ui:
  mainQml: ":/qt/qml/SystemUi/main.qml"
resources: [ "${CONFIG_PWD}/SystemUi/libsystemuimodule" ]库从本地文件系统加载,但main.qml文件随后可以从资源文件系统加载(键ui/mainQml)。路径以资源前缀开始,扩展为模块URI。由于main.qml中使用的图像具有相对URL,它们也位于资源文件系统中。
有关如何在应用程序管理器上下文中添加和使用资源的概述,请参阅使用Qt资源。
崩溃应用的QML模块
Crash应用程序由两个QML模块组成:crashmodule和sequelmoduleplugin。第一个类似于上面的systemuimodule,但它还包含C++代码(《code translate="no">terminator1.cpp)。生成的库在应用程序启动时通过以下《code translate="no">apps/Crash/info.yaml
runtimeParameters:
  resources: [ "libcrashmodule" ]
它提供《code translate="no">crashapp.qml文件,这是应用程序的主要QML文件和Terminator1 QML单例类型。
第二个模块《code translate="no">sequelmodulepluginapps/Crash/Sequel/CMakeLists.txt
qt6_add_qml_module(
    sequelmoduleplugin
    URI "Sequel"
    PLUGIN_TARGET sequelmoduleplugin
    SOURCES terminator2.cpp
    QML_FILES CrashAnimation.qml
)
为了方便起见,《code translate="no">PLUGIN_TARGET使用了与模块目标名称相同的参数。这创建了一个已经包含后端目标的插件(见qt_add_qml_module)。该插件在运行时通过《code translate="no">crashapp.qml中的《code translate="no">import Sequel语句隐式加载。它提供了《code translate="no">CrashAnimation和《code translate="no">Terminator2 QML类型。
© 2024 Qt公司有限公司。此处包含的文档贡献是各自版权所有者的版权。此处提供的文档按照自由软件基金会的GNU自由文档许可证第1.3版的条款发布。Qt和相应的标志是芬兰的Qt公司以及全世界其他国家的商标。所有其他商标均属于各自所有者。
