警告
本部分包含从C++自动翻译到Python的片段,可能包含错误。
场景图 - 绘制项#
展示如何使用QPainter实现自定义场景图项。
绘制项示例展示了如何使用QML场景图框架,通过QPainter实现自定义场景图项。
QQuickPaintedItem类是从QQuickItem类派生出来的,用于实现使用QPainter接口的自定义QML场景图项。
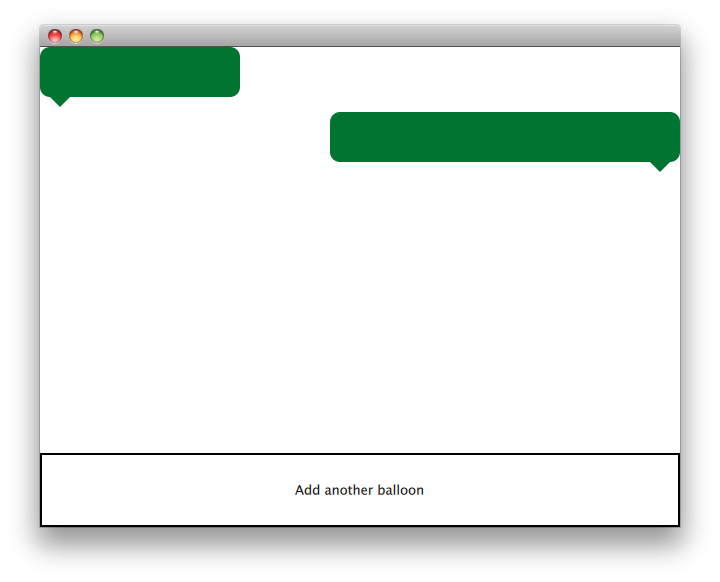
示例包括一个项类和一个QML文件,用于使用该项。TextBalloon类表示扩展了QQuickPaintedItem的单独文字气泡,而textballoons.qml文件用于加载包含TextBalloon QML类型的模块并显示文字气泡。
我们将首先关注TextBalloon类,然后继续讲解textballoons.qml文件。有关如何实现QML模块的插件示例,请参阅编写扩展插件
TextBalloon 类声明#
TextBalloon类继承了QQuickPaintedItem。 QQuickPaintedItem是QML场景图框架中所有基于QPainter的项的基类。
class TextBalloon(QQuickPaintedItem):

    Q_OBJECT
    Q_PROPERTY(bool rightAligned READ isRightAligned WRITE setRightAligned NOTIFY rightAlignedChanged)
    QML_ELEMENT
#     public
        TextBalloon(QQuickItem parent = None)
        def paint(painter):
        isRightAligned = bool()
        def setRightAligned(rightAligned):
#     private
        rightAligned = bool()
#     signals
        def rightAlignedChanged():
实现QQuickPaintedItem必须实现QQuickPaintedItem的纯虚函数`paint()`,该函数实现类型的绘制。
TextBalloon 类定义#
我们必须确保为TextBalloon项初始化正确的对齐属性。
def __init__(self, parent):
    super().__init__(parent)
    , rightAligned(False)
然后我们实现`paint()`函数,该函数将被场景图框架自动调用以绘制项的内容。该函数在局部坐标系中绘制项。
def paint(self, painter):

    brush = QBrush(QColor("#007430"))
    painter.setBrush(brush)
    painter.setPen(Qt.NoPen)
    painter.setRenderHint(QPainter.Antialiasing)
    itemSize = size()
    painter.drawRoundedRect(0, 0, itemSize.width(), itemSize.height() - 10, 10, 10)
    if rightAligned:

        QPointF points[3] = {
            QPointF(itemSize.width() - 10.0, itemSize.height() - 10.0),
            QPointF(itemSize.width() - 20.0, itemSize.height()),
            QPointF(itemSize.width() - 30.0, itemSize.height() - 10.0),

        painter.drawConvexPolygon(points, 3)

else:

        QPointF points[3] = {
            QPointF(10.0, itemSize.height() - 10.0),
            QPointF(20.0, itemSize.height()),
            QPointF(30.0, itemSize.height() - 10.0),

        painter.drawConvexPolygon(points, 3)
我们首先设置笔刷和画布来定义项目的外观。之后我们开始绘制。注意,根据项目的尺寸,会调用 contentsBoundingRect() 项目进行绘制。该函数返回的矩形表示项目的尺寸,正如在 QML 文件中定义的那样。
textballoons.qml 文件#
界面由两个主要部分组成:带有文本气泡的可滚动区域以及用于添加新气泡的控制按钮。
BalloonView#
ListModel {
    id: balloonModel
    ListElement {
        balloonWidth: 200
    }
    ListElement {
        balloonWidth: 120
    }
}

ListView {
    id: balloonView
    anchors.bottom: controls.top
    anchors.bottomMargin: 2
    anchors.top: parent.top
    delegate: TextBalloon {
        anchors.right: index % 2 != 0 ? parent?.right : undefined
        height: 60
        rightAligned: index % 2 != 0
        width: balloonWidth
    }
    model: balloonModel
    spacing: 5
    width: parent.width
}
应用程序启动时,balloonModel 包含两种类型,balloonView 将显示这些类型。balloonView 在左对齐和右对齐之间轮换 TextBalloon 委托项。
控制项#
Rectangle {
    id: controls

    anchors.bottom: parent.bottom
    anchors.left: parent.left
    anchors.margins: 1
    anchors.right: parent.right
    border.width: 2
    color: "white"
    height: parent.height * 0.15

    Text {
        anchors.centerIn: parent
        text: qsTr("Add another balloon")
    }

    MouseArea {
        anchors.fill: parent
        hoverEnabled: true
        onClicked: {
            balloonModel.append({"balloonWidth": Math.floor(Math.random() * 200 + 100)})
            balloonView.positionViewAtIndex(balloonView.count -1, ListView.End)
        }
        onEntered: {
            parent.color = "#8ac953"
        }
        onExited: {
            parent.color = "white"
        }
    }
}
UI 的控制部分包含一个带有 MouseArea 的矩形,当鼠标悬停在其上时颜色会变化。此“按钮”控制项会在模型末尾添加一个具有随机宽度的新对象。
