订单表单示例
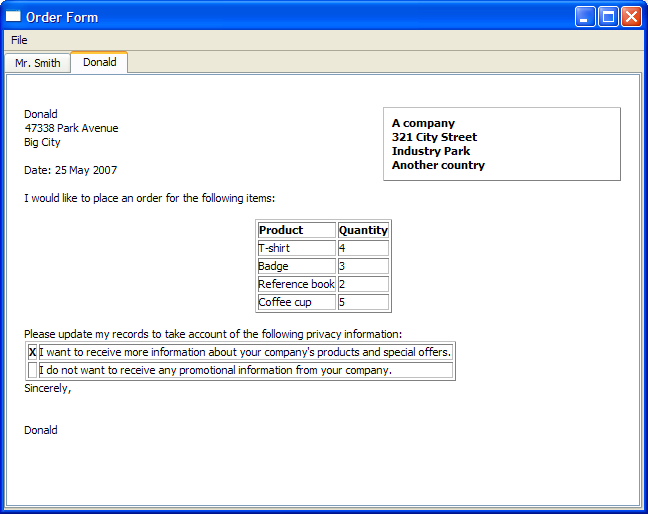
订单表单示例展示了如何通过将简单的模板与用户在对话框中输入的数据结合来生成富文本文档。

详情对话框定义
DetailsDialog 类是 QDialog 的子类,实现了一个槽 verify() 来允许稍后验证 DetailsDialog 的内容。这将在 DetailsDialog 实现中进行进一步解释。
class DetailsDialog : public QDialog
{
    Q_OBJECT

public:
    DetailsDialog(const QString &title, QWidget *parent);

public slots:
    void verify();

public:
    QList<QPair<QString, int> > orderItems();
    QString senderName() const;
    QString senderAddress() const;
    bool sendOffers();

private:
    void setupItemsTable();

    QLabel *nameLabel;
    QLabel *addressLabel;
    QCheckBox *offersCheckBox;
    QLineEdit *nameEdit;
    QStringList items;
    QTableWidget *itemsTable;
    QTextEdit *addressEdit;
    QDialogButtonBox *buttonBox;
};
DetailsDialog 构造函数接受 title 和 parent 参数。该类定义了四个 getter 函数:orderItems()、senderName()、senderAddress() 和 sendOffers(),以便外部可以访问数据。
类定义包含了所需字段的输入小部件,nameEdit 和 addressEdit。此外,还定义了一个 QCheckBox 和一个 QDialogButtonBox;前者为用户提供接收产品信息与优惠的选择,后者确保按钮的使用根据用户的原生平台进行排列。此外,还使用 QTableWidget、itemsTable 用来保存订单详情。
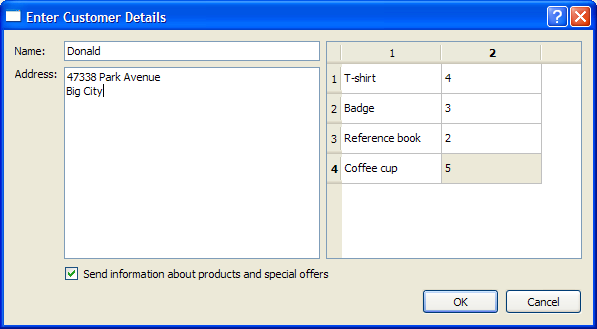
下面的截图显示了我们要创建的 DetailsDialog。

详情对话框实现
DetailsDialog 构造函数创建了之前定义的字段及其相应的标签。设置了 offersCheckBox 的标签,并调用了 setupItemsTable() 函数来设置和填充 itemsTable。创建了拥有 OK 和 Cancel 按钮的 QDialogButtonBox 对象,并将其 accepted() 和 rejected() 信号连接到 DetailsDialog 中的 verify() 和 reject() 槽。
DetailsDialog::DetailsDialog(const QString &title, QWidget *parent)
    : QDialog(parent)
{
    nameLabel = new QLabel(tr("Name:"));
    addressLabel = new QLabel(tr("Address:"));
    addressLabel->setAlignment(Qt::AlignLeft | Qt::AlignTop);

    nameEdit = new QLineEdit;
    addressEdit = new QTextEdit;

    offersCheckBox = new QCheckBox(tr("Send information about products and "
                                      "special offers"));

    setupItemsTable();

    buttonBox = new QDialogButtonBox(QDialogButtonBox::Ok
                                     | QDialogButtonBox::Cancel);

    connect(buttonBox, &QDialogButtonBox::accepted, this, &DetailsDialog::verify);
    connect(buttonBox, &QDialogButtonBox::rejected, this, &DetailsDialog::reject);
使用 QGridLayout 将所有对象放置于 DetailsDialog 中。
    QGridLayout *mainLayout = new QGridLayout;
    mainLayout->addWidget(nameLabel, 0, 0);
    mainLayout->addWidget(nameEdit, 0, 1);
    mainLayout->addWidget(addressLabel, 1, 0);
    mainLayout->addWidget(addressEdit, 1, 1);
    mainLayout->addWidget(itemsTable, 0, 2, 2, 1);
    mainLayout->addWidget(offersCheckBox, 2, 1, 1, 2);
    mainLayout->addWidget(buttonBox, 3, 0, 1, 3);
    setLayout(mainLayout);

    setWindowTitle(title);
}
函数 setupItemsTable() 实例化了 QTableWidget 对象 itemsTable,并根据存储订购项目类型的 QStringList 对象 items 设置行数。列数设置为 2,提供一个 "name" 和 "quantity" 布局。使用 for 循环填充 itemsTable,并将 name 项的标志设置为 Qt::ItemIsEnabled 或 Qt::ItemIsSelectable。为了演示目的,quantity 项被设置为 1,并且 itemsTable 中所有项目的数量值都为 1;但可以在运行时通过编辑单元格内容来修改此值。
void DetailsDialog::setupItemsTable()
{
    items << tr("T-shirt") << tr("Badge") << tr("Reference book")
          << tr("Coffee cup");

    itemsTable = new QTableWidget(items.count(), 2);

    for (int row = 0; row < items.count(); ++row) {
        QTableWidgetItem *name = new QTableWidgetItem(items[row]);
        name->setFlags(Qt::ItemIsEnabled | Qt::ItemIsSelectable);
        itemsTable->setItem(row, 0, name);
        QTableWidgetItem *quantity = new QTableWidgetItem("1");
        itemsTable->setItem(row, 1, quantity);
    }
}
函数 orderItems() 从 itemsTable 中提取数据,并以其形式返回 QList<QPair<QString,int>>,其中每个 QPair 对应一个项目和所订购的数量。
QList<QPair<QString, int> > DetailsDialog::orderItems()
{
    QList<QPair<QString, int> > orderList;

    for (int row = 0; row < items.count(); ++row) {
        QPair<QString, int> item;
        item.first = itemsTable->item(row, 0)->text();
        int quantity = itemsTable->item(row, 1)->data(Qt::DisplayRole).toInt();
        item.second = qMax(0, quantity);
        orderList.append(item);
    }

    return orderList;
}
函数 senderName() 用于返回存储订购表单名称字段的 QLineEdit 的值。
QString DetailsDialog::senderName() const
{
    return nameEdit->text();
}
函数 senderAddress() 用于返回存储订购表单地址的 QTextEdit 的值。
QString DetailsDialog::senderAddress() const
{
    return addressEdit->toPlainText();
}
函数 sendOffers() 用于返回一个表示客户是否希望接收公司优惠和促销更多信息的 true 或 false 值。
bool DetailsDialog::sendOffers()
{
    return offersCheckBox->isChecked();
}
函数 verify() 是一个额外实现的槽函数,用于验证用户在 DetailsDialog 中输入的详细信息。如果输入的详细信息不完整,将显示一个 QMessageBox,提供给用户丢弃 DetailsDialog 的选项。否则,详细信息被接受,并调用 accept() 函数。
void DetailsDialog::verify()
{
    if (!nameEdit->text().isEmpty() && !addressEdit->toPlainText().isEmpty()) {
        accept();
        return;
    }

    QMessageBox::StandardButton answer;
    answer = QMessageBox::warning(this, tr("Incomplete Form"),
        tr("The form does not contain all the necessary information.\n"
           "Do you want to discard it?"),
        QMessageBox::Yes | QMessageBox::No);

    if (answer == QMessageBox::Yes)
        reject();
}
主窗口定义
MainWindow 类是 QMainWindow 的子类,实现了两个槽函数 - openDialog() 和 printFile()。它还包含一个私有的 QTabWidget 实例 letters。
class MainWindow : public QMainWindow
{
    Q_OBJECT

public:
    MainWindow();
    void createSample();

public slots:
    void openDialog();
    void printFile();

private:
    void createLetter(const QString &name, const QString &address,
                      QList<QPair<QString,int> > orderItems,
                      bool sendOffers);

    QAction *printAction;
    QTabWidget *letters;
};
主窗口实现
MainWindow 构造函数设置 fileMenu 和所需的动作,newAction 和 printAction。这些动作的 triggered() 信号连接到额外实现的 openDialog() 槽和默认的 close() 槽。QTabWidget letters 被实例化,并设置为窗口的中心部件。
MainWindow::MainWindow()
{
    QMenu *fileMenu = new QMenu(tr("&File"), this);
    QAction *newAction = fileMenu->addAction(tr("&New..."));
    newAction->setShortcuts(QKeySequence::New);
    printAction = fileMenu->addAction(tr("&Print..."), this, &MainWindow::printFile);
    printAction->setShortcuts(QKeySequence::Print);
    printAction->setEnabled(false);
    QAction *quitAction = fileMenu->addAction(tr("E&xit"));
    quitAction->setShortcuts(QKeySequence::Quit);
    menuBar()->addMenu(fileMenu);

    letters = new QTabWidget;

    connect(newAction, &QAction::triggered, this, &MainWindow::openDialog);
    connect(quitAction, &QAction::triggered, this, &MainWindow::close);

    setCentralWidget(letters);
    setWindowTitle(tr("Order Form"));
}
函数 createLetter() 创建一个新的 QTabWidget,其中包含以 QTextEdit,editor 作为父对象的 editor。此函数接受四个参数,这些参数对应通过 DetailsDialog 获得的值,以填充 editor。
void MainWindow::createLetter(const QString &name, const QString &address,
                              QList<QPair<QString,int> > orderItems,
                              bool sendOffers)
{
    QTextEdit *editor = new QTextEdit;
    int tabIndex = letters->addTab(editor, name);
    letters->setCurrentIndex(tabIndex);
然后我们使用 QTextEdit::textCursor() 获得对 editor 的光标。然后使用 QTextCursor::Start 将光标移动到文档的开始位置。
    QTextCursor cursor(editor->textCursor());
    cursor.movePosition(QTextCursor::Start);
回顾一个富文本文档的结构,其中帧和表的序列始终由文本块隔开,其中一些可能包含没有信息。
在订单表单示例中,这个部分的文档结构由以下表格描述
| 具有 referenceFrameFormat 标准化的帧 | |
| 块 | 一个公司 |
| 块 | |
| 块 | 321 City Street |
| 块 | |
| 块 | 工业公园 |
| 块 | |
| 块 | 另一个国家 |
这是通过以下代码实现的
    QTextFrame *topFrame = cursor.currentFrame();
    QTextFrameFormat topFrameFormat = topFrame->frameFormat();
    topFrameFormat.setPadding(16);
    topFrame->setFrameFormat(topFrameFormat);

    QTextCharFormat textFormat;
    QTextCharFormat boldFormat;
    boldFormat.setFontWeight(QFont::Bold);

    QTextFrameFormat referenceFrameFormat;
    referenceFrameFormat.setBorder(1);
    referenceFrameFormat.setPadding(8);
    referenceFrameFormat.setPosition(QTextFrameFormat::FloatRight);
    referenceFrameFormat.setWidth(QTextLength(QTextLength::PercentageLength, 40));
    cursor.insertFrame(referenceFrameFormat);

    cursor.insertText("A company", boldFormat);
    cursor.insertBlock();
    cursor.insertText("321 City Street");
    cursor.insertBlock();
    cursor.insertText("Industry Park");
    cursor.insertBlock();
    cursor.insertText("Another country");
请注意,topFrame 是 editor 的顶级框架,在文档结构中不显示。
然后我们将 cursor 的位置设置回 topFrame 中的上一个位置,并填写客户的姓名(由构造函数提供)和地址 - 使用基于范围的 for 循环来遍历 QString,address。
    cursor.setPosition(topFrame->lastPosition());

    cursor.insertText(name, textFormat);
    const QStringList lines = address.split('\n');
    for (const QString &line : lines) {
        cursor.insertBlock();
        cursor.insertText(line);
    }
cursor 现在回到了 topFrame,上面代码段的文档结构如下
| 块 | Donald |
| 块 | 47338 Park Avenue |
| 块 | Big City |
为了间距,我们调用了两次 insertBlock()。获取并显示 currentDate()。我们使用 setWidth() 增加宽度 bodyFrameFormat,然后使用该宽度插入新的框架。
    cursor.insertBlock();
    cursor.insertBlock();

    QDate date = QDate::currentDate();
    cursor.insertText(tr("Date: %1").arg(date.toString("d MMMM yyyy")),
                      textFormat);
    cursor.insertBlock();

    QTextFrameFormat bodyFrameFormat;
    bodyFrameFormat.setWidth(QTextLength(QTextLength::PercentageLength, 100));
    cursor.insertFrame(bodyFrameFormat);
以下代码将标准文本插入订单表单中。
    cursor.insertText(tr("I would like to place an order for the following "
                         "items:"), textFormat);
    cursor.insertBlock();
    cursor.insertBlock();
现在文档结构这部分包含日期、bodyFrameFormat 框架以及标准文本。
| 块 | |
| 块 | |
| 块 | 日期:2007年5月25日 |
| 块 | |
| 包含 bodyFrameFormat 的框架 | |
| 块 | 我想订购以下商品 |
| 块 | |
| 块 |
使用一个 QTextTableFormat 对象,orderTableFormat,用来保存商品的类型和订单数量。
    QTextTableFormat orderTableFormat;
    orderTableFormat.setAlignment(Qt::AlignHCenter);
    QTextTable *orderTable = cursor.insertTable(1, 2, orderTableFormat);

    QTextFrameFormat orderFrameFormat = cursor.currentFrame()->frameFormat();
    orderFrameFormat.setBorder(1);
    cursor.currentFrame()->setFrameFormat(orderFrameFormat);
我们使用 cellAt() 设定 orderTable 的标题。
    cursor = orderTable->cellAt(0, 0).firstCursorPosition();
    cursor.insertText(tr("Product"), boldFormat);
    cursor = orderTable->cellAt(0, 1).firstCursorPosition();
    cursor.insertText(tr("Quantity"), boldFormat);
然后,我们遍历 QList 中的 QPair 对象来填充 orderTable。
    for (int i = 0; i < orderItems.count(); ++i) {
        QPair<QString,int> item = orderItems[i];
        int row = orderTable->rows();

        orderTable->insertRows(row, 1);
        cursor = orderTable->cellAt(row, 0).firstCursorPosition();
        cursor.insertText(item.first, textFormat);
        cursor = orderTable->cellAt(row, 1).firstCursorPosition();
        cursor.insertText(QString("%1").arg(item.second), textFormat);
    }
该部分的最终文档结构如下
包含 orderTableFormat 的 orderTable | |
| 块 | 商品 |
| 块 | 数量 |
| 块 | T恤 |
| 块 | 4 |
| 块 | 徽章 |
| 块 | 3 |
| 块 | 参考书 |
| 块 | 2 |
| 块 | 咖啡杯 |
| 块 | 5 |
然后,cursor 被移回 topFrame's lastPosition(),并插入了更多标准文本。
    cursor.setPosition(topFrame->lastPosition());

    cursor.insertBlock();
    cursor.insertText(tr("Please update my records to take account of the "
                         "following privacy information:"));
    cursor.insertBlock();
插入另一个 QTextTable,以显示客户关于促销的喜好。
    QTextTable *offersTable = cursor.insertTable(2, 2);

    cursor = offersTable->cellAt(0, 1).firstCursorPosition();
    cursor.insertText(tr("I want to receive more information about your "
                         "company's products and special offers."), textFormat);
    cursor = offersTable->cellAt(1, 1).firstCursorPosition();
    cursor.insertText(tr("I do not want to receive any promotional information "
                         "from your company."), textFormat);

    if (sendOffers)
        cursor = offersTable->cellAt(0, 0).firstCursorPosition();
    else
        cursor = offersTable->cellAt(1, 0).firstCursorPosition();

    cursor.insertText("X", boldFormat);
该部分的文档结构如下
| 块 | |
| 块 | 请更新我的... |
| 块 | |
offersTable | |
| 块 | 我想接收... |
| 块 | 我不想接收... |
| 块 | X |
将 "诚挚地" 与客户的姓名一起插入,为了间距,插入了更多块。启用 printAction 以指示现在可以打印订单表单。
    cursor.setPosition(topFrame->lastPosition());
    cursor.insertBlock();
    cursor.insertText(tr("Sincerely,"), textFormat);
    cursor.insertBlock();
    cursor.insertBlock();
    cursor.insertBlock();
    cursor.insertText(name);

    printAction->setEnabled(true);
}
文档结构的底部部分如下
| 块 | |
| 块 | 诚挚地, |
| 块 | |
| 块 | |
| 块 | |
| 块 | Donald |
createSample() 函数用于演示目的,用于创建示例订单表单。
void MainWindow::createSample()
{
    DetailsDialog dialog("Dialog with default values", this);
    createLetter("Mr. Smith", "12 High Street\nSmall Town\nThis country",
                 dialog.orderItems(), true);
}
openDialog() 函数打开一个 DetailsDialog 对象。如果 dialog 中的详细信息被接受,则会使用从 dialog 提取的参数调用 createLetter() 函数。
void MainWindow::openDialog()
{
    DetailsDialog dialog(tr("Enter Customer Details"), this);

    if (dialog.exec() == QDialog::Accepted) {
        createLetter(dialog.senderName(), dialog.senderAddress(),
                     dialog.orderItems(), dialog.sendOffers());
    }
}
为了打印订单表单,包括以下 printFile() 函数
void MainWindow::printFile()
{
#if defined(QT_PRINTSUPPORT_LIB) && QT_CONFIG(printdialog)
    QTextEdit *editor = static_cast<QTextEdit*>(letters->currentWidget());
    QPrinter printer;

    QPrintDialog dialog(&printer, this);
    dialog.setWindowTitle(tr("Print Document"));
    if (editor->textCursor().hasSelection())
        dialog.setOption(QAbstractPrintDialog::PrintSelection);
    if (dialog.exec() != QDialog::Accepted) {
        return;
    }

    editor->print(&printer);
#endif
}
此函数还允许用户通过 QTextCursor::hasSelection() 打印选定的区域,而不是打印整个文档。
main() 函数
main() 函数实例化 MainWindow,并设置其大小为640x480像素,然后调用 show() 函数和 createSample() 函数。
int main(int argc, char *argv[])
{
    QApplication app(argc, argv);
    MainWindow window;
    window.resize(640, 480);
    window.show();
    window.createSample();
    return app.exec();
}
© 2024 Qt Company Ltd. 下列文档贡献的专有权利属于各自所有者。本提供的文档受GNU自由文档许可证1.3版本的许可,该许可证由自由软件基金会发布。Qt及其相关标志是芬兰及其它世界的注册商标,所有其他商标亦属于其各自所有者。
