使用 C++ 编写 QML 扩展
The Qt Qml module provides a set of APIs for extending QML through C++ extensions. You can write extensions to add your own QML types, extend existing Qt types, or call C/C++ functions that are not accessible from ordinary QML code.
This tutorial shows how to write a QML extension using C++ that includes core QML features, including properties, signals and bindings. It also shows how extensions can be deployed through plugins.
Many of the topics covered in this tutorial are documented in further detail in Overview - QML and C++ Integration and its documentation sub-topics. In particular, you may be interested in the sub-topics Exposing Attributes of C++ Classes to QML and Defining QML Types from C++.
Opening the Tutorial Sources
The code in this tutorial is available as part of the Qt sources. If you installed Qt with the Qt Online Installer, you can find the sources in the Qt installation directory under Examples/Qt-6.7.2/qml/tutorials/extending-qml/.
Creating Project from Scratch
Alternatively, you can follow the tutorial by creating the sources from scratch: For each chapter, create a new project using the Qt Quick Application template in Qt Creator, as instructed in Qt Creator: Creating Qt Quick Projects. Then follow along by adapting and extending the generated skeleton code.
第一章:创建新类型
extending-qml/chapter1-basics
A common task when extending QML is to provide a new QML type that supports some custom functionality beyond what is provided by the built-in Qt Quick types. For example, this could be done to implement particular data models, or provide types with custom painting and drawing capabilities, or access system features like network programming that are not accessible through built-in QML features.
In this tutorial, we will show how to use the C++ classes in the Qt Quick module to extend QML. The end result will be a simple Pie Chart display implemented by several custom QML types connected together through QML features like bindings and signals, and made available to the QML runtime through a plugin.
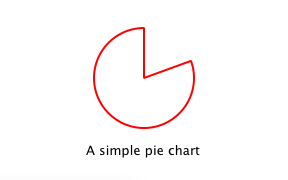
To begin with, let's create a new QML type called "PieChart" that has two properties: a name and a color. We will make it available in an importable type namespace called "Charts", with a version of 1.0.
We want this PieChart type to be usable from QML like this
import Charts

PieChart {
    width: 100; height: 100
    name: "A simple pie chart"
    color: "red"
}
To do this, we need a C++ class that encapsulates this PieChart type and its two properties. Since QML makes extensive use of Qt's meta object system, this new class must
- Inherit from QObject
- Declare its properties using the Q_PROPERTY macro
类声明
以下是我们定义的 PieChart 类,定义在 piechart.h 中
#include <QtQuick/QQuickPaintedItem>
#include <QColor>

class PieChart : public QQuickPaintedItem
{
    Q_OBJECT
    Q_PROPERTY(QString name READ name WRITE setName FINAL)
    Q_PROPERTY(QColor color READ color WRITE setColor FINAL)
    QML_ELEMENT

public:
    PieChart(QQuickItem *parent = nullptr);

    QString name() const;
    void setName(const QString &name);

    QColor color() const;
    void setColor(const QColor &color);

    void paint(QPainter *painter) override;

private:
    QString m_name;
    QColor m_color;
};
该类从 QQuickPaintedItem 继承,因为我们想要覆盖 QQuickPaintedItem::paint() 来使用 QPainter API 进行绘图操作。如果这个类只是表示某些数据类型,并不需要实际显示,它可以简单地继承自 QObject。或者,如果我们想要扩展基于 QObject 的现有类的功能,我们可以选择从该类继承。另外,如果我们想要创建一个不需要使用 QPainter API 进行绘图操作的视觉项,我们可以直接从 QQuickItem 继承。
PieChart 类使用 Q_PROPERTY 宏定义了两个属性 name 和 color,并覆盖了 QQuickPaintedItem::paint 方法。使用 QML_ELEMENT 宏注册 PieChart 类,允许它在 QML 中使用。如果不注册该类,App.qml 将无法创建 PieChart。
qmake 配置
为了使注册生效,需要在项目文件中将 CONFIG 中加入 qmltypes 选项,并指定 QML_IMPORT_NAME 和 QML_IMPORT_MAJOR_VERSION
CONFIG += qmltypes
QML_IMPORT_NAME = Charts
QML_IMPORT_MAJOR_VERSION = 1
CMake 配置
同样,在使用 CMake 时,为了使注册生效,请使用 qt_add_qml_module 命令
qt_add_qml_module(chapter1-basics
    URI Charts
    QML_FILES App.qml
    DEPENDENCIES QtQuick
)
类实现
piechart.cpp 中的类实现简单地设置和返回适当的 m_name 和 m_color 值,并实现了 paint() 来绘制简单的饼图
PieChart::PieChart(QQuickItem *parent)
    : QQuickPaintedItem(parent)
{
}
...
void PieChart::paint(QPainter *painter)
{
    QPen pen(m_color, 2);
    painter->setPen(pen);
    painter->setRenderHints(QPainter::Antialiasing, true);
    painter->drawPie(boundingRect().adjusted(1, 1, -1, -1), 90 * 16, 290 * 16);
}
QML 使用
现在我们已经定义了 PieChart 类型,我们将在 QML 中使用它。在 App.qml 文件中创建一个 PieChart 项,并使用标准的 QML Text 项显示饼图的详细信息
import Charts
import QtQuick

Item {
    width: 300; height: 200

    PieChart {
        id: aPieChart
        anchors.centerIn: parent
        width: 100; height: 100
        name: "A simple pie chart"
        color: "red"
    }

    Text {
        anchors { bottom: parent.bottom; horizontalCenter: parent.horizontalCenter; bottomMargin: 20 }
        text: aPieChart.name
    }
}
请注意,尽管在 QML 中颜色指定为一个字符串,但它将被自动转换为饼图 color 属性的 QColor 对象。提供了各种其他 值类型 的自动转换。例如,字符串 "640x480" 可以自动转换为 QSize 值。
我们还将创建一个使用 QQuickView 运行和显示 App.qml 的 C++ 应用程序。
以下是应用程序的 main.cpp
#include "piechart.h"
#include <QtQuick/QQuickView>
#include <QGuiApplication>

int main(int argc, char *argv[])
{
    QGuiApplication app(argc, argv);

    QQuickView view;
    view.setResizeMode(QQuickView::SizeRootObjectToView);
    view.loadFromModule("Charts", "App");
    view.show();
    return QGuiApplication::exec();
}
项目构建
为了构建该项目,我们包含文件,链接库,并为任何暴露给 QML 的类型定义一个版本为 1.0 的类型命名空间 "Charts"。
使用 qmake
QT += qml quick

CONFIG += qmltypes
QML_IMPORT_NAME = Charts
QML_IMPORT_MAJOR_VERSION = 1

HEADERS += piechart.h
SOURCES += piechart.cpp \
           main.cpp

RESOURCES += chapter1-basics.qrc

DESTPATH = $$[QT_INSTALL_EXAMPLES]/qml/tutorials/extending-qml/chapter1-basics
target.path = $$DESTPATH
INSTALLS += target
使用 CMake
# Copyright (C) 2022 The Qt Company Ltd.
# SPDX-License-Identifier: LicenseRef-Qt-Commercial OR BSD-3-Clause

cmake_minimum_required(VERSION 3.16)
project(chapter1-basics LANGUAGES CXX)

find_package(Qt6 REQUIRED COMPONENTS Core Gui Qml Quick)

qt_standard_project_setup(REQUIRES 6.5)

qt_add_executable(chapter1-basics
    main.cpp
    piechart.cpp piechart.h
)

set_target_properties(chapter1-basics PROPERTIES
    WIN32_EXECUTABLE TRUE
    MACOSX_BUNDLE TRUE
)

target_link_libraries(chapter1-basics PUBLIC
    Qt6::Core
    Qt6::Gui
    Qt6::Qml
    Qt6::Quick
)
qt_add_qml_module(chapter1-basics
    URI Charts
    QML_FILES App.qml
    DEPENDENCIES QtQuick
)
install(TARGETS chapter1-basics
    BUNDLE  DESTINATION .
    RUNTIME DESTINATION ${CMAKE_INSTALL_BINDIR}
    LIBRARY DESTINATION ${CMAKE_INSTALL_LIBDIR}
)

qt_generate_deploy_qml_app_script(
    TARGET chapter1-basics
    OUTPUT_SCRIPT deploy_script
    MACOS_BUNDLE_POST_BUILD
    NO_UNSUPPORTED_PLATFORM_ERROR
    DEPLOY_USER_QML_MODULES_ON_UNSUPPORTED_PLATFORM
)
install(SCRIPT ${deploy_script})
现在我们可以构建并运行应用程序

注意:您可能会看到一个警告 表达式 ... 依赖于非 NOTIFICATIONable 属性:PieChart::name。这是因为我们向可写的 name 属性添加了一个绑定,但尚未为其定义一个通知信号。因此,如果 name 的值发生变化,QML 引擎无法更新绑定。这将在后续章节中解决。
第 2 章:连接到 C++ 方法和方法
extending-qml/chapter2-methods
假设我们希望 PieChart 具有一个名为 "clearChart()" 的方法,该方法可以清除图表并输出 "chartCleared" 信号。我们的 App.qml 可以调用 clearChart() 并接收 chartCleared() 信号,如下所示:
import Charts
import QtQuick

Item {
    width: 300; height: 200

    PieChart {
        id: aPieChart
        anchors.centerIn: parent
        width: 100; height: 100
        color: "red"

        onChartCleared: console.log("The chart has been cleared")
    }

    MouseArea {
        anchors.fill: parent
        onClicked: aPieChart.clearChart()
    }

    Text {
        anchors { bottom: parent.bottom; horizontalCenter: parent.horizontalCenter; bottomMargin: 20 }
        text: "Click anywhere to clear the chart"
    }
}

为此,我们在我们的 C++ 类中添加一个 clearChart() 方法和一个 chartCleared() 信号。
class PieChart : public QQuickPaintedItem
{
    ...
public:
    ...
    Q_INVOKABLE void clearChart();

signals:
    void chartCleared();
    ...
};
使用 Q_INVOKABLE 使 clearChart() 方法对 Qt Meta-Object 系统和 QML 可用。注意,它也可以声明为 Qt 插槽而不是使用 Q_INVOKABLE,因为槽从 QML 也可调用。这两种方法都是有效的。
clearChart() 方法将颜色更改为 Qt::transparent,然后重绘图表,最后输出 chartCleared() 信号。
现在,当我们运行应用程序并单击窗口时,饼图将消失,应用程序将输出
qml: The chart has been cleared
第三章:添加属性绑定
extending-qml/chapter3-bindings
属性绑定是 QML 的一个强大特性,它允许不同类型的值自动同步。它使用信号在属性值更改时通知并更新其他类型的值。
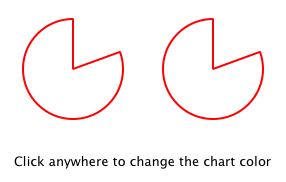
让我们为 color 属性启用属性绑定。这意味着如果我们有如下代码:
import Charts
import QtQuick

Item {
    width: 300; height: 200

    Row {
        anchors.centerIn: parent
        spacing: 20

        PieChart {
            id: chartA
            width: 100; height: 100
            color: "red"
        }

        PieChart {
            id: chartB
            width: 100; height: 100
            color: chartA.color
        }
    }

    MouseArea {
        anchors.fill: parent
        onClicked: { chartA.color = "blue" }
    }

    Text {
        anchors { bottom: parent.bottom; horizontalCenter: parent.horizontalCenter; bottomMargin: 20 }
        text: "Click anywhere to change the chart color"
    }
}

"color: chartA.color" 语句将 chartB 的 color 值绑定到 chartA 的 color。当 chartA 的 color 值更改时,chartB 的 color 值也会更新为相同的值。当窗口被单击时,MouseArea 中的 onClicked 处理器更改 chartA 的颜色,从而将两个图表的颜色都改变为蓝色。
要为 color 属性启用属性绑定,我们只需在其 Q_PROPERTY() 声明中添加一个 NOTIFY 功能,以表示每当值更改时都会输出“colorChanged”信号。
class PieChart : public QQuickPaintedItem
{
    ...
    Q_PROPERTY(QColor color READ color WRITE setColor NOTIFY colorChanged FINAL)
public:
    ...
signals:
    void colorChanged();
    ...
};
然后,我们在 setColor() 中输出这信号。
void PieChart::setColor(const QColor &color)
{
    if (color != m_color) {
        m_color = color;
        update();   // repaint with the new color
        emit colorChanged();
    }
}
setColor() 确保在输出 colorChanged() 之前颜色值确实已更改。这确保了信号不会被不必要地输出,并防止在响应其他类型的值更改时出现循环。
在 QML 中使用绑定至关重要。如果可以实现,您应该始终为属性添加 NOTIFY 信号,以便您的属性可以在绑定中使用。无法绑定的属性无法自动更新,并且无法在 QML 中灵活使用。此外,由于绑定在 QML 使用中被频繁调用,如果未实现绑定,则您的自定义 QML 类型用户可能看到意外的行为。
第四章:使用自定义属性类型
extending-qml/chapter4-customPropertyTypes
目前,PieChart 类型具有一个字符串类型属性和一个颜色类型属性。它可能有更多其他类型的属性。例如,它可以有一个 int 类型属性来存储每个图表的标识符。
// C++
class PieChart : public QQuickPaintedItem
{
    Q_PROPERTY(int chartId READ chartId WRITE setChartId NOTIFY chartIdChanged)
    ...

public:
    void setChartId(int chartId);
    int chartId() const;
    ...

signals:
    void chartIdChanged();
};

// QML
PieChart {
    ...
    chartId: 100
}
除了 int 以外,我们还可以使用各种其他属性类型。许多 Qt 数据类型,如 QColor、QSize 和 QRect 默认情况下在 QML 中自动支持。(有关完整列表,请参阅 QML 和 C++ 之间的数据类型转换 记录。)
如果我们想创建一个类型在 QML 中默认不支持的自定义属性,我们需要将该类型注册到 QML 引擎中。
例如,我们可以用一个名为 "PieSlice" 的类型来替换使用 属性,该类型有一个 颜色 属性。我们不是分配一个颜色,而是分配一个 PieSlice 值,而这个值本身包含一个 颜色
import Charts
import QtQuick

Item {
    width: 300; height: 200

    PieChart {
        id: chart
        anchors.centerIn: parent
        width: 100; height: 100

        pieSlice: PieSlice {
            anchors.fill: parent
            color: "red"
        }
    }

    Component.onCompleted: console.log("The pie is colored " + chart.pieSlice.color)
}
像 PieChart 一样,这个新的 PieSlice 类型继承自 QQuickPaintedItem 并使用 Q_PROPERTY() 声明其属性
class PieSlice : public QQuickPaintedItem
{
    Q_OBJECT
    Q_PROPERTY(QColor color READ color WRITE setColor FINAL)
    QML_ELEMENT

public:
    PieSlice(QQuickItem *parent = nullptr);

    QColor color() const;
    void setColor(const QColor &color);

    void paint(QPainter *painter) override;

private:
    QColor m_color;
};
要在 PieChart 中使用它,我们需要修改 颜色 属性声明和相关方法签名
class PieChart : public QQuickItem
{
    Q_OBJECT
    Q_PROPERTY(PieSlice* pieSlice READ pieSlice WRITE setPieSlice FINAL)
    ...
public:
    ...
    PieSlice *pieSlice() const;
    void setPieSlice(PieSlice *pieSlice);
    ...
};
在实现 setPieSlice() 时需要注意一件事。由于 PieSlice 是一个视觉项,因此必须使用 QQuickItem::setParentItem() 将其设置为 PieChart 的子项,以便 PieChart 知道在绘制内容时要绘制此子项
void PieChart::setPieSlice(PieSlice *pieSlice)
{
    m_pieSlice = pieSlice;
    pieSlice->setParentItem(this);
}
与 PieChart 类型一样,PieSlice 类型也必须通过 QML_ELEMENT 导出到 QML
class PieSlice : public QQuickPaintedItem
{
    Q_OBJECT
    Q_PROPERTY(QColor color READ color WRITE setColor FINAL)
    QML_ELEMENT

public:
    PieSlice(QQuickItem *parent = nullptr);

    QColor color() const;
    void setColor(const QColor &color);

    void paint(QPainter *painter) override;

private:
    QColor m_color;
};
    ...
与 PieChart 一样,我们向我们的构建文件中添加 "Charts" 类型命名空间,版本 1.0
使用 qmake
QT += qml quick

CONFIG += qmltypes
QML_IMPORT_NAME = Charts
QML_IMPORT_MAJOR_VERSION = 1

HEADERS += piechart.h \
           pieslice.h
SOURCES += piechart.cpp \
           pieslice.cpp \
           main.cpp

RESOURCES += chapter4-customPropertyTypes.qrc

DESTPATH = $$[QT_INSTALL_EXAMPLES]/qml/tutorials/extending-qml/chapter4-customPropertyTypes
target.path = $$DESTPATH
INSTALLS += target
使用 CMake
    ...
qt_add_executable(chapter4-customPropertyTypes
    main.cpp
    piechart.cpp piechart.h
    pieslice.cpp pieslice.h
)
qt_add_qml_module(chapter4-customPropertyTypes
    URI Charts
    QML_FILES App.qml
    DEPENDENCIES QtQuick
)
    ...
第 5 章:使用列表属性类型
extending-qml/chapter5-listproperties
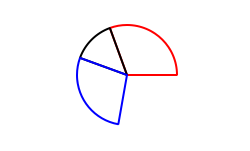
目前,PieChart 只能有一个 PieSlice。理想情况下,图表应该有多个片,具有不同的颜色和大小时。为此,我们可以有一个接受一系列 PieSlice 项的 slices 属性
import Charts
import QtQuick

Item {
    width: 300; height: 200

    PieChart {
        anchors.centerIn: parent
        width: 100; height: 100

        slices: [
            PieSlice {
                anchors.fill: parent
                color: "red"
                fromAngle: 0; angleSpan: 110
            },
            PieSlice {
                anchors.fill: parent
                color: "black"
                fromAngle: 110; angleSpan: 50
            },
            PieSlice {
                anchors.fill: parent
                color: "blue"
                fromAngle: 160; angleSpan: 100
            }
        ]
    }
}

为此,我们在 PieChart 中用 slices 属性替换了 pieSlice 属性,将其声明为 QQmlListProperty 类型。QQmlListProperty 类允许在 QML 扩展中创建列表属性。我们将 pieSlice() 函数替换为 slices() 函数,该函数返回一个切片列表,并添加一个内部 append_slice() 函数(下面将讨论)。我们也使用一个 QList 来存储内部切片列表,作为 m_slices
class PieChart : public QQuickItem
{
    Q_OBJECT
    Q_PROPERTY(QQmlListProperty<PieSlice> slices READ slices FINAL)
    ...
public:
    ...
    QQmlListProperty<PieSlice> slices();

private:
    static void append_slice(QQmlListProperty<PieSlice> *list, PieSlice *slice);

    QString m_name;
    QList<PieSlice *> m_slices;
};
尽管 slices 属性没有相关的 WRITE 函数,但由于 QQmlListProperty 的工作方式,它仍然可修改。在 PieChart 实现中,我们实现了 PieChart::slices(),以返回一个 QQmlListProperty 值,并指示在 QML 从列表添加项目的请求时调用内部的 PieChart::append_slice() 函数
QQmlListProperty<PieSlice> PieChart::slices()
{
    return QQmlListProperty<PieSlice>(this, nullptr, &PieChart::append_slice, nullptr,
                                      nullptr, nullptr, nullptr, nullptr);
}

void PieChart::append_slice(QQmlListProperty<PieSlice> *list, PieSlice *slice)
{
    PieChart *chart = qobject_cast<PieChart *>(list->object);
    if (chart) {
        slice->setParentItem(chart);
        chart->m_slices.append(slice);
    }
}
append_slice() 函数只是像以前那样设置父项,并将新项目添加到 m_slices 列表。如您所见,QQmlListProperty 的 append 函数用两个参数调用:列表属性和要附加的项。
PieSlice 类也已修改,包括 fromAngle 和 angleSpan 属性,并根据这些值绘制切片。如果您已经阅读了本教程的前几页,这是一个直接的修改,因此此处未显示代码。
第 6 章:编写扩展插件
extending-qml/chapter6-plugins
目前,PieChart 和 PieSlice 类型被 App.qml 使用,这是在一个 C++ 应用程序中使用 QQuickView 显示的。另一种使用我们 QML 扩展的方法是创建一个插件库,使其成为 QML 引擎的新 QML 导入模块。这允许将 PieChart 和 PieSlice 类型注册到类型命名空间中,任何 QML 应用程序都可以导入,而不是将这两个类型限制在单个应用程序中使用。
创建插件的步骤在 Creating C++ Plugins for QML 中描述。首先,我们创建一个名为 ChartsPlugin 的插件类。它继承自 QQmlEngineExtensionPlugin,并使用 Q_PLUGIN_METADATA() 宏将插件与 Qt 元对象系统注册。
下面是 chartsplugin.h 中的 ChartsPlugin 定义
#include <QQmlEngineExtensionPlugin>

class ChartsPlugin : public QQmlEngineExtensionPlugin
{
    Q_OBJECT
    Q_PLUGIN_METADATA(IID QQmlEngineExtensionInterface_iid)
};
然后,我们配置构建文件,定义项目为插件库。
使用 qmake
TEMPLATE = lib
CONFIG += plugin qmltypes
QT += qml quick

QML_IMPORT_NAME = Charts
QML_IMPORT_MAJOR_VERSION = 1

TARGET = $$qtLibraryTarget(chartsplugin)

HEADERS += piechart.h \
           pieslice.h \
           chartsplugin.h

SOURCES += piechart.cpp \
           pieslice.cpp

DESTPATH=$$[QT_INSTALL_EXAMPLES]/qml/tutorials/extending-qml/chapter6-plugins/$$QML_IMPORT_NAME

target.path=$$DESTPATH
qmldir.files=$$PWD/qmldir
qmldir.path=$$DESTPATH
INSTALLS += target qmldir

CONFIG += install_ok  # Do not cargo-cult this!

OTHER_FILES += qmldir

# Copy the qmldir file to the same folder as the plugin binary
cpqmldir.files = qmldir
cpqmldir.path = .
COPIES += cpqmldir
使用 CMake
# Copyright (C) 2022 The Qt Company Ltd.
# SPDX-License-Identifier: LicenseRef-Qt-Commercial OR BSD-3-Clause

qt6_policy(SET QTP0001 NEW)
qt6_add_qml_module(chartsplugin
    URI "Charts"
    PLUGIN_TARGET chartsplugin
    DEPENDENCIES QtQuick
)

target_sources(chartsplugin PRIVATE
    piechart.cpp piechart.h
    pieslice.cpp pieslice.h
)

target_link_libraries(chartsplugin PRIVATE
    Qt6::Core
    Qt6::Gui
    Qt6::Qml
    Qt6::Quick
)

install(TARGETS chartsplugin
    RUNTIME DESTINATION "${CMAKE_INSTALL_BINDIR}/Charts"
    LIBRARY DESTINATION "${CMAKE_INSTALL_BINDIR}/Charts"
)
install(FILES ${CMAKE_CURRENT_BINARY_DIR}/qmldir
    DESTINATION "${CMAKE_INSTALL_BINDIR}/Charts"
)
当在 Windows 或 Linux 上构建此示例时,Charts 目录将与使用新导入模块的应用程序位于同一级别。这样,QML 引擎会将应用程序可执行文件的目录作为 QML 导入的默认搜索路径。在 macOS 上,插件二进制文件将复制到应用程序包中的 Contents/PlugIns。使用 qmake,此路径在 chapter6-plugins/app.pro 中设置。
macos:!qtConfig(static) {
    charts.files = $$OUT_PWD/Charts
    charts.path = Contents/PlugIns
    QMAKE_BUNDLE_DATA += charts
}
为了解决这一点,我们还需要将此位置添加为 QML 导入路径到 main.cpp 中。
    QQuickView view;
#ifdef Q_OS_MACOS
    view.engine()->addImportPath(app.applicationDirPath() + "/../PlugIns");
#endif
    ...
定义自定义导入路径在多个应用程序使用相同的 QML 导入时也非常有用。
.pro 文件还包含额外的设置,以确保模块定义 qmldir 文件总是与插件二进制文件位于同一位置。
qmldir 文件声明了模块名称和该模块提供的插件
module Charts
optional plugin chartsplugin
typeinfo plugins.qmltypes
depends QtQuick
prefer :/qt/qml/Charts/
现在我们有一个 QML 模块可以导入到任何应用程序,只要 QML 引擎知道它在何处。示例包含一个可执行文件,该文件加载 App.qml,并使用 import Charts 1.0 语句。或者,您可以使用 qml 工具加载 QML 文件,将其导入路径设置为当前目录,以便找到 qmldir 文件
qml -I . App.qml
“Charts”模块将由 QML 引擎加载,该模块提供的类型将可用于导入它的任何 QML 文档中。
第 7 章:总结
在本教程中,我们展示了创建 QML 扩展的基本步骤
- 通过继承 QObject 并使用 QML_ELEMENT 或 QML_NAMED_ELEMENT() 注册它们来定义新 QML 类型
- 使用 Q_INVOKABLE 或 Qt 信号槽添加可调用方法,并使用 onSignal 语法连接到 Qt 信号
- 通过定义 NOTIFY 信号来添加属性绑定
- 如果内置类型不足,则定义自定义属性类型
- 使用 QQmlListProperty 定义列表属性类型
- 通过定义 Qt 插件和编写 qmldir 文件来创建插件库
QML 和 C++ 集成概述文档显示了可以添加到 QML 扩展中的其他有用功能。例如,我们可以使用默认属性来允许不使用 slices 属性添加切片
PieChart {
    PieSlice { ... }
    PieSlice { ... }
    PieSlice { ... }
}
或者不时随机添加和移除切片,使用 属性值来源
PieChart {
    PieSliceRandomizer on slices {}
}注意:要了解有关 QML 扩展和功能的更多信息,请查看 使用 C++ 编写高级 QML 扩展 教程。
© 2024 The Qt Company Ltd。本文件中的文档贡献是各自所有者的版权。本文件提供的内容是在自由软件基金会的 GNU 自由文档许可(FDL)1.3 版本 下授权的。Qt 及其相关标识是芬兰的 The Qt Company Ltd. 在全球的注册商标。其他所有商标均为各自所有者的财产。
