天气信息
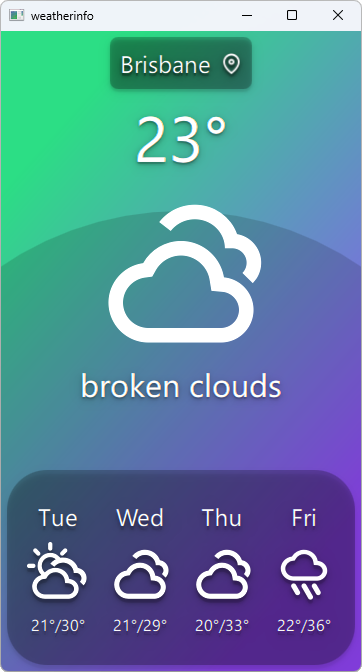
天气信息示例展示了如何使用用户的当前位置通过 Qt Quick 的 C++ 插件从网络服务中检索本地内容,使用Qt 定位。
此示例中使用的关键 Qt 定位 类

运行示例
要从 Qt Creator 运行此示例,请打开 欢迎 模式并从 示例 中选择示例。更多信息,请访问 构建和运行示例。
天气数据提供程序
此示例使用几个不相关的天气数据提供程序
所使用的提供程序在运行时自动选择,可以在所选提供程序不可用的情况下进行更改。但是,不能手动指定。
注意: 所有提供程序都使用免费计划,这意味着在天气请求的数量上存在某些限制。如果超过限制,提供程序将暂时不可用。当所有提供程序都不可用,应用程序将无法显示任何天气信息。在这种情况下,需要等待至少一个提供程序再次可用。
应用程序数据模型
此示例的关键部分是应用程序的数据模型,位于 WeatherData 和 AppModel 类中。WeatherData 代表从 HTTP 服务中获取的天气信息。它是一个简单的数据类,但我们使用 Q_PROPERTY 来很好地将其公开给 QML,之后我们使用 QML_ANONYMOUS 宏,使它在 QML 中被识别。
class WeatherData : public QObject {
    Q_OBJECT
    Q_PROPERTY(QString dayOfWeek
               READ dayOfWeek WRITE setDayOfWeek
               NOTIFY dataChanged)
    Q_PROPERTY(QString weatherIcon
               READ weatherIcon WRITE setWeatherIcon
               NOTIFY dataChanged)
    Q_PROPERTY(QString weatherDescription
               READ weatherDescription WRITE setWeatherDescription
               NOTIFY dataChanged)
    Q_PROPERTY(QString temperature
               READ temperature WRITE setTemperature
               NOTIFY dataChanged)
    QML_ANONYMOUS

public:
    explicit WeatherData(QObject *parent = 0);
    WeatherData(const WeatherData &other);
    WeatherData(const WeatherInfo &other);

    QString dayOfWeek() const;
    QString weatherIcon() const;
    QString weatherDescription() const;
    QString temperature() const;

    void setDayOfWeek(const QString &value);
    void setWeatherIcon(const QString &value);
    void setWeatherDescription(const QString &value);
    void setTemperature(const QString &value);

signals:
    void dataChanged();
};
AppModel 模拟整个应用程序的状态。在启动时,我们使用 QGeoPositionInfoSource::createDefaultSource() 获取平台的默认位置源。
AppModel::AppModel(QObject *parent) :
        QObject(parent),
        d(new AppModelPrivate)
{
    d->src = QGeoPositionInfoSource::createDefaultSource(this);

    if (d->src) {
        d->useGps = true;
        connect(d->src, &QGeoPositionInfoSource::positionUpdated,
                this, &AppModel::positionUpdated);
        connect(d->src, &QGeoPositionInfoSource::errorOccurred,
                this, &AppModel::positionError);
#if QT_CONFIG(permissions)
        QLocationPermission permission;
        permission.setAccuracy(QLocationPermission::Precise);
        permission.setAvailability(QLocationPermission::WhenInUse);

        switch (qApp->checkPermission(permission)) {
        case Qt::PermissionStatus::Undetermined:
            qApp->requestPermission(permission, [this] (const QPermission& permission) {
                if (permission.status() == Qt::PermissionStatus::Granted)
                    d->src->startUpdates();
                else
                    positionError(QGeoPositionInfoSource::AccessError);
            });
            break;
        case Qt::PermissionStatus::Denied:
            qWarning("Location permission is denied");
            positionError(QGeoPositionInfoSource::AccessError);
            break;
        case Qt::PermissionStatus::Granted:
            d->src->startUpdates();
            break;
        }
#else
        d->src->startUpdates();
#endif
    } else {
        d->useGps = false;
        d->city = "Brisbane";
        emit cityChanged();
        requestWeatherByCity();
    }

    QTimer *refreshTimer = new QTimer(this);
    connect(refreshTimer, &QTimer::timeout, this, &AppModel::refreshWeather);
    using namespace std::chrono;
    refreshTimer->start(60s);
}
如果没有默认源可用,我们将采用静态位置并获取该位置的天气。但是,如果我们确实有位置源,我们将其 positionUpdated() 信号连接到 AppModel 的槽并提供 startUpdates(),这开始定期更新设备位置。
当收到位置更新时,我们使用返回坐标的经纬度检索指定位置的天气数据。
void AppModel::positionUpdated(QGeoPositionInfo gpsPos)
{
    d->coord = gpsPos.coordinate();

    if (!d->useGps)
        return;

    requestWeatherByCoordinates();
}
为了通知 UI 此过程,当使用新城市时发出 cityChanged() 信号,并且每次发生天气更新时都会发出 weatherChanged() 信号。
模型还使用 QML_ELEMENT 宏,使其可在 QML 中使用。
class AppModel : public QObject
{
    Q_OBJECT
    Q_PROPERTY(bool ready
               READ ready
               NOTIFY readyChanged)
    Q_PROPERTY(bool hasSource
               READ hasSource
               NOTIFY readyChanged)
    Q_PROPERTY(bool hasValidCity
               READ hasValidCity
               NOTIFY cityChanged)
    Q_PROPERTY(bool hasValidWeather
               READ hasValidWeather
               NOTIFY weatherChanged)
    Q_PROPERTY(bool useGps
               READ useGps WRITE setUseGps
               NOTIFY useGpsChanged)
    Q_PROPERTY(QString city
               READ city WRITE setCity
               NOTIFY cityChanged)
    Q_PROPERTY(WeatherData *weather
               READ weather
               NOTIFY weatherChanged)
    Q_PROPERTY(QQmlListProperty<WeatherData> forecast
               READ forecast
               NOTIFY weatherChanged)
    QML_ELEMENT

public:
    explicit AppModel(QObject *parent = 0);
    ~AppModel();

    bool ready() const;
    bool hasSource() const;
    bool useGps() const;
    bool hasValidCity() const;
    bool hasValidWeather() const;
    void setUseGps(bool value);

    QString city() const;
    void setCity(const QString &value);

    WeatherData *weather() const;
    QQmlListProperty<WeatherData> forecast() const;

public slots:
    Q_INVOKABLE void refreshWeather();

signals:
    void readyChanged();
    void useGpsChanged();
    void cityChanged();
    void weatherChanged();
};
我们使用QQmlListProperty来处理天气预报信息,其中包含未来几天的天气预报(天数由提供者特定)。这使得从QML访问预报变得容易。
在QML中暴露自定义模型
为了将模型暴露给QML UI层,我们使用QML_ELEMENT和QML_ANONYMOUS宏。有关这些宏的更多详细信息,请参阅QQmlEngine类的描述。
为了使类型在QML中可用,我们需要相应地更新构建。
CMake构建
对于基于CMake的构建,我们需要将以下内容添加到CMakeLists.txt
qt_add_qml_module(weatherinfo
    URI Weather
    VERSION 1.0
    SOURCES
        appmodel.cpp appmodel.h
        openmeteobackend.cpp openmeteobackend.h
        openweathermapbackend.cpp openweathermapbackend.h
        providerbackend.cpp providerbackend.h
        weatherapibackend.cpp weatherapibackend.h
    QML_FILES
        BigForecastIcon.qml
        ForecastIcon.qml
        WeatherIcon.qml
        WeatherInfo.qml
    RESOURCES
        icons/weather-few-clouds.svg
        icons/weather-fog.svg
        icons/weather-haze.svg
        icons/weather-icy.svg
        icons/weather-overcast.svg
        icons/weather-showers.svg
        icons/weather-sleet.svg
        icons/weather-snow.svg
        icons/weather-storm.svg
        icons/weather-sunny-very-few-clouds.svg
        icons/weather-sunny.svg
        icons/weather-thundershower.svg
        icons/weather-showers-scattered.svg
        icons/waypoint.svg
)
qmake构建
对于qmake构建,我们需要以下方式修改weatherinfo.pro文件
CONFIG += qmltypes
QML_IMPORT_NAME = Weather
QML_IMPORT_MAJOR_VERSION = 1

qml_resources.files = \
    qmldir \
    BigForecastIcon.qml \
    ForecastIcon.qml \
    WeatherIcon.qml \
    WeatherInfo.qml \
    icons/weather-few-clouds.svg \
    icons/weather-fog.svg \
    icons/weather-haze.svg \
    icons/weather-icy.svg \
    icons/weather-overcast.svg \
    icons/weather-showers.svg \
    icons/weather-showers-scattered.svg \
    icons/weather-sleet.svg \
    icons/weather-snow.svg \
    icons/weather-storm.svg \
    icons/weather-sunny-very-few-clouds.svg \
    icons/weather-sunny.svg \
    icons/weather-thundershower.svg \
    icons/waypoint.svg

qml_resources.prefix = /qt/qml/Weather

RESOURCES += qml_resources
在QML中实例化模型
最后,在实际的QML中,我们实例化AppModel
Window {
    id: window
    AppModel {
        id: appModel
        onReadyChanged: {
            if (appModel.ready)
                statesItem.state = "ready"
            else
                statesItem.state = "loading"
        }
    }
}
模型实例化后,我们可以在QML文档的其他地方使用其属性
    BigForecastIcon {
        id: current
        Layout.fillWidth: true
        Layout.fillHeight: true

        weatherIcon: (appModel.hasValidWeather
                      ? appModel.weather.weatherIcon
                      : "sunny")
    }
文件和归属
本例将包含来自第三方来源的以下图像
| Tango图标 | 公共领域 |
| Darkobra的Tango天气预报图标包 | 公共领域 |
© 2024 Qt公司有限公司。此处包含的文档贡献的版权归其各自所有者所有。提供的文档根据Free Software Foundation发布的GNU自由文档许可证第1.3版的条款进行许可。Qt和相应的标志是芬兰及其它国家/地区的Qt公司的商标。所有其他商标归其各自所有者所有。
